Field Reimbursement Management
Field Reimbursement Management enables users to track, create, and update reimbursement cases from their iPad. This feature provides end users with a centralized, focused view of their active caseload, for example, prior authorizations, benefit verifications, and copay assistance requests. Field Reimbursement Management is available from the My Cases tab, the call report, or a custom X-Pages entry point if configured.
Who can use this feature?
- End Users - iPad
- Viewing the Cases Tab
- Creating Cases
- Managing Cases
- Creating Cases from a Call Report
- Managing Cases from a Call Report
- Users do not require an additional license
Configuring Field Reimbursement Management for
To configure this feature:
- Ensure Configuring Call Reporting is complete.
- Navigate to Admin > Users & Groups > Permission Sets.
- Select the appropriate permission set.
- Select the Objects tab.
- Grant the following permissions:
| Object | Object Permission | Object Types | Fields | Field Permission |
|---|---|---|---|---|
| account__v | R | n/a | n/a | Read |
| call__v | R | n/a | n/a | Read |
| case__v | CRE | reimbursement_case__v |
|
Edit |
| case_call__v | CRE | n/a |
|
Edit |
| case_comment__v | CRE | n/a | mobile_id__v | Edit |
| case_note__v | CRE | n/a | mobile_id__v | Edit |
| case_queue__v | R | n/a | n/a | Read |
| case_timeline__v | CRE | n/a | mobile_id__v | Edit |
| product__v | R | n/a | n/a | Read |
| user__v | R | n/a | n/a | n/a |
- Navigate to Admin > Configuration > Objects > Case (case__v).
- Select the Layouts tab.
- Select the appropriate layout.
- Ensure Case Note section is present on Case Page Layout (case_note_section__v) for end users.
- Navigate to Business Admin > Objects > Veeva Settings.
- Enable ENABLE_CASES_ON_CALL to allow end users to associate Cases from active call reports
- Add Case to the TAB_NAV_DISPLAY message to control the sort order and position of the Cases tab in iPad navigation. If not configured, the Cases tab displays directly to the right of the Accounts tab by default. For more information, see Managing Tab Visibility and Display Order.
- Navigate to Business Admin > Objects > VMobile Object Configurations.
- Ensure a VMOC is enabled for the following objects for iPad:
- case__v
- case_call__v
- case_comment__v
- case_note__v
- case_queue__v
- case_timeline__v
Configuring the X-Page Entry Point
Admins can optionally configure an X-Pages entry point on the Cases tab to display custom dashboards relevant to end users.
To configure this feature:
-
Ensure X-Pages is configured.
-
Navigate to Admin > Users & Groups > Permission Sets.
-
Select the appropriate permission set.
-
Select Objects.
-
Grant the following permissions:
Object Object Permission Object Types Fields Field Permission html_report__v R case__v All applicable fields Read
Viewing the Cases Tab as
End users can use the Cases tab to view all assigned cases in a sortable, filterable table. The Cases tab includes two sub-tabs:
-
All Cases - Displays the user’s accessible Case records in a table view
-
X-Pages Studio - Displays dynamic interactive content if configured
Viewing the All Cases Sub-Tab
Cases are sorted with Escalated state cases first, then in descending order by Last Updated. Escalated status cases display a yellow warning triangle for the Status field.
Select a column header to sort by ascending or descending values. Users can also use inline search to search cases based on the case subject, account name, or case number. All locally synced case metadata displayed in the table is searchable.
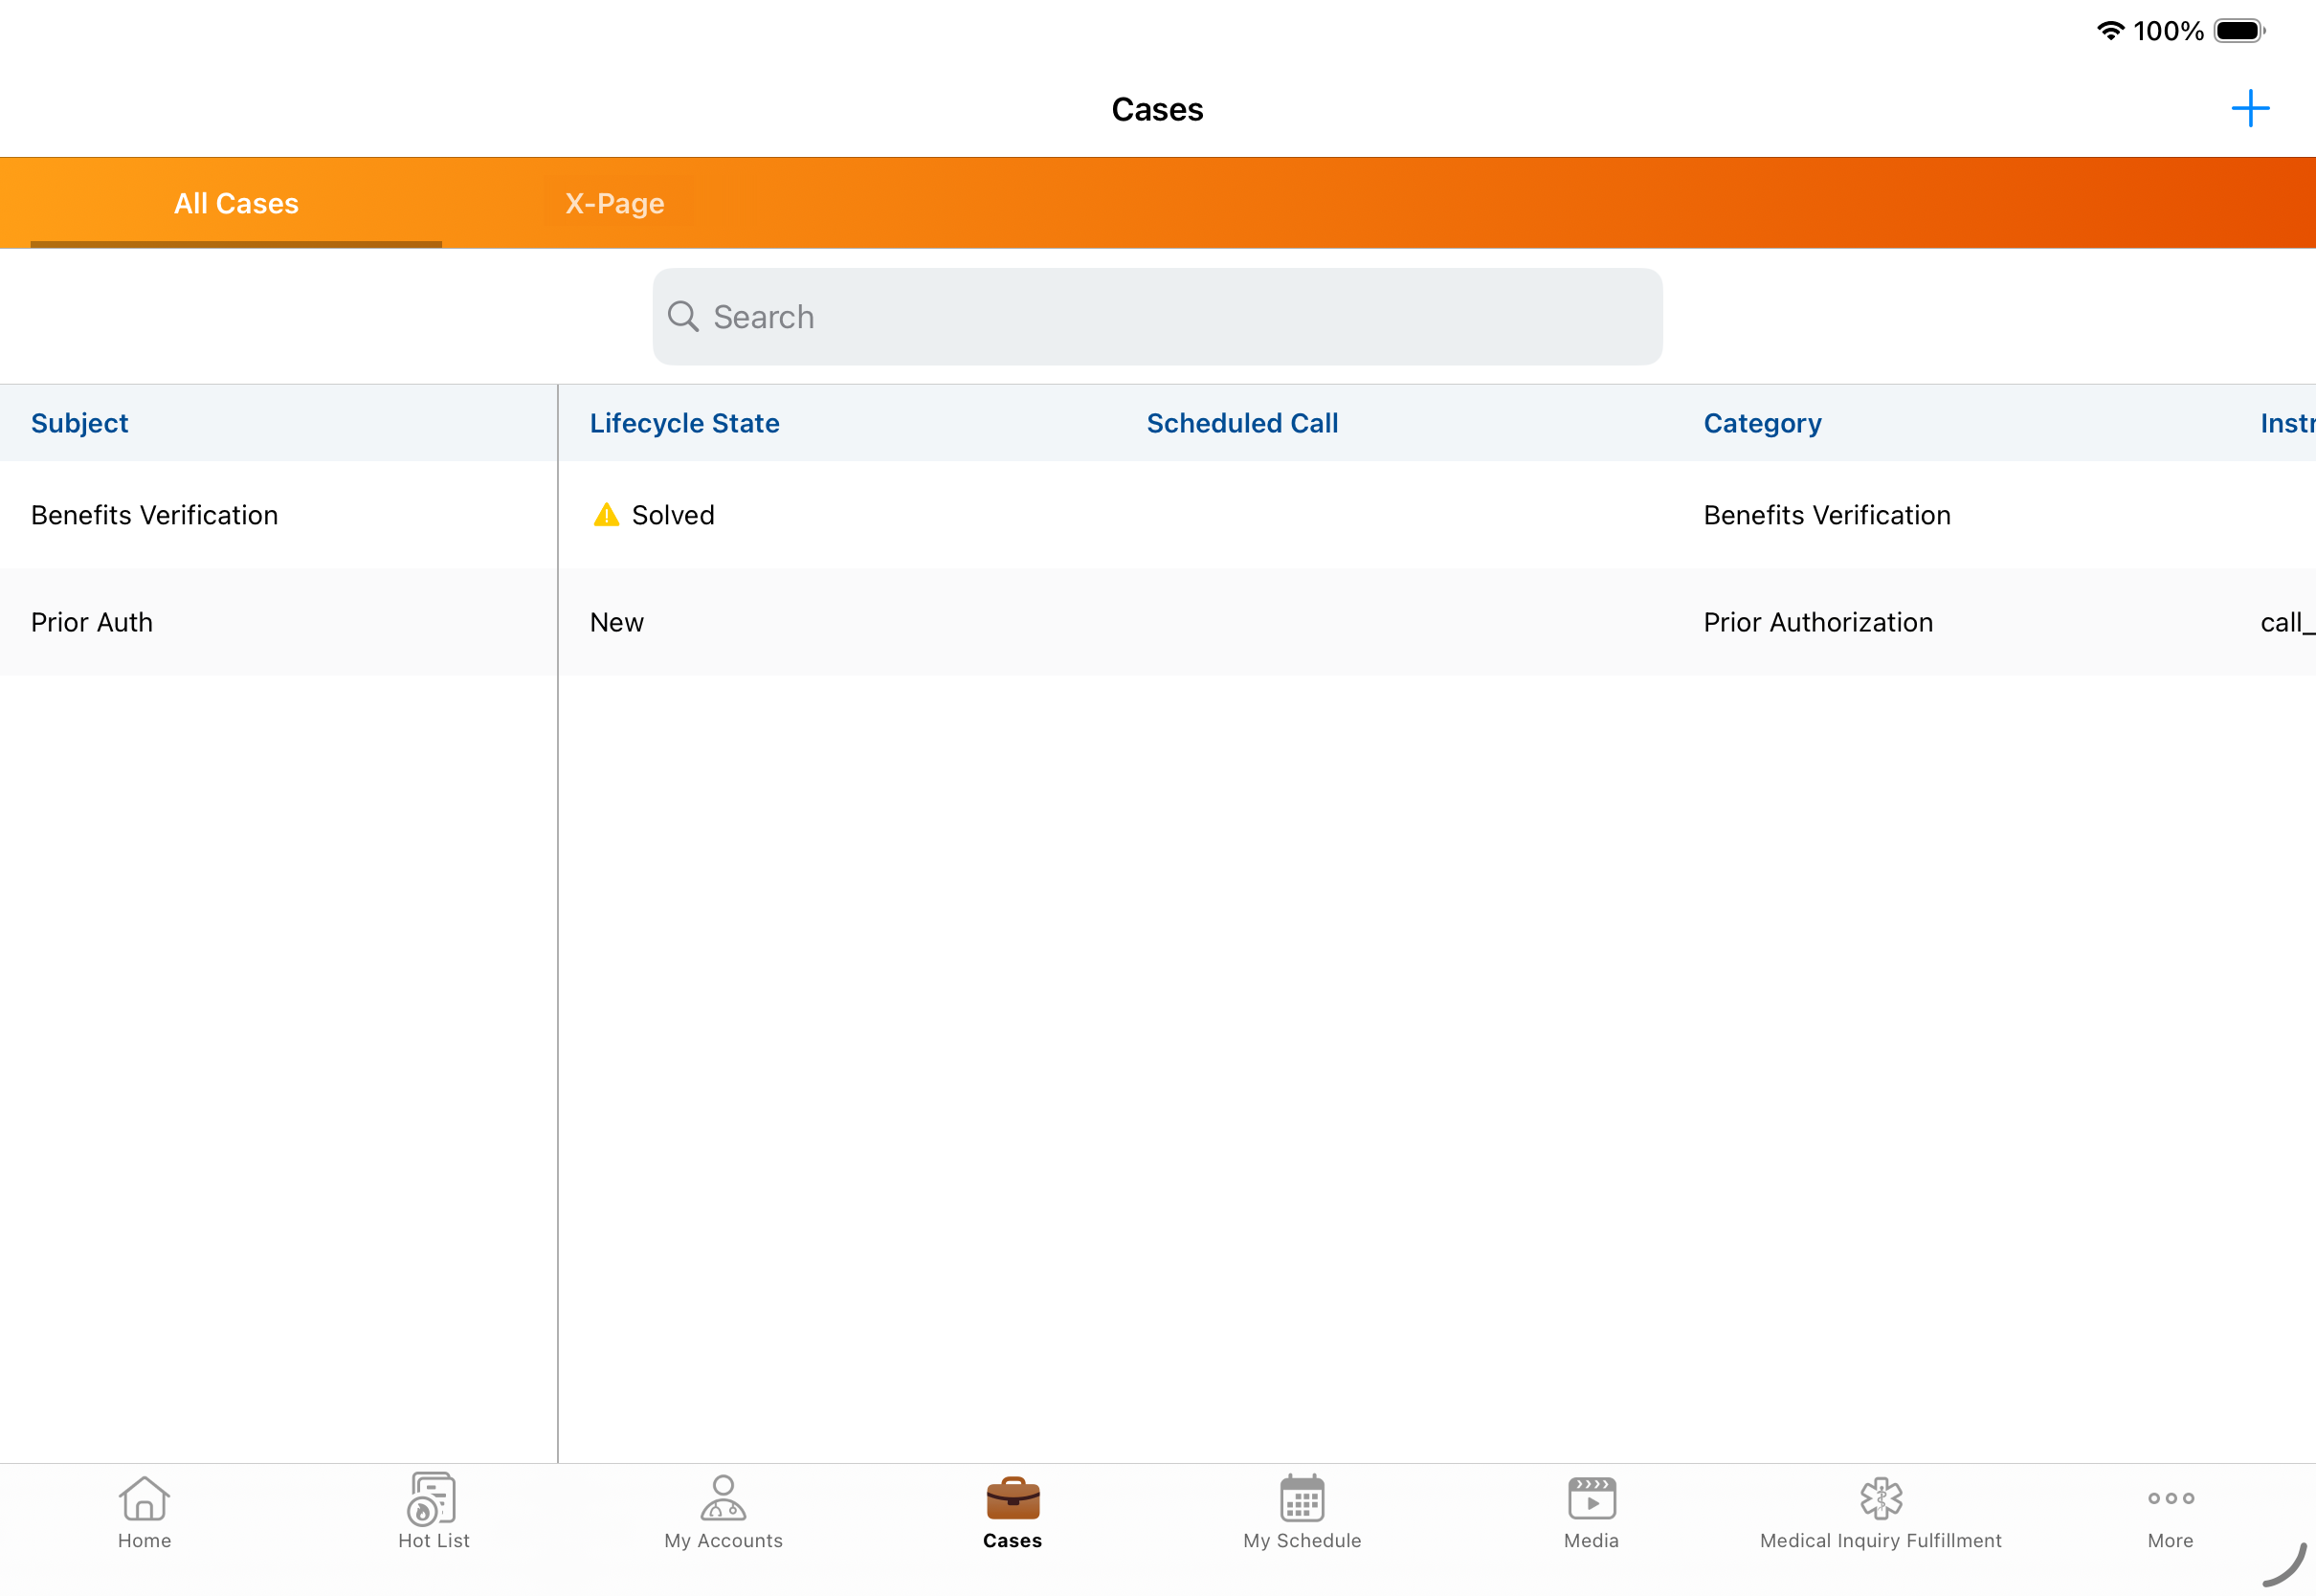
The Scheduled Call column displays the date and time of the next upcoming, unsubmitted call associated with the case. If the case has multiple associated calls, the column displays the nearest upcoming, unsubmitted call.
Creating a Case as
End users can create new cases via the All Cases sub-tab or from within the Manage Cases modal on a call report.
To create a case from the All Cases sub-tab:
- Navigate to Cases > All Cases.
- Select the plus icon (+) in the top-right corner of the screen.
- Populate the fields in the Case modal.
- Select Save.
When the case is created, the following records are created:
- A new case__v record with the reimbursement_case__v object type
- A case_note__v record with the text entered in the Case Note field, if applicable
- A case_timeline__v record
- If created via the Manage Cases modal on a call report, a case_call__v join record linking the new case to the active call
Managing a Case as
Select a case row in the All Cases sub-tab to access the Case Details. This screen displays the case information based on the reimbursement_case_layout__v page layout assigned to the user. The Case Details screen is organized into the following sections:
- Case Note - Displays the most recent case note
- Details - Displays standard case attributes, for example, Case Subject, Category, and Status
- Payer and Insurance - Displays payer-specific fields, for example, Payer Name, Pharmacy Name, and Primary Insurance
- Account - Displays the account associated with the case
Creating a Call Report from Cases
When viewing the Case Details screen, users can select the handshake icon in the top-right corner to create a new call report associated with the case.
When a call report is created via the Case Details screen, a case_call__v record is created and tied to the parent call record.
Updating the Case Lifecycle State
This reason is logged as a case_comment__v record for compliance. If an internet connection is not available, an error message displays and the state is not updated.
To update a case lifecycle state:
- Navigate to the appropriate Case Details screen.
- Select Edit in the top-right corner.
- Expand the Lifecycle State drop-down.
- Select the updated state to open the Change Lifecycle State modal.
- Enter the reason for the state change.
- Select Save.
Editing Case Details
Users can edit case information from the associated Case Details screen. Case Number, Created Date, and Last Modified Date are read-only and can not be edited.
To edit a case:
- Navigate to the appropriate Case Details screen.
- Select Edit in the top-right corner.
- Update the necessary fields.
- Select Save.
Creating a Case from a Call Report as
End users can create cases from an active, unsubmitted call report without leaving the call.
To create a case from an unsubmitted call report:
- Navigate to the unsubmitted call report.
- Select the briefcase icon in the call report header to open the Add Cases to this Call modal.
- Select Create Case.
- Populate the call report fields.
- Select Save.
To configure this feature, ensure Configuring Call Reporting is complete.
Managing a Case from a Call Report as
End users can associate and manage cases with an active, unsubmitted call report without leaving the call.
The Add Cases to this Call modal displays case cards for cases associated with the call’s account that are not Closed or Solved, as well as any cases already attached to the call. Cases are sorted with Escalated cases first, then in descending order by Last Updated.
Associating a Case with a Call Report
To associate a case with a call report:
- Navigate to the unsubmitted call report.
- Select the briefcase icon in the call report header to open the Add Cases to this Call modal.

- Select the appropriate case(s).
- Select Save.
Editing a Case from a Call Report
To edit a case from a call report:
- Navigate to the unsubmitted call report.
- Select the briefcase icon in the call report header to open the Add Cases to this Call modal.
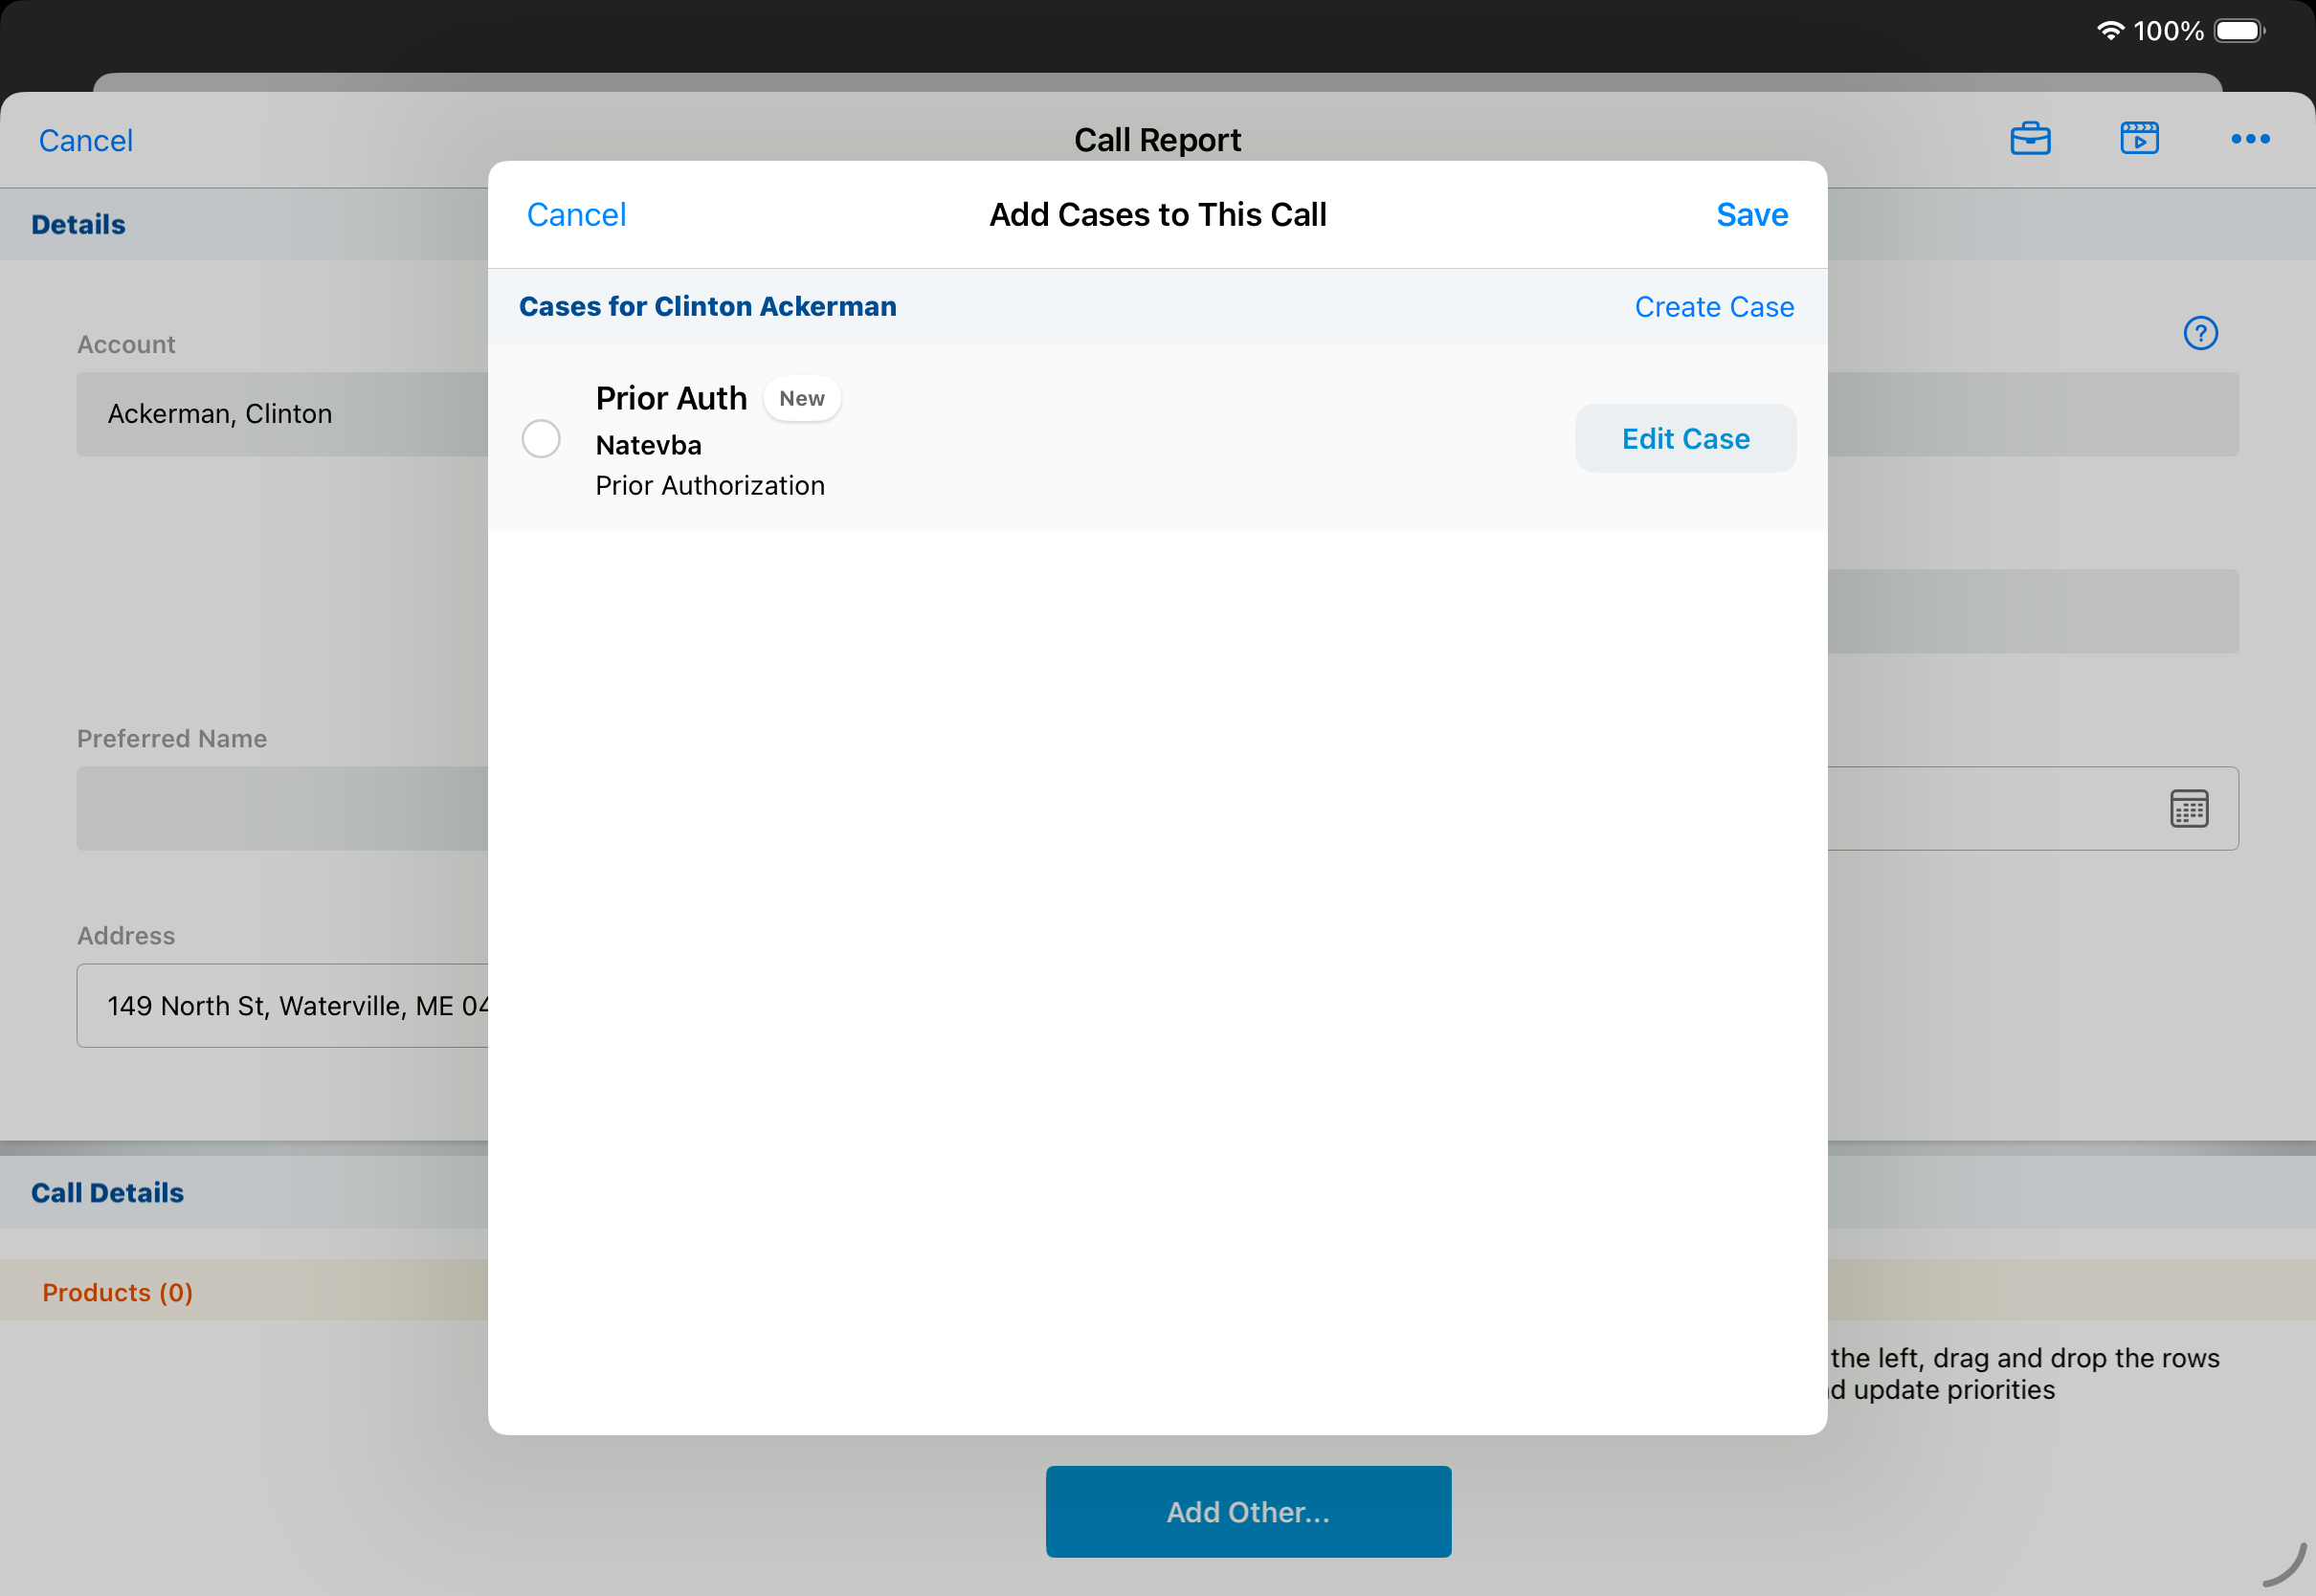
- Select Edit Case for the corresponding case.
- Update the necessary fields.
- Select Save.
Selecting Cancel in the Add Cases to this Call modal after creating or editing a case does not discard those changes. Created cases remain attached to the call, and case edits persist.

