Using the Data Grid Loader
Business admins using the CRM Desktop (Windows) app can import records from spreadsheets into Vault CRM using the Data Grid Loader by directly copying and pasting the data. Unlike the Vault Loader, the Data Grid Loader allows admins to define the type of data that can be imported by configuring templates that only allow specific objects and fields to be data loaded into Vault CRM, improving efficiency when creating large numbers of new records, while enabling greater control over the objects and fields users can data load into Vault CRM.
Who can use this feature?
- CRM Desktop (Windows) Users
- Users do not require an additional license
- Admin Users, Business Admin Users
Configuring the Data Grid Loader for
To configure this feature:
- Navigate to Admin > Users & Groups > Permission Sets.
- Select the appropriate permission set.
- Select the Objects tab.
-
Grant the following permissions:
Object
Object Permission
Object Types
Fields
Field Permission
data_grid_loader_configuration__v
CRED
n/a
- object_name__v
- field_list__v
- status__v
- access_type__v
- description__v
- country__v
- create_as_object_type__v
- sharing_group__v
Edit
- Select the Tabs tab.
- Grant access to the Data Grid Loader Configurations tab.
To configure this feature:
- Ensure CRM Desktop (Windows) is configured.
- Navigate to Admin > Users & Groups > Permission Sets.
- Select the appropriate permission set.
- Select the Objects tab.
-
Grant the following permissions:
Object
Object Permission
Object Types
Fields
Field Permission
data_grid_loader_configuration__v
R
n/a
- object_name__v
- field_list__v
- status__v
- access_type__v
- description__v
- country__v
- create_as_object_type__v
- sharing_group__v
Read
-
Navigate to Business Admin > Objects > vmobile_object_configuration__v.
-
Activate the CRM Desktop (Windows) VMOCs for the following objects:
- data_grid_loader_configuration__v – Ensure the include_attachments__v checkbox is selected
- message__v
- user__sys
- veeva_settings__v
-
Create VMOCs for any object end users can data load into with the following fields populated:
- object_name__v – The API name of the object
- type__v – Top level
- device__v – CRM Desktop Windows
- metadata_only__v = True
- active__v = True
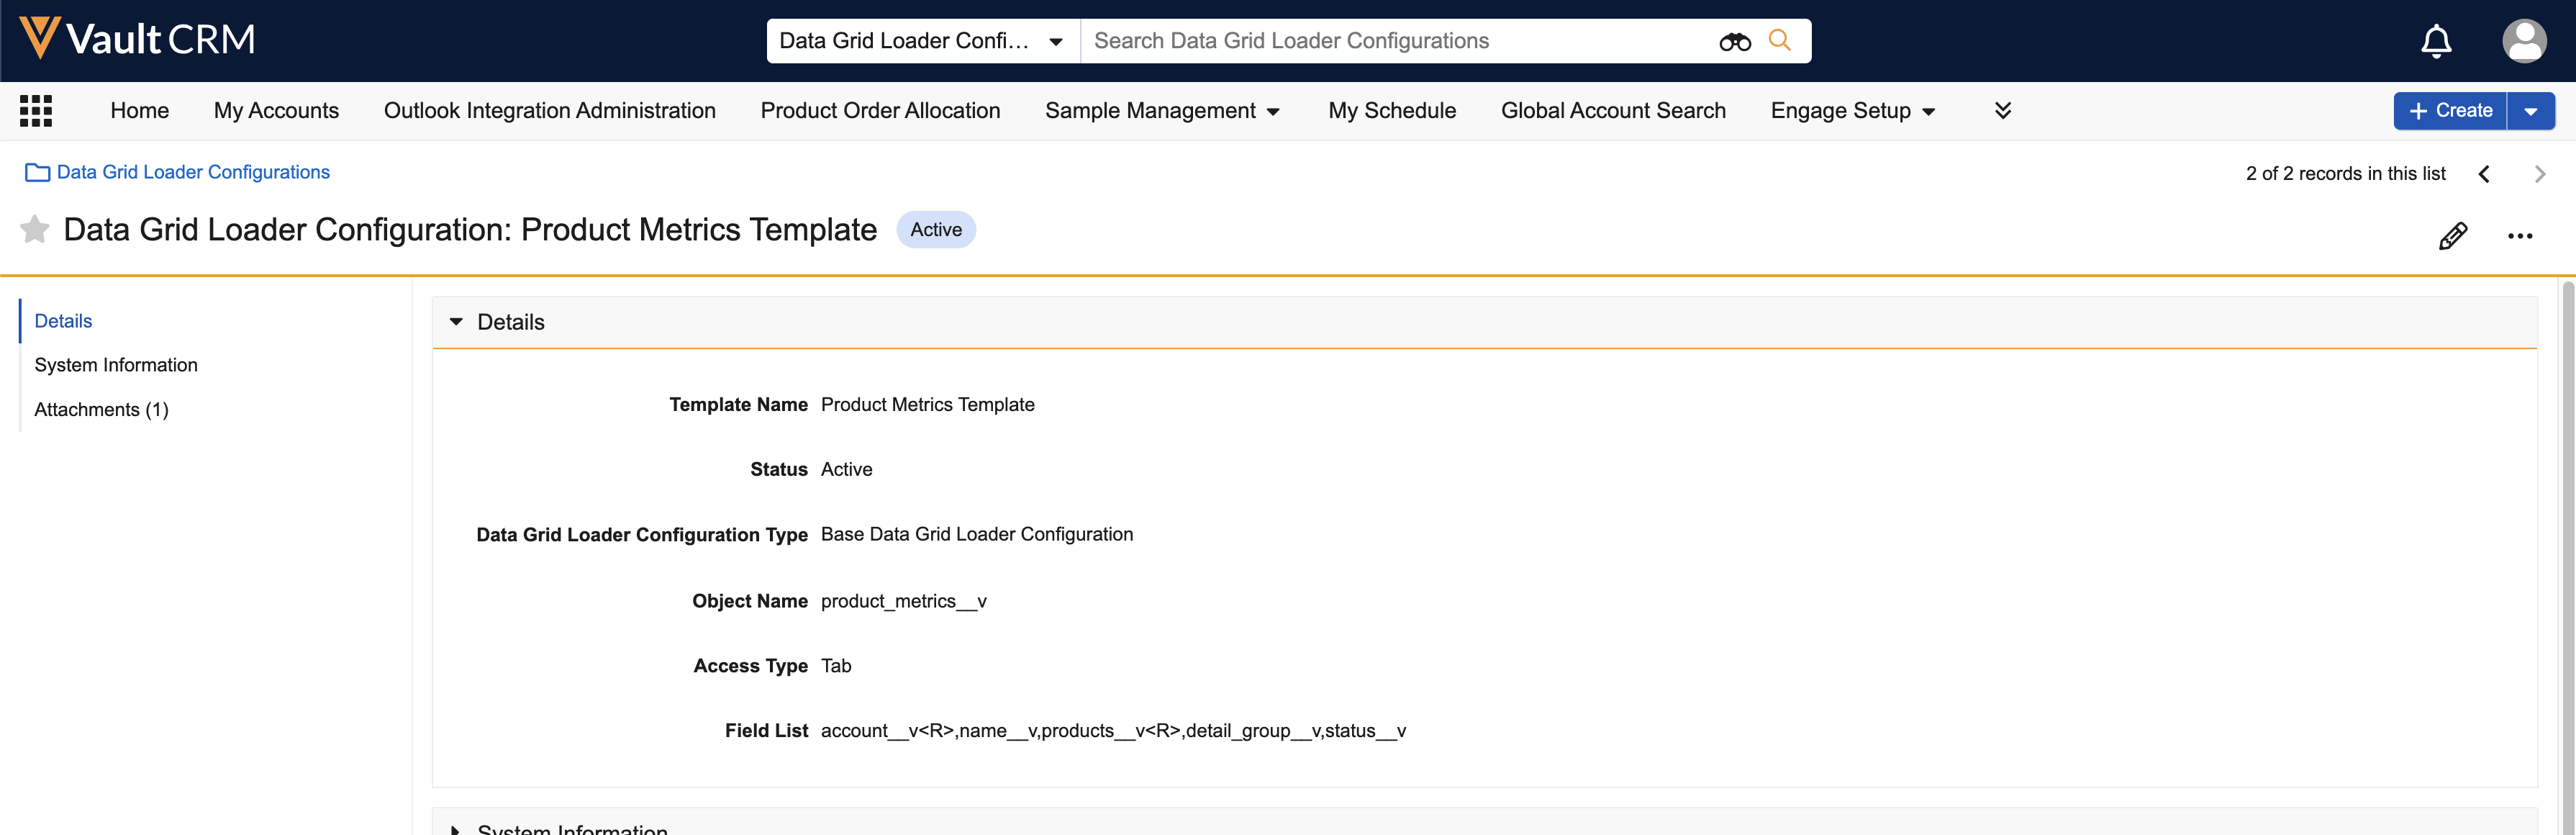
Creating Data Grid Loader Templates as
Admins must set up templates by creating data_grid_loader_configuration__v records that enable user groups to use the Data Grid Loader.
To create a template:
- Navigate to All > Data Grid Loader Configurations.
- Select Create.
-
Populate the following fields:
- object_name__v – The API name of the appropriate object
- access_type__v = tab__v
-
Populate the field_list__v field with a comma-separated list of field API names on the corresponding object available for loading. The following field types are not supported:
- Formula
- Roll-Up
- Lookup
- Attachment
Field names are case-sensitive and display in the Data Grid Loader in the order entered. Admins can mark fields as required by adding the <R> parameter after a field. Fields required at the object level do not need this parameter.
Ensure users have Edit permission for any listed field.
When defining the list of fields, admins should consider specific behavior for the following fields:
- ID – Data loading into ID fields enables updating existing records instead of creating new records. When users populate the ID column in a row, the upload updates that record. If the ID column is blank or if it is not added to the list of fields, data loading the row creates a new record.
- External ID fields – External ID fields populated in the Data Grid Loader are not used for updating existing records. The upload creates a new record if a row has a blank ID column with a populated External ID column.
- Object fields - Only add one Object field per referenced object. An error occurs when saving a data_grid_loader_configuration__v record with a field list including multiple fields referencin the same object.
- object_type__v – Including this field in the list of fields enables business admin users to define the object type of each row imported into Vault CRM via this template. Values in this column override the value in the create_as_object_type__v field.
-
Populate the following optional fields, as needed:
- create_as_object_type__v – This field is optional. When this field is populated, all records created via this template are created as the entered object type. This field is overridden if an individual record has a defined object_type__v field.
- country__v – This field is optional. When this field is populated, the template applies specifically to users matching the country. If this field is left blank, the template applies to all users.
- sharing_group__v – This field is optional and enables admins to configure sharing rules that restrict visibility to the template. See Configuring Custom Sharing Rules for Objects for more information.
- status__v – Select active__v to make the template available for use
- Select Save.
Attaching a Downloadable Template File
To provide instructions and guidance on formatting data correctly when using the Data Grid Loader, each template has a system-generated .xlsx file that users can download directly from the Data Grid Loader. Admins can optionally create and attach a custom downloadable template file to provide detailed instructions when preparing to load data, for example, instructing appropriate picklist values.
Admins should consider the following recommendations when creating the custom .xlsx file:
- Headers in the file should match the list of fields defined in the corresponding template
- Add and format instructions or help text to the template file as needed. For example, admins can use comments to provide an explanation of fields to guide users.
- Downloadable files should be localized to the country defined in the template. If multiple languages are applicable, admins can create separate tabs for each language.
Attach the downloadable file via the Attachments section of the Data Grid Loader Template.
If multiple files are attached to the record, the latest custom file is made available to end users. If there are no custom files attached, the system-generated file is used.
Using the Data Grid Loader as
If at least one data_grid_loader_configuration__v record is active, the Data Grid Loader tab displays in the CRM Desktop (Windows) app, enabling end users to data load records into Vault CRM based on defined templates:
-
Navigate to the Data Grid Loader tab in the CRM Desktop (Windows) app.
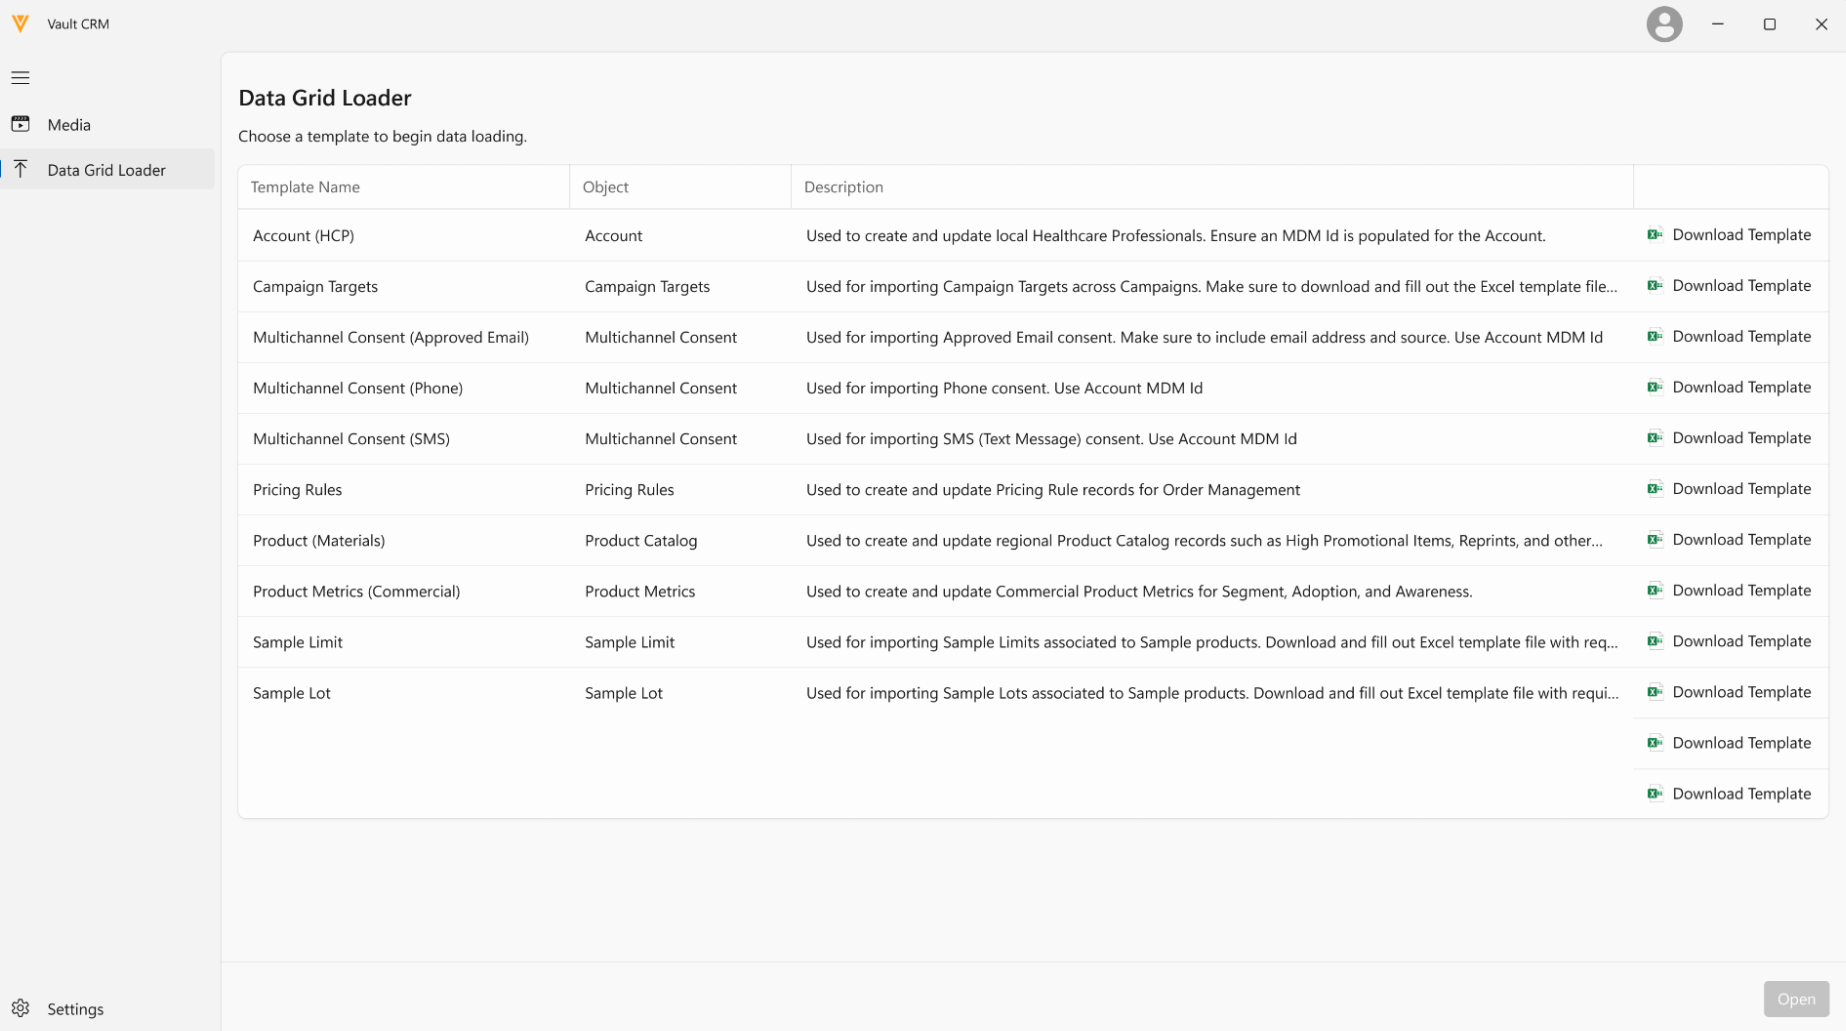
- Select the appropriate template.
-
Select Open. Select Open. Users can open up to five concurrent windows of the Data Grid Loader at the same time. The configured template fields display as columns in the Data Grid Loader, enabling users to see which fields are available for loading.

Select the Download Template button to download the attached .xlsx file.
-
Prepare the source data using an external spreadsheet or the attached .xslx file. Ensure the source spreadsheet contains all appropriate rows and data and that data in the following field types are formatted correctly:
Field Type
Format Validation Requirements
Example
Rich Text
Ensure any HTML included in the rich text is formatted correctly.
<p>This text is <b>bold</b>.</p>
Text
Format masking is not validated when uploading via the Data Grid Loader, though unique fields are validated.
“Example Text”
Currency
A maximum of six decimal places is supported.
34.17
Number
The field's minimum, maximum, and decimal values are validated on upload.
1000
Percent
The field's minimum, maximum, and decimal values are validated on upload.
7.5
Date
Must use the format YYYY-MM-DD.
2024-12-12
DateTime
The following formats are supported:
- {YYYY-MM-DD}T{HH:MM:SS.SSS}Z
- {YYYY-MM-DD}T{HH:MM:SS}Z
- {YYYY-MM-DD} {HH:MM:SS}
Entered times must use 24 hour time and use UTC, not user specific time zones.
{2025-01-31}{14:30:00}
Time
The following formats are supported:
- HH:MM:SS
- HH:MM
Entered times must use 24 hour time.
08:30:00
Object
Populate with the related record’s 15 character record ID.
VFZ000000001001
Object Type API Name
Populate with the value from the api_name__v field.
professional__v
Object with Unique Field
Populate with value of the unique field for related object record.
MD010101
Picklist
Populate using the appropriate picklist value’s API name. If the picklist is a multi-select picklist, multiple values can be selected using the following format:
value1APIName, value2APIName
active__v
Yes/No
The following values are supported:
- true
- false
true
If a row has an empty value for a field, it is treated as null.
-
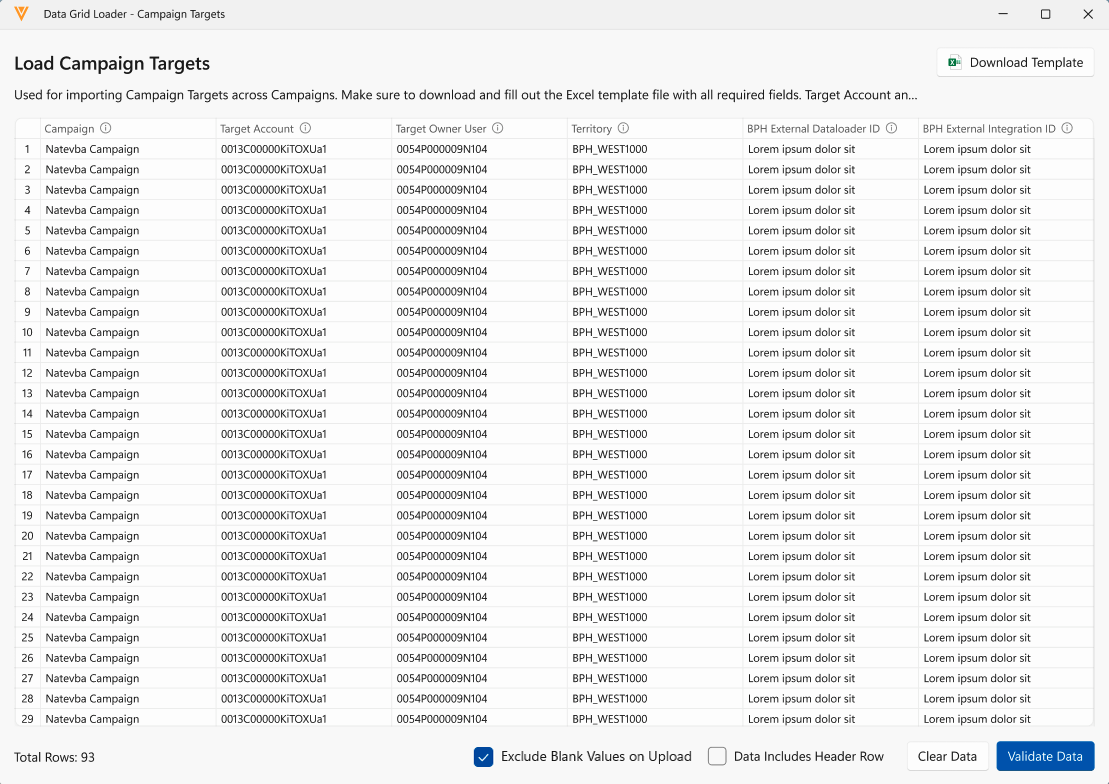
Copy the data from the spreadsheet. When data is pasted into the Data Grid Loader, it replaces all data currently in the loader. Ensure all appropriate data is pasted at once.
-
Paste the data into the Data Grid Loader. The following methods are available to paste the data:
- Selecting the Paste Data button in the Data Grid Loader
- Using a keyboard shortcut (Ctrl + V)
- Right-clicking anywhere within the grid, then selecting Paste
Business admins can zoom into or out of the Data Grid Loader to more clearly view pasted data via the following methods:
- Right clicking within the Data Grid Load and selecting the appropriate zoom option
- Using the following keyboard shortcuts
- Ctrl + – Zoom in
- Ctrl - – Zoom out
- Ctrl 0 – Return to default zoom level
-
Select the following check boxes based on the contents of the data:
- Data Includes Header Row – Select this checkbox if the first row of the pasted data contains column headers. This ignores the first row when uploading.
- Exclude Blank Values on Upload – Select this checkbox to ignore blank cell values in the pasted data when uploading. This prevents updating existing data with blank values.
- Select Validate Data. The validation process ensures any required fields are populated for every row in the data.
Validating Data
The validation process ensures that any required fields are populated for every row in the data. Rows with validation errors are highlighted in red. Additionally, the Status column displays a message about the validation results for each row.
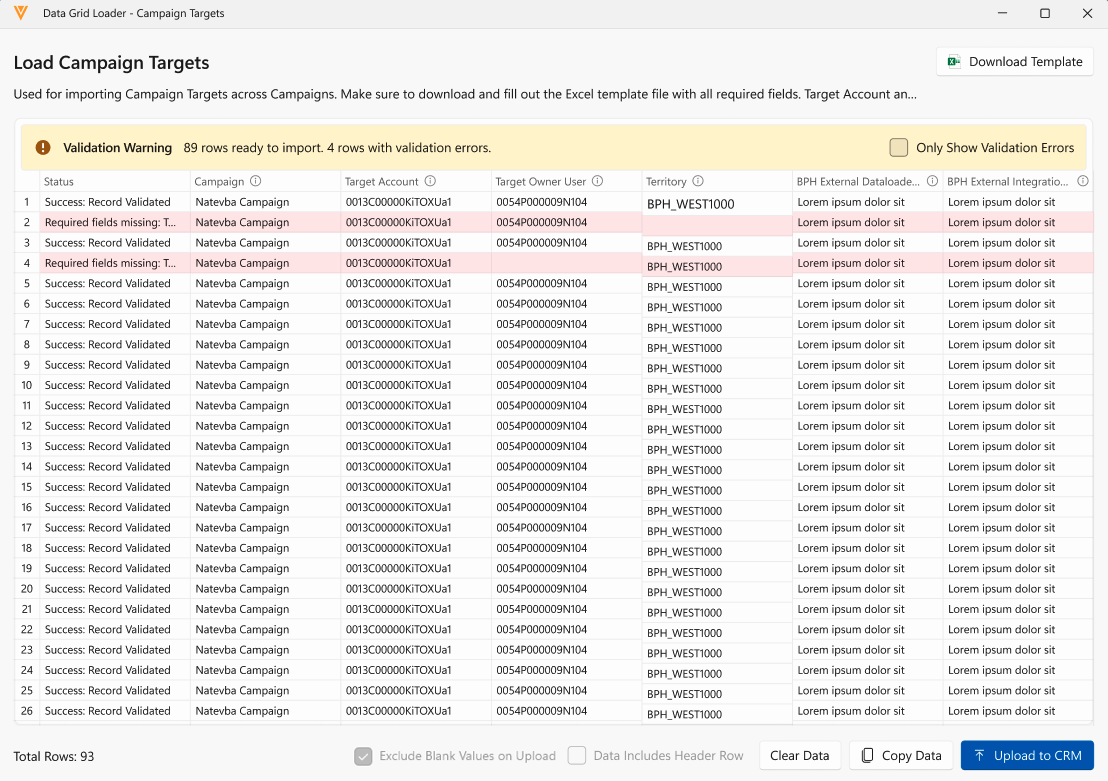
To more quickly identify and resolve validation errors, select the Only Show Errors checkbox to filter the list of rows to only display rows with validation errors. Users can use the leftmost number column to identify which rows in their source data contain validation errors.
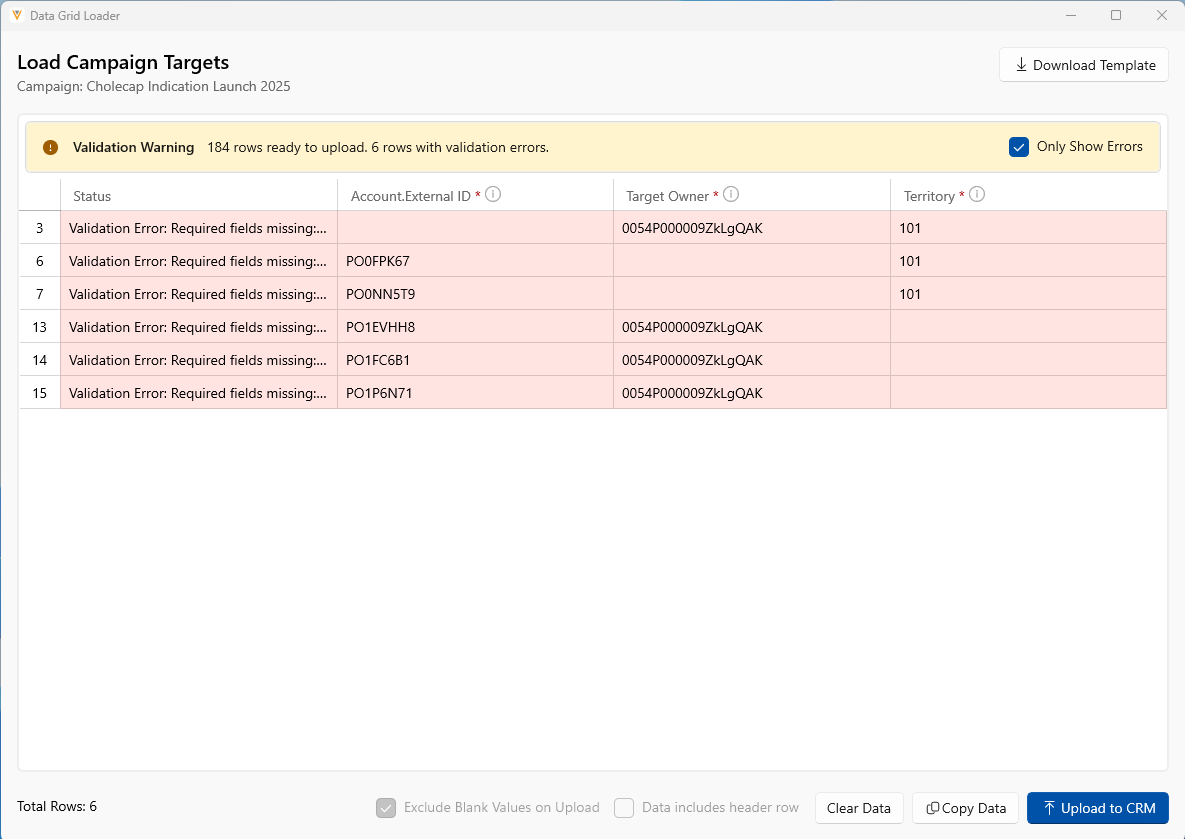
User can proceed with uploading valid rows, or resolve validation errors first.
To resolve validation errors:
- Review validations errors in the Data Grid Loader.
- Correct the errors in the original spreadsheet.
- Copy the corrected data.
- Select Clear Data (keyboard shortcut Delete or Backspace) from the Data Grid Loader.
- Paste the updated data into the Data Grid Loader.
Uploading Data to CRM
After validating the data, select the Upload to CRM button to proceed with uploading the data.
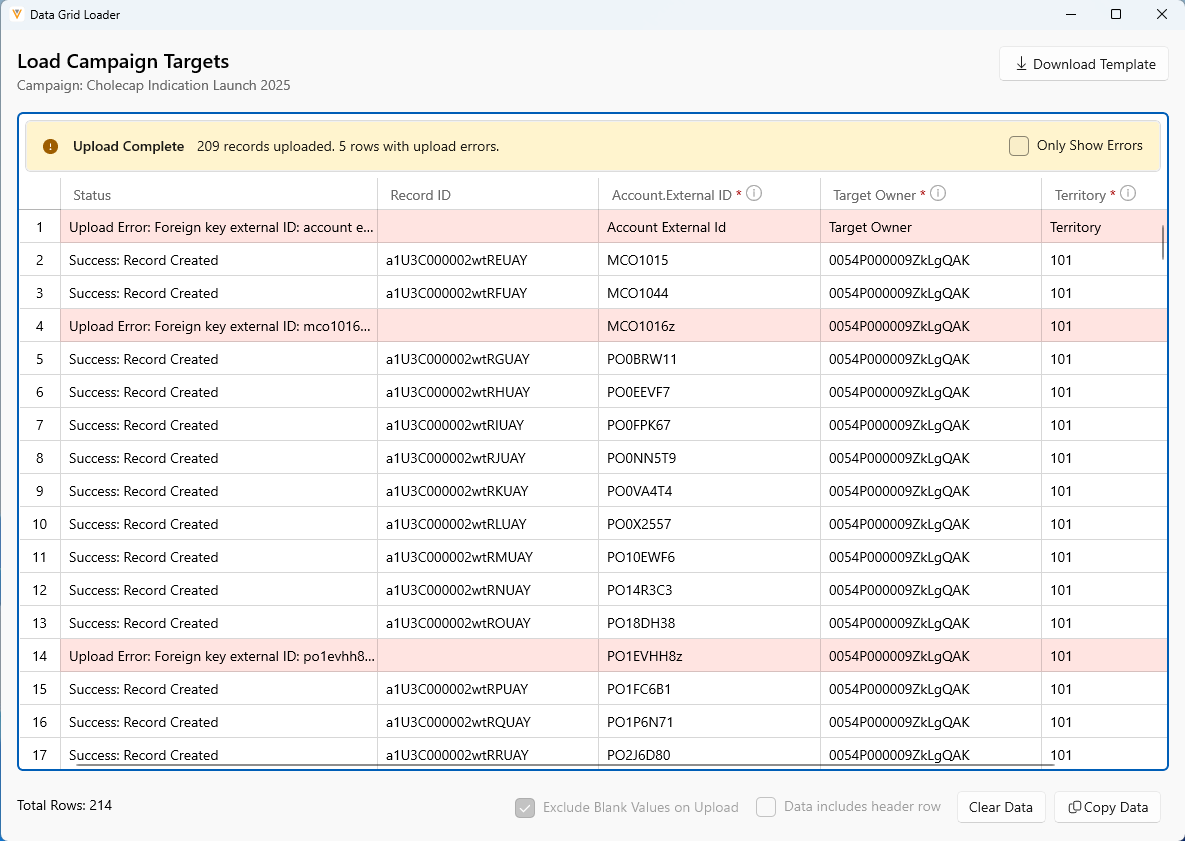
While the upload is in progress, do not close the Data Grid Loader window.
Both upload and validation errors are highlighted in red. A Status column displays the results for each row. To quickly identify records that could not be uploaded, business admin users can filter for errors by selecting the Only Show Errors checkbox.
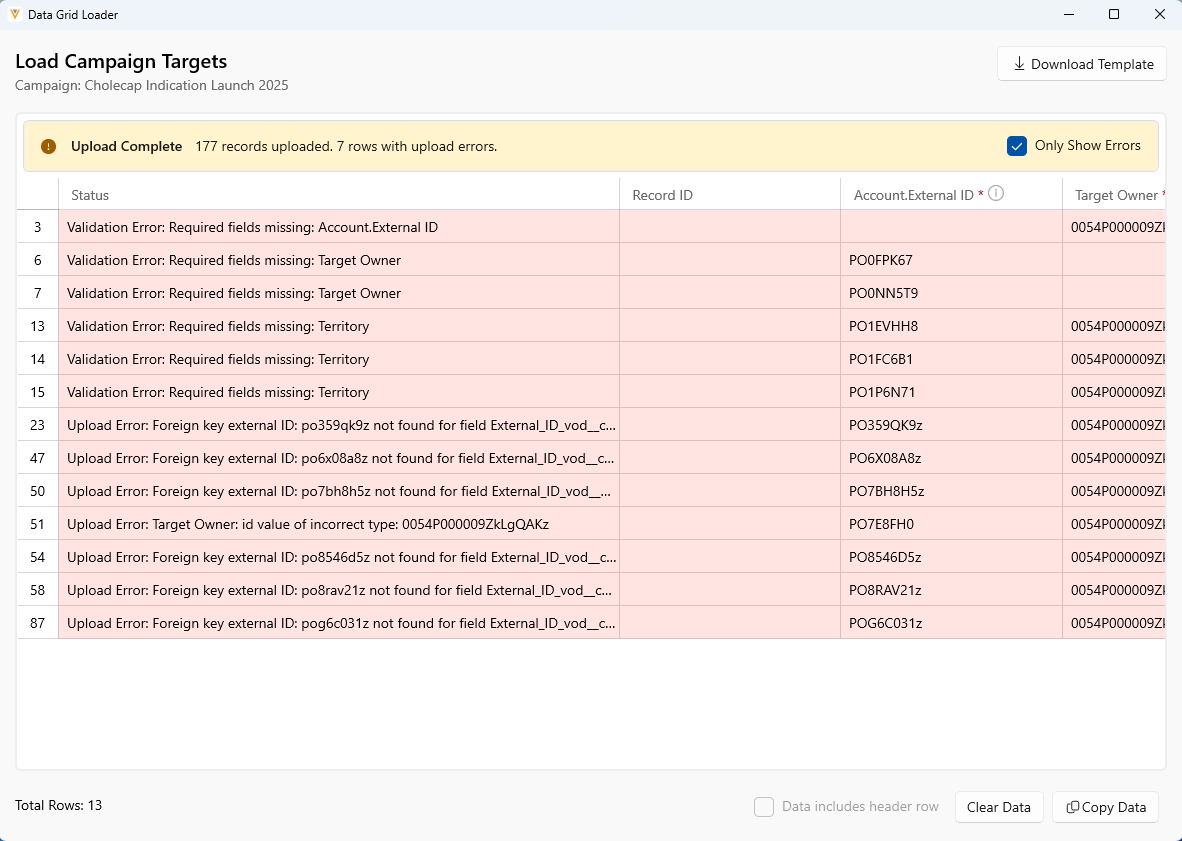
Additionally, if the ID field was not configured in the template, the ID field is added to the grid, enabling users to identify records in the system for later reference.
Once the upload is complete, users can select the Copy Data button to copy the entire grid, including columns and upload results. They can then paste this data into a spreadsheet as a log for the upload. Users can also correct any upload or validation errors and retry importing the data by selecting the Clear Data button and pasting the corrected data.

