Printing Orders
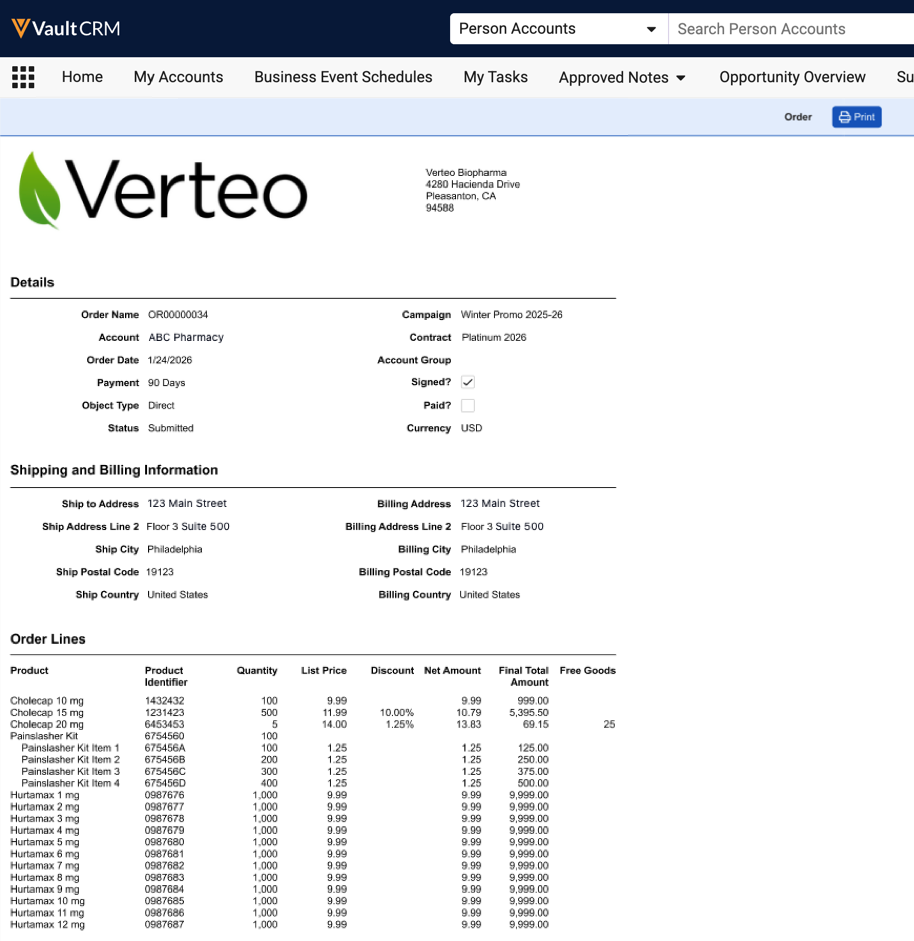
End users can generate a printable view of an order directly from the order record. The printable view presents Order Header and Order Line information in a clean, structured layout optimized for printing and sharing, eliminating the need to manually compile order details.
Business admin users can customize the printable view with a company logo or additional company information, and can control which Order Header sections and Order Line fields display.
Who can use this feature?
- Business Admin Users - Browser
- Customizing the Print View
- End Users - Browser
- Printing an Order
- Users do not require an additional license
Configuring Print Order for
To configure this feature:
- Ensure Configuring Order Management is complete.
- Navigate to Admin > Users & Groups > Permission Sets.
- Select the appropriate permission set.
- Select Objects.
- Select order__v.
- Grant Execute permission to the print__v object action.
- Select Save.
-
Enable the print__v action for the appropriate object types:
- Navigate to Admin > Configuration > Objects
- Select the order__v object
- Select the Object Types tab.
- Select Actions
- Select Edit Object Type Actions from the All Actions menu
- Select the print__v checkbox for each order object type that should support the print action
- Select Save
Uploading a Company Logo
Customers can display a company logo in the printable order’s header. The logo is sourced from the image attached on the global veeva_settings__v record.
To upload a company logo:
- Navigate to Admin > Configuration > Objects > Veeva Settings > Details.
- Ensure Allow attachments is selected for the veeva_settings__v object.
- Navigate to Business Admin > Objects > VMobile Object Configurations.
- Ensure a VMOC for the veeva_settings__v object is active for the appropriate platforms.
- Navigate to Business Admin > Objects > Veeva Settings.
- Select the global veeva_settings__v record.
- Upload an image named order_logo.XXX to the Attachments section of the record where XXX represents the image file extension. Supported file types are JPG, PNG and GIF.
Setting Company Information
Company information, for example, name and address, can be displayed in the printable order’s header. The company information is sourced from the company_fields_for_print__v field on the veeva_settings__v record.
To set the company information:
- Navigate to Business Admin > Objects > Veeva Settings.
- Select the appropriate record.
- Select Edit.
-
Populate or update the company_fields_for_print__v field in the following format:
<table id='orgtbl' width='100%'> <tr><td><b>Company Name</b></td></tr> <tr><td><b>Address</b></td></tr> <tr><td><b>City</b></td></tr> <tr><td><b>State</b></td></tr> </table>
- Select Save.
Customizing the Print View as
- Page Header - Displays the logo and company information
- Order Header - Displays the fields and sections as configured on the Order Page layout
- Order Lines - Displays the Order Line fields as configured on the Order Lines layout
- Assortments
- Delivery orders
- Section controls
- Related lists
- Attachments
Excluding the Order Header
The Order Header detail displays on the printable order by default. Admins can add the no_print__v field control to the page layout section to exclude it from displaying on the printable order.
The no_print__v field control excludes entire Order Header sections. Individual fields within an Order Header section can not be excluded.
To exclude the Order Header section:
- Navigate to Admin > Configuration > Objects.
- Select order__v.
- Select Layouts.
- Select the appropriate layout.
- Add the no_print__v field control to the Detail section.
- Select Save.
Excluding Order Line Fields
The Order Lines section of the printable order displays a maximum of eight fields. The Product field is always included. The remaining fields are pulled from left to right based on the Order Lines layout. If the layout includes more than eight fields or if certain fields are not relevant, use the om_print_blocked_fields__v field on the veeva_settings__v record to exclude specific fields by order type.
To exclude Order Line fields:
- Navigate to Business Admin > Objects > Veeva Settings.
- Select the appropriate record.
- Select Edit.
-
Enter the appropriate value in the OM Print Blocked Fields field using the following format:
- Order Type 1: Excluded Field 1, Excluded Field 2; Order Type 2: Excluded Field 1, Excluded Field 2
- For example, direct__v: warning__v, free_goods__v; transfer__v: warning__v, total_discount__v
- Select Save.
For Direct order types, exclude the Warning and Free Goods order lines; for Transfer order types, exclude the Warning and Total Discount order lines.
The following Order Line fields are always excluded from the printable order:
- name__v
- order__v
- local_currency__sys
- modified_by__v
- modified_date__v
- created_by__v
- created_date__v
- Any field ending in corpv__sys or corp__sys
- Custom fields of type Long Text, Rich Text, or Attachment
- Any fields the current user does not have read permission to
Printing an Order as
End users can generate a printable view of an order from the order record.
To print an order:
- Navigate to the order record.
-
Select Print from the All Actions menu to open a new tab.
- Select Print to send the order to a printer.

