Creating Event Approvals Using Object Workflows
Business Admin Users can leverage Vault's Object Workflow functionality to create custom approval workflows that dynamically update based on specific event attributes, for example, estimated attendance size. By defining these criteria, you can ensure each event follows the appropriate approval process, streamlining operations and maintaining compliance.
Who can use this feature?
- Business Admin Users - Browser
- Creating Approval Object Workflows
- End Users - Browser, iPad
- Initiating Object Workflows
- Users require an Events Management License
Configuring Object Workflows for Event Approvals
To configure this feature:
- Ensure Configuring Events Management is complete.
- Navigate to Admin > Users & Groups > Permission Sets.
- Select the appropriate permission set.
- Select the Objects tab.
-
Grant users the following permissions:
Object Object Permission Object Types Fields Field Permission em_event_action__v
CRED
n/a
All fields
Edit
em_event__v
RE
n/a
approval_process_error__v
Edit
- Select the Application tab of the permission set.
- Select the Start and Participate checkbox in the Workflow section.
To configure this feature:
- Ensure Configuring Events Management is complete.
- Navigate to Admin > Users & Groups > Permission Sets.
- Select the appropriate permission set.
- Select the Objects tab.
-
Grant the following permissions:
Object Object Permission Object Types Fields Field Permission em_event_action__v
R
n/a
All fields
Read
em_event_history__v
R
workflow_history__v
- next_approver_participant__v
- task_id__v
- task_completed__v
- verdict__v
- workflow_instance_id__v
Read
em_event__v
RE
n/a
approval_process_error__v
Edit
- Select the Application tab of the permission set.
- Select the Start and Participate checkbox in the Workflow section.
Defining Delegate Approvers
Delegate approvers can accept and complete Object Workflow Tasks on the original approver's behalf to ensure events flow through the system uninterupted
To define a user’s Delegate Approver, populate the delegatedapproverid__v field on the appropriate user__sys records with the designated delegate user. See Configuring Object Workflows for Delegate Approvers for more information on how to configure specific Object Workflows to support delegate approvers.
Creating Approval Object Workflows as
To create Object Workflows for event approvals:
- Navigate to Admin > Configuration > Workflows.
- Select Create.
- Select Object Workflow for the Workflow Type.
- Select Continue.
-
Populate the following fields:
- Label – Enter the appropriate label for the Workflow
- Name – Enter the appropriate name
- Lifecycle – Select the appropriate Event Lifecycle
- Use workflow for single object record – Ensure this checkbox is selected
- Ensure all other options and check boxes are left empty or deselected
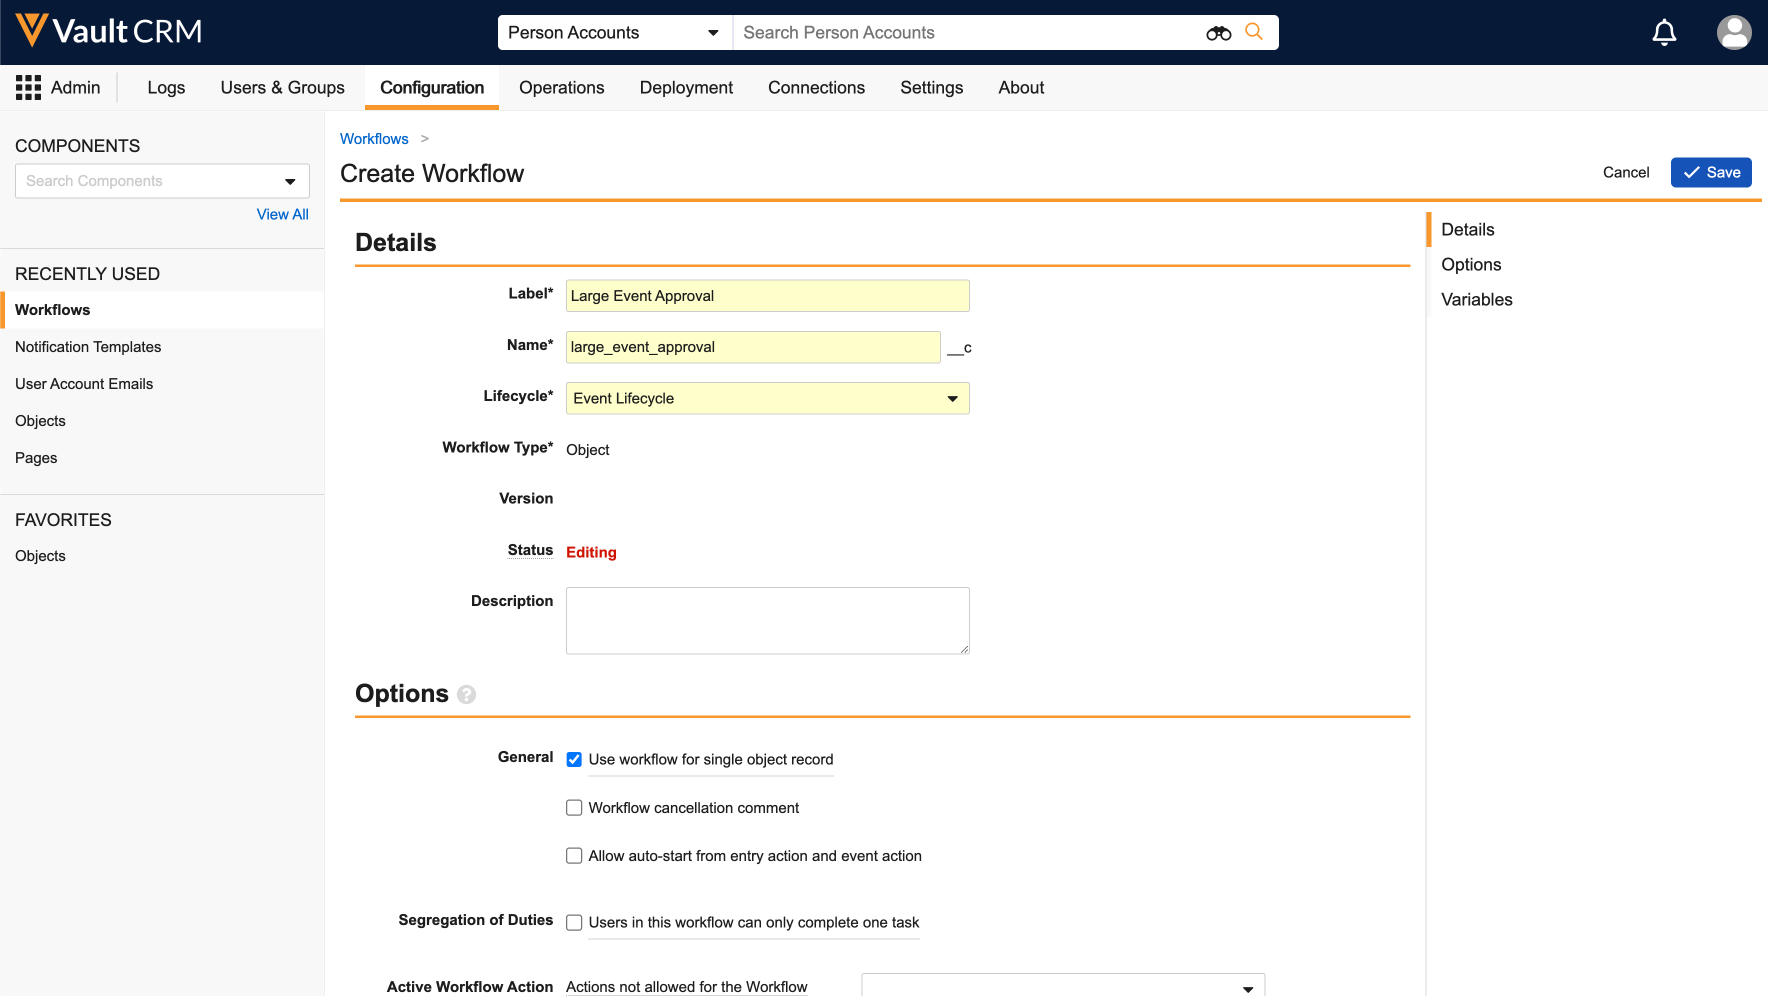
- Select Save.
Defining Workflow Participants
After creating the Object Workflow, business admin users must then define the appropriate participants in the workflow. This determines which users or groups are able to interact with the event’s approval process:
- Navigate to the Workflow Steps section of the Object Workflow.
- Select the All Actions (...) button next to the Start Workflow state.
- Select Edit.
- Select Add Control in the Start Options section.
-
Select Participants as the control.
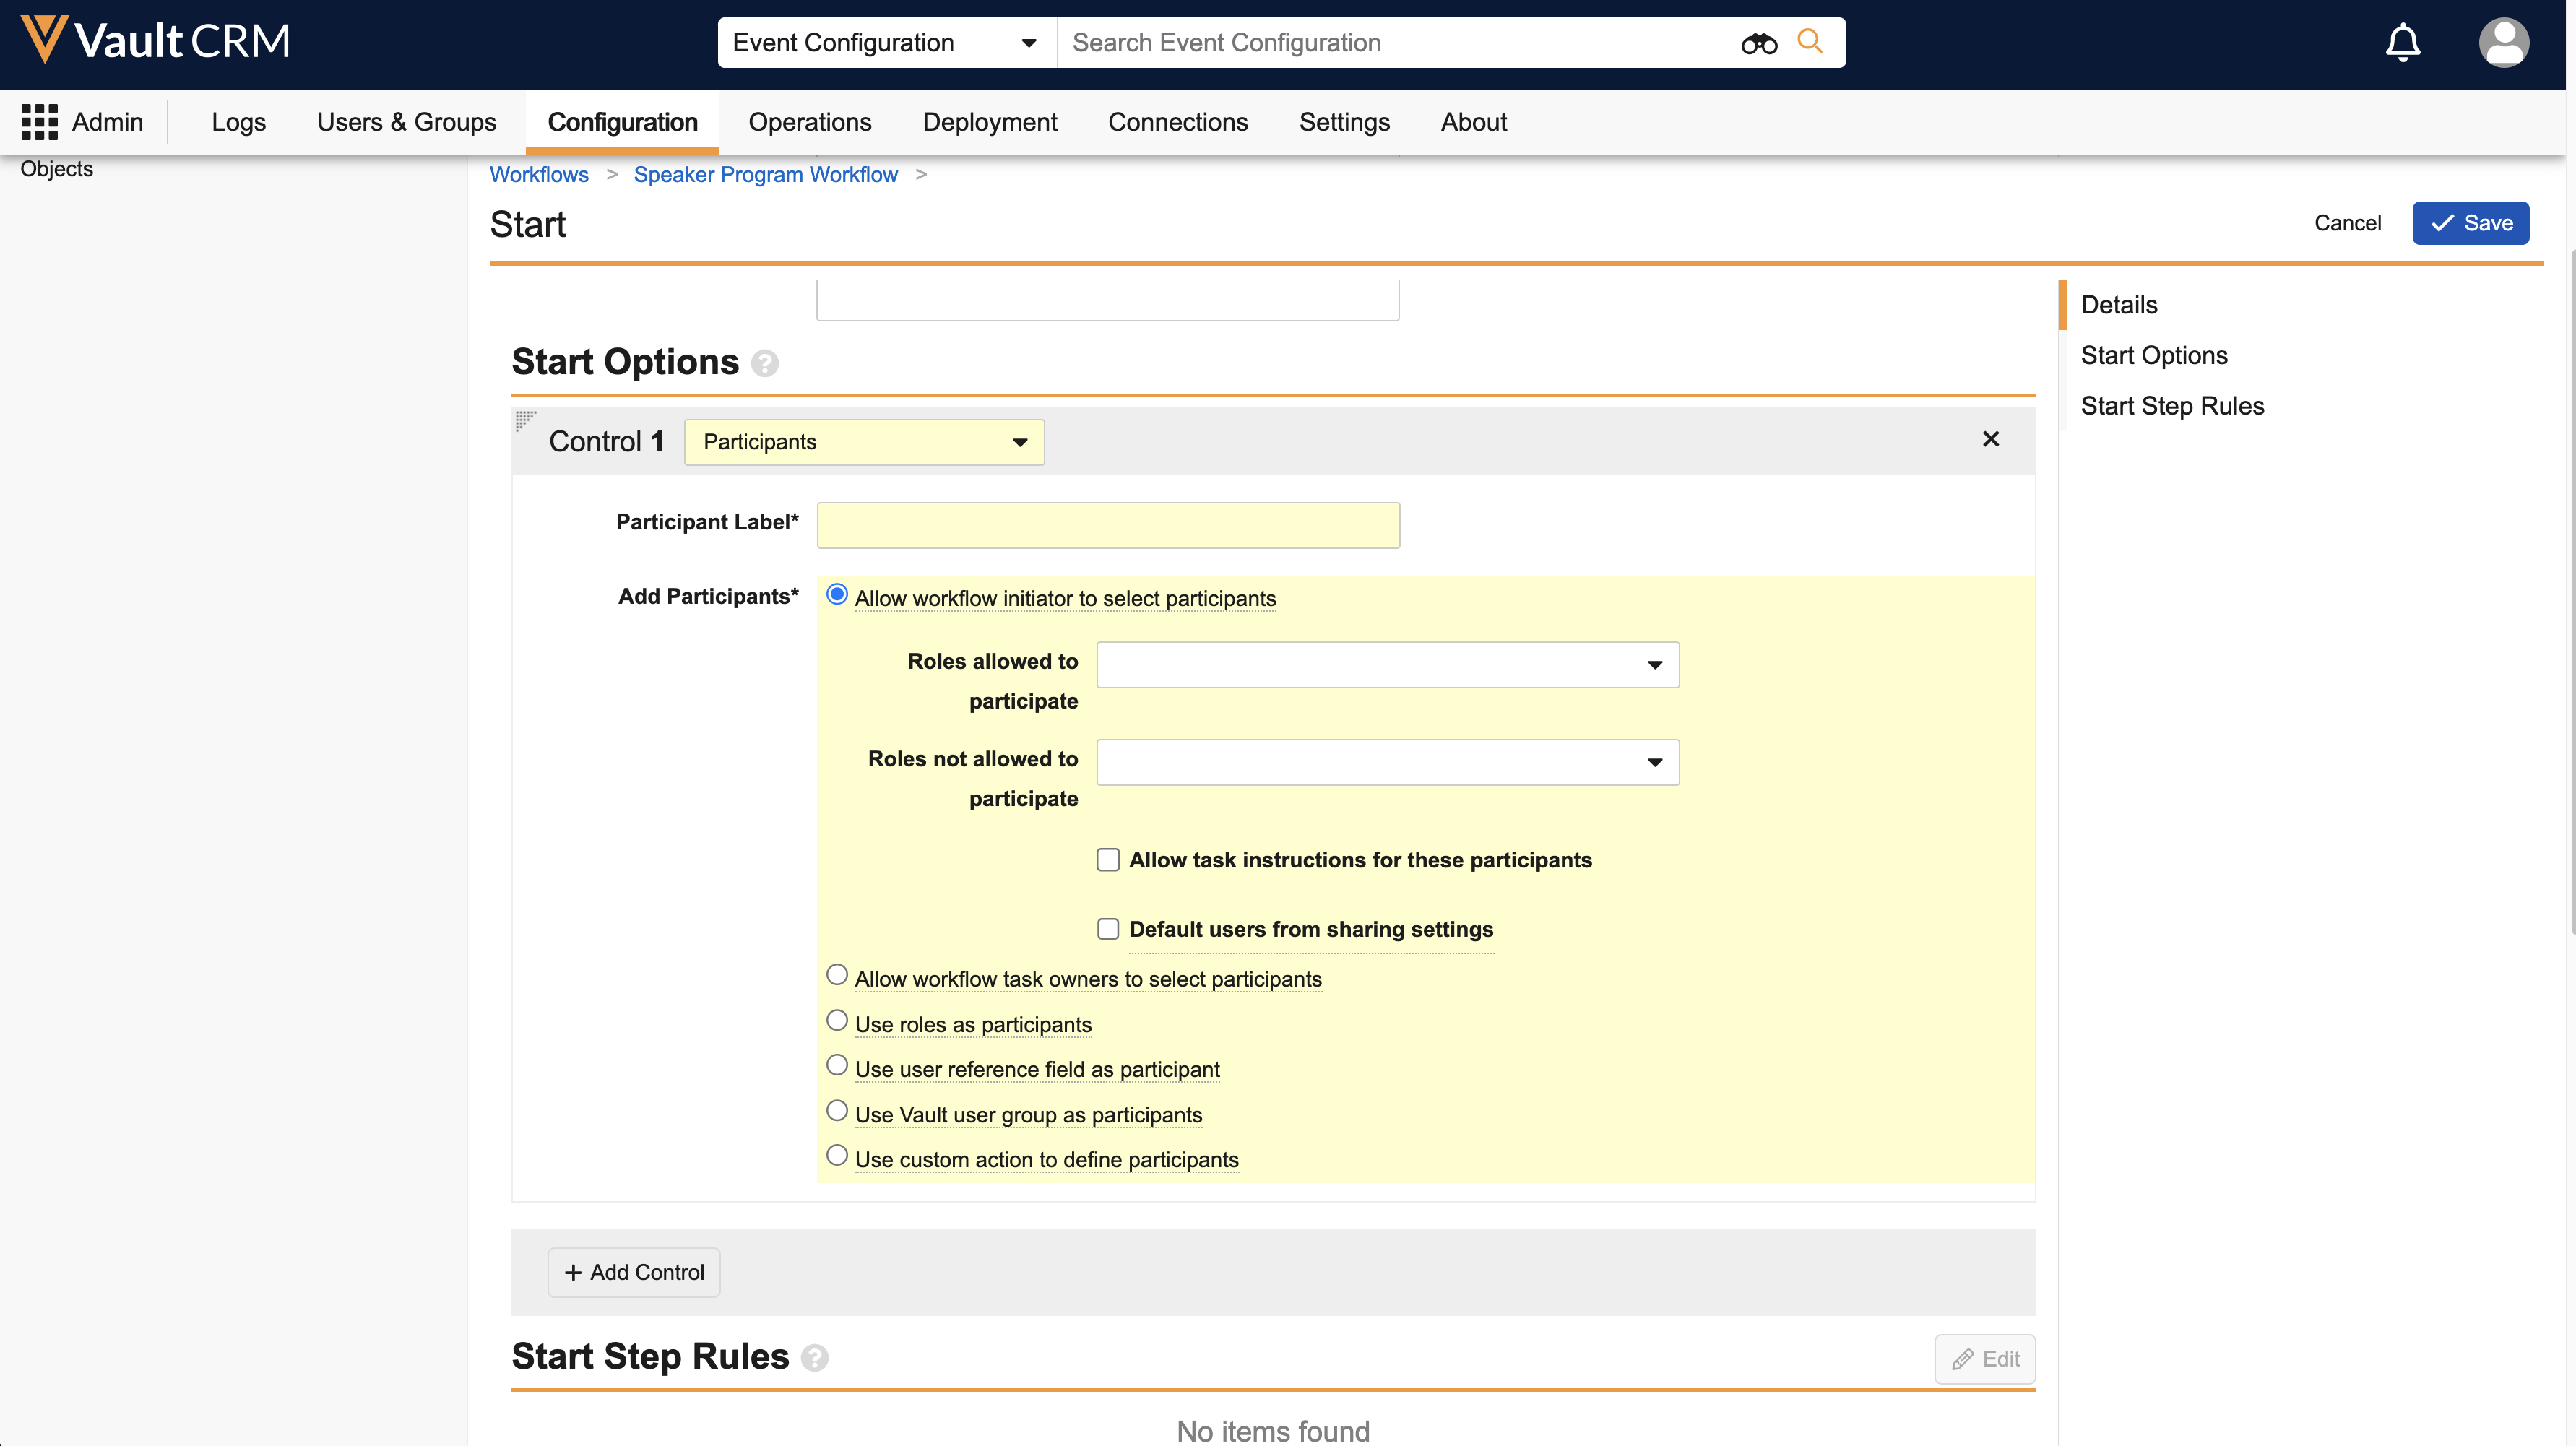
- Enter the appropriate label.
-
Select the appropriate option in the Add Participants section. The following options are supported:
- Allow workflow initiator to select participants – The end user who initiated the Workflow is immediately prompted to select the next approver. This option is recommended if the Workflow initiator should always manually define a participant.
- Allow workflow task owners to select participants – The end user who initiated the Workflow is automatically assigned a task directing them to choose the approver or assignee. This option is recommended if a Decision step immediately after initiating the Workflow determines if the Workflow initiator should manually define a participant based on the event’s attributes, for example, its country.
- Use user reference field as participant – References a specific user via a defined Object Reference field. For example, the manager of the event’s owner.
- Use Vault user group as participants – Defines a Vault Group to add as a participant
- Select either Add Control to continue adding Participant Controls, or select Save.
See Participants Control for more information.
Creating Workflow Steps
Once the participants for the Workflow are defined, business admin users must then create the appropriate Decisions, Tasks, Notifications, and Actions for the flow:
- Navigate to the Workflow Steps section of the Object Workflow.
-
Select the + Create button. Alternatively, admins can create a step by selecting the + button in the appropriate place in the Object Workflow.
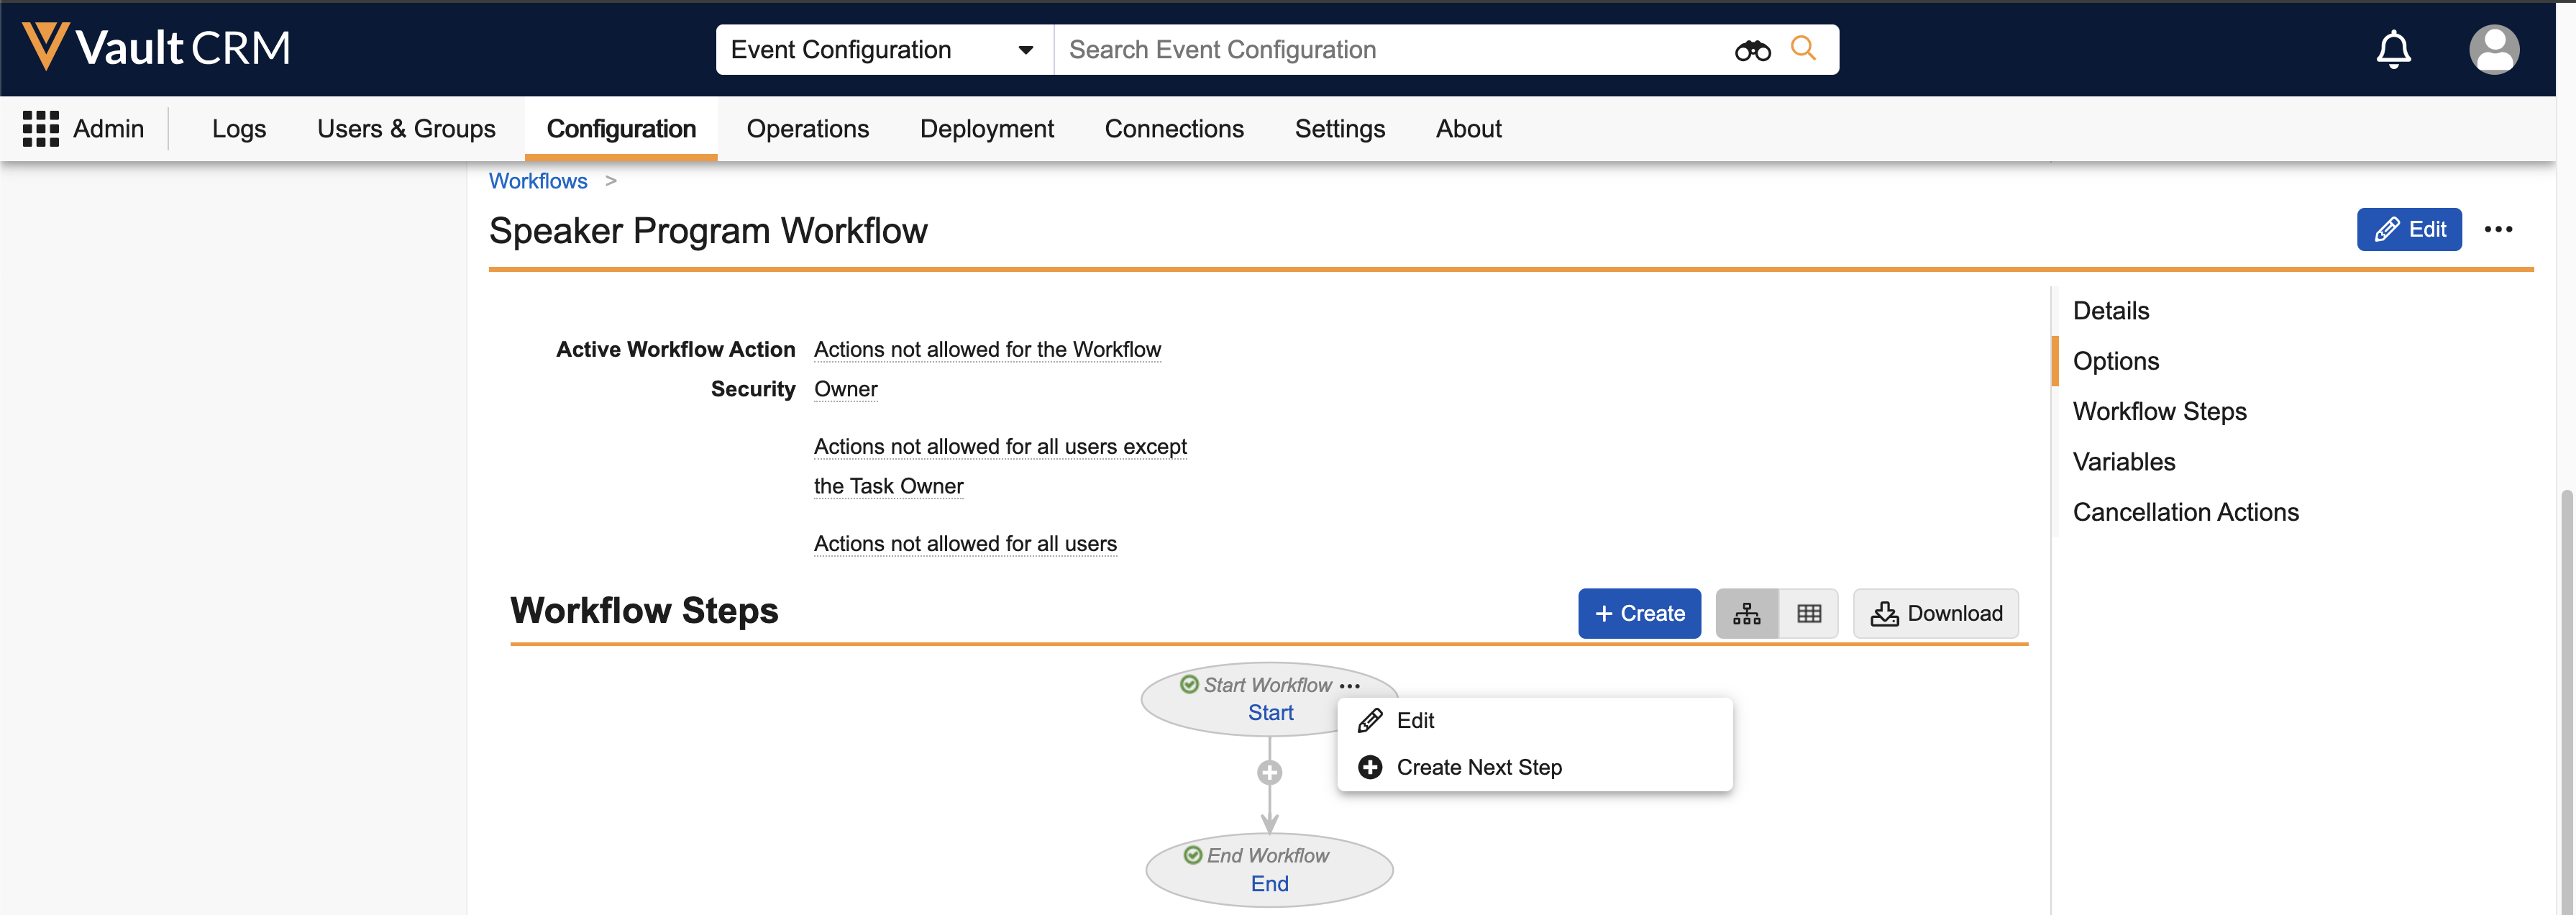
-
Populate the following information:
- Label – The step's label
- Name – The step's name
- Type – The following step types are supported:
- System Action – Initiates a system action. Every Object Workflow created for Events Management approval processes needs exactly one system action for handling events that do not meet any Decision criteria. See Creating the Entry Criteria Not Met System Action for more information.
- Action – Automatically initiated actions that edit the state or fields of the event. See Creating Workflow Actions for more information.
-
Decision – Enables the Workflow to diverge into separate paths based on verdicts from a previous step or the values of fields on the event. See Creating Workflow Decisions for more information.
It is recommended to create a Decision as the first step in the Workflow.
- Task – Creates actionable tasks assigned to a defined user or group. Certain tasks may have different outcomes, or verdicts, which determine the next step in the Workflow. See Creating Workflow Tasks for more information.
- Notifications – Sends email notifications to a specific user or group based on a defined notification template. See Creating Workflow Notifications for more information.
- Select Save.
Creating the Entry Criteria Not Met System Action
Every Object Workflow created for Events Management approval processes requires a system action step used in the final Else rule of Decisions. This ensures events that do not meet any of the criteria of the Decision's rules display an error when users attempt to initiate or progress the Workflow, ensuring events do not enter an invalid state.
To create the Entry Criteria Not Met System Action
- Edit the Step’s Label to Entry Criteria Not Met. This ensures the system action is easy to find when referencing the step in Decisions.
- Select Entry Criteria Not Met from the System Action picklist.
- Select Save.
Creating Workflow Actions
Workflow Actions automatically initiate when the event reaches that step of the Workflow and edit the state or fields of the event.
To define what fields or properties are affected by a Workflow Action:
-
Select the + Create Rule button in the Rules section of the Step.
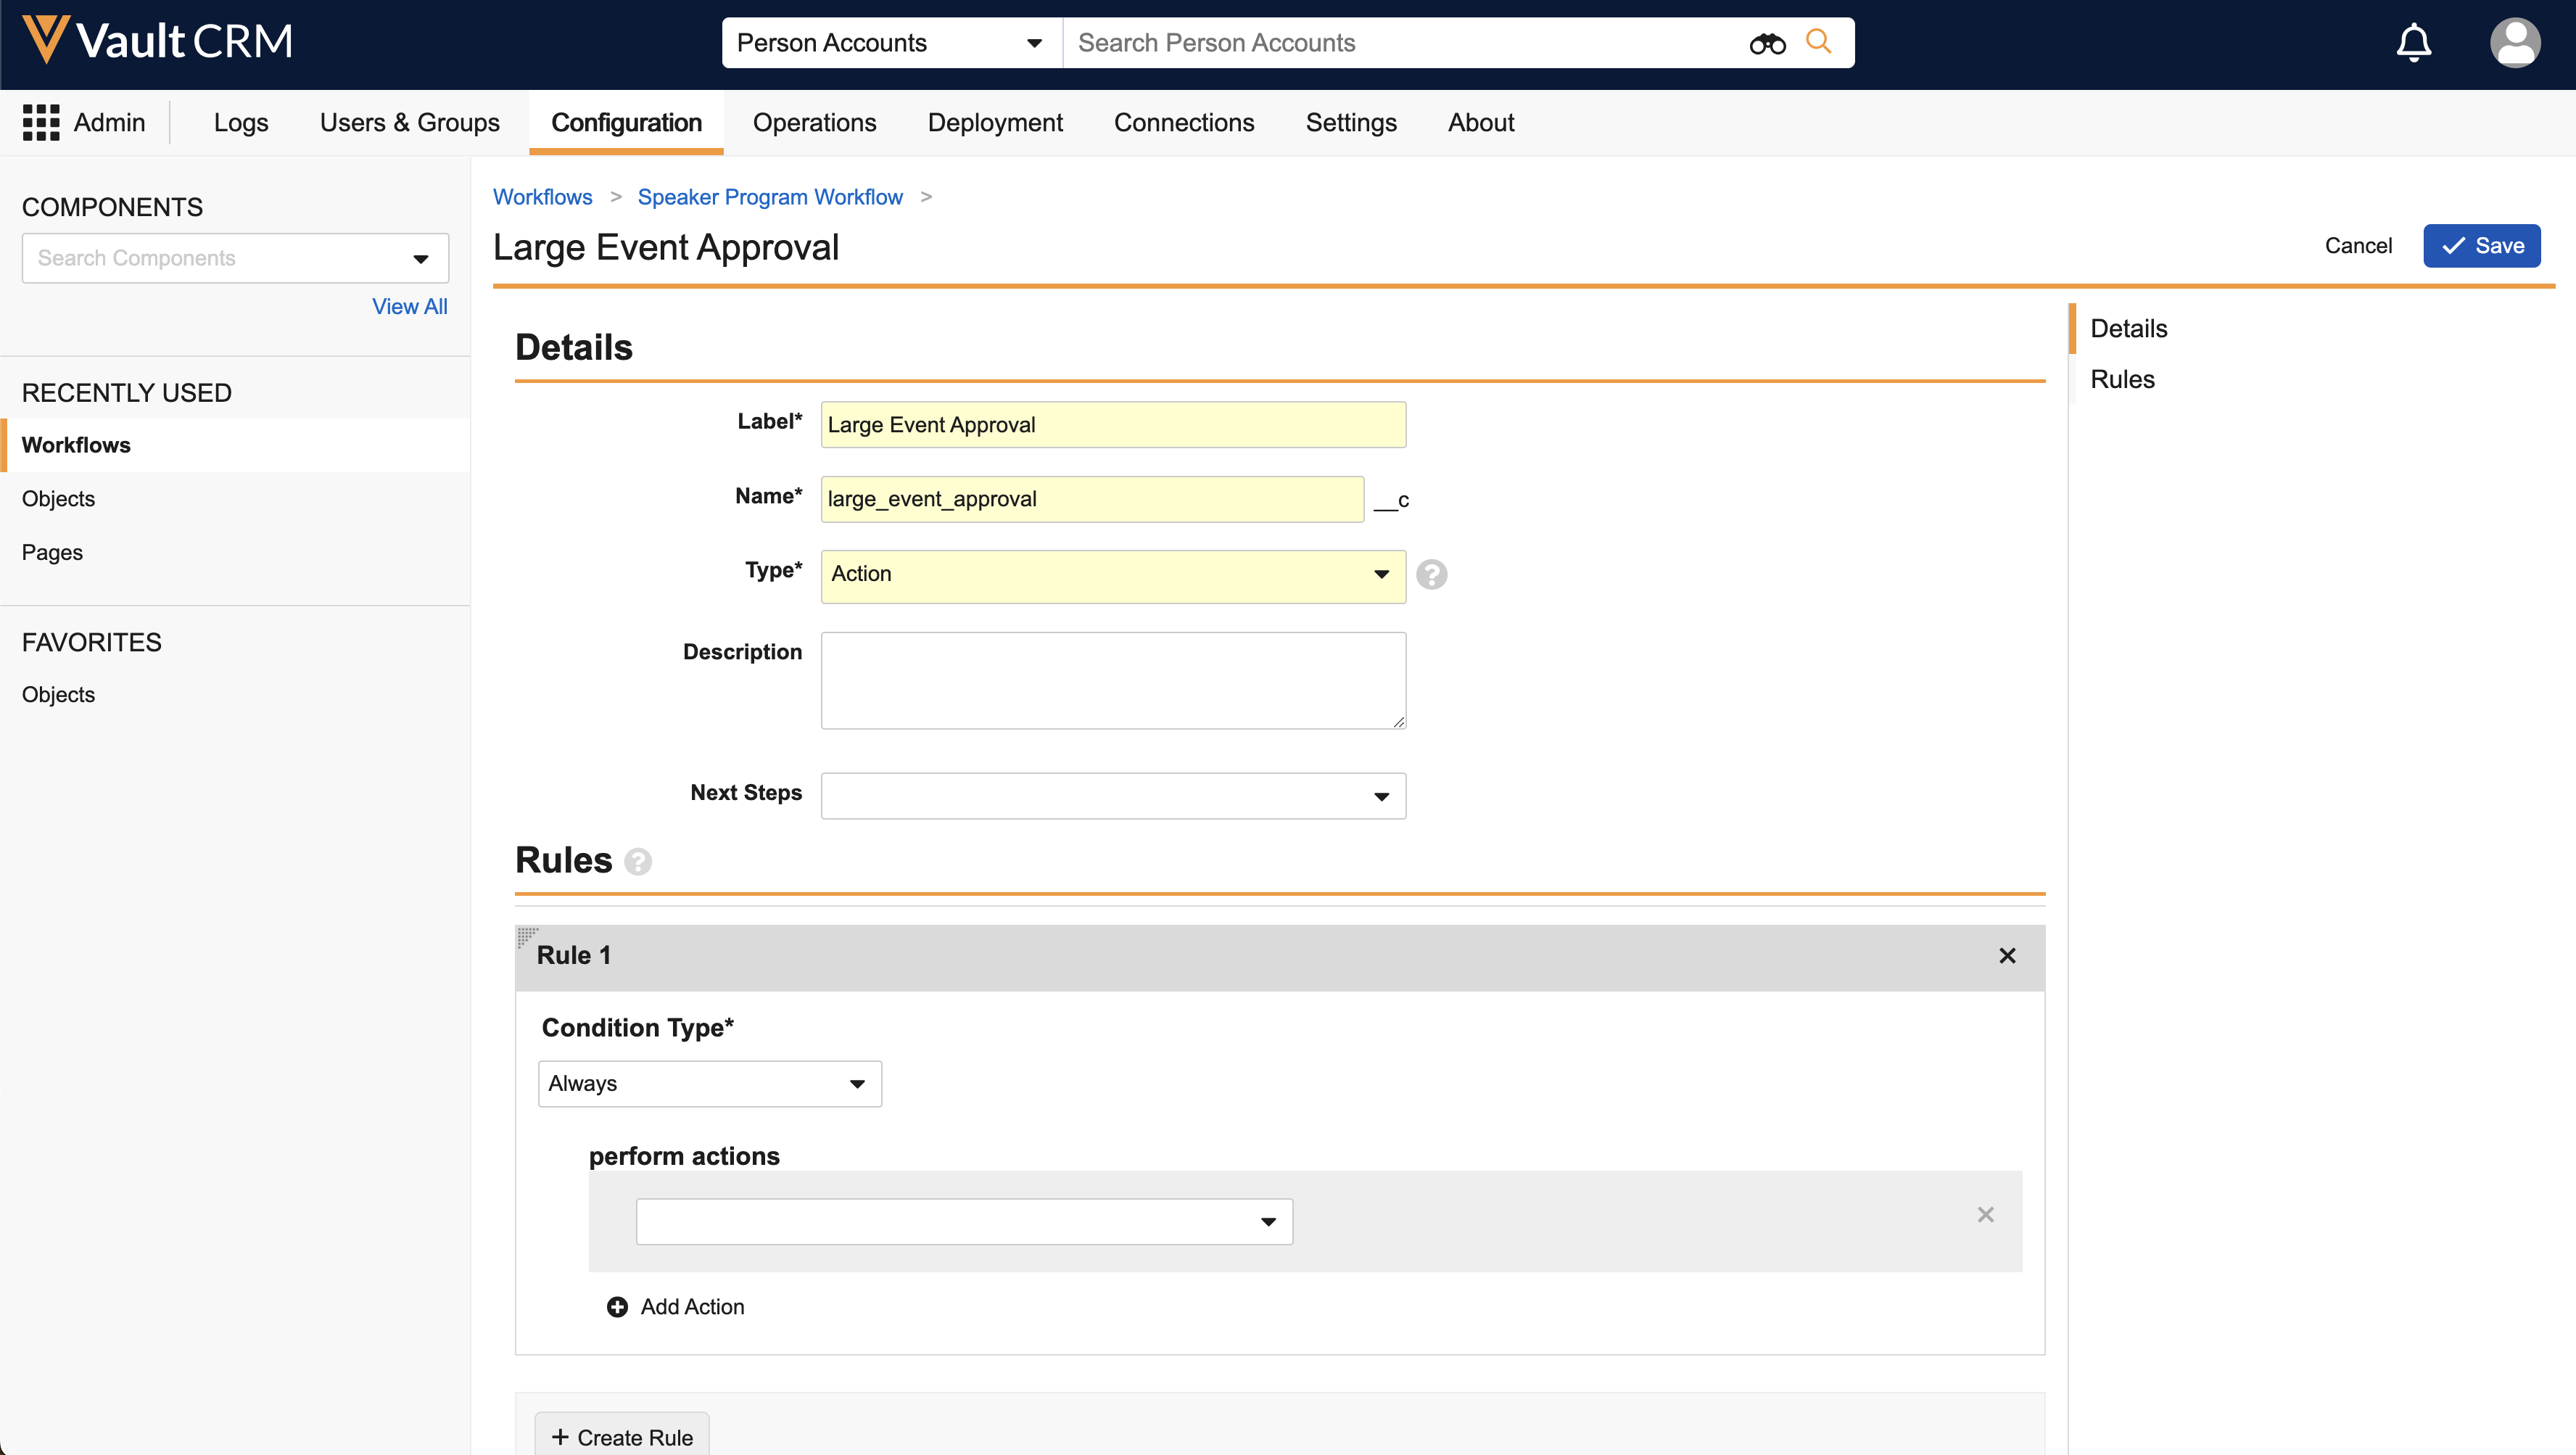
-
Select the appropriate value in the performs actions picklist. Available values are:
- Update Field – Updates a field on the em_event__v record
- Update related record field – Updates a field on a record related to the em_event__v record
Do not select Update State. All Lifecycle State changes are controlled via the event’s em_event_status__v field.
-
Enter the appropriate field or lifecycle state information.
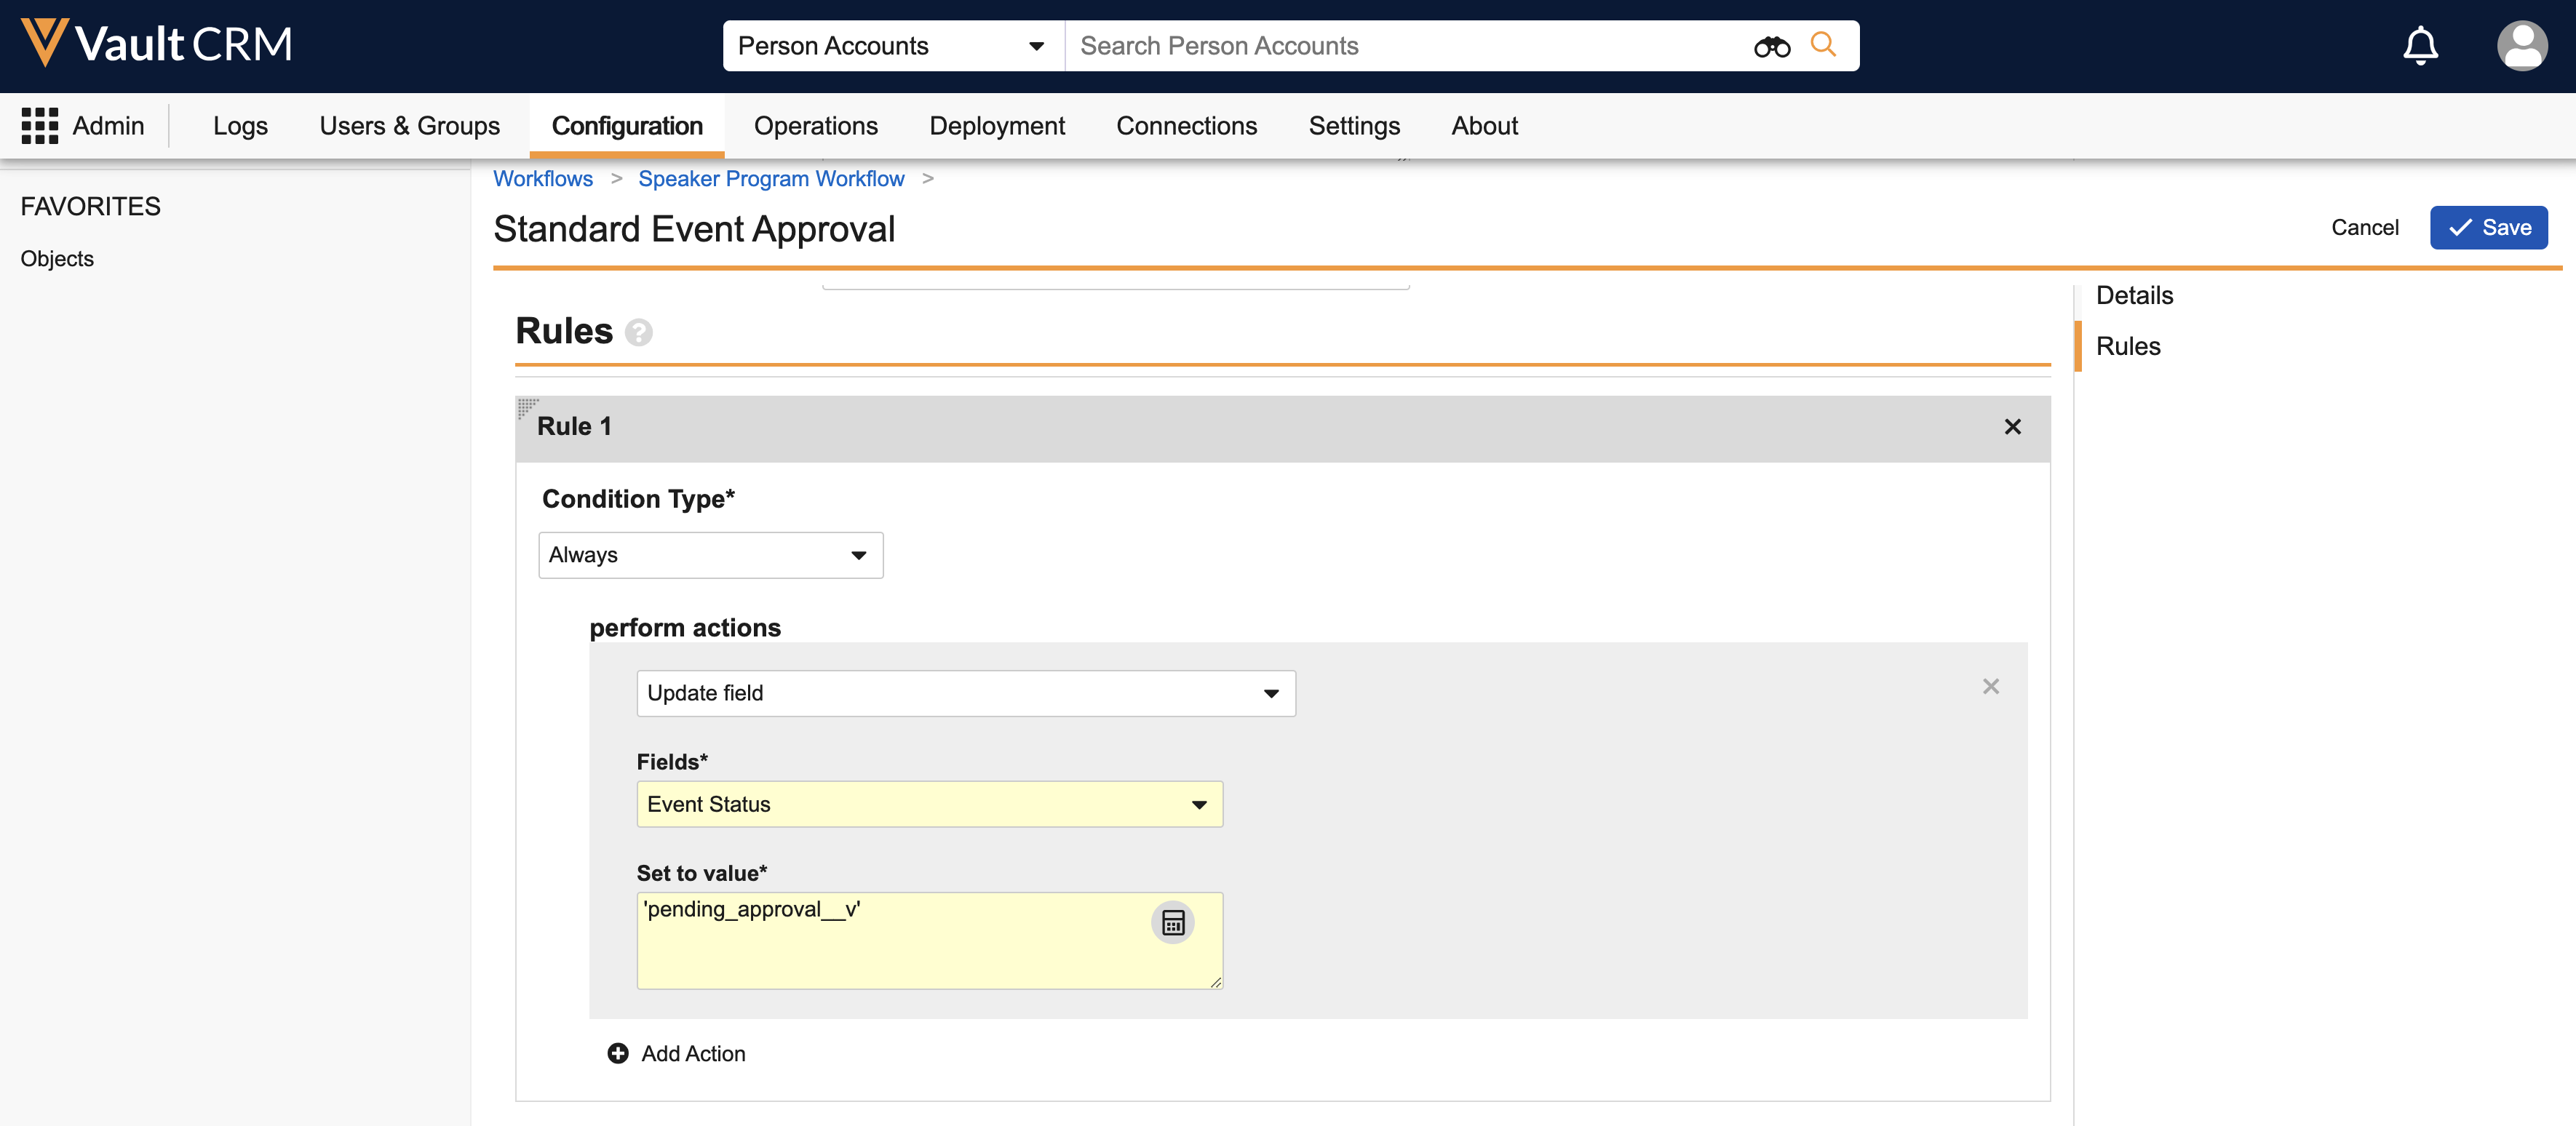
- Select Add Action to add additional actions, if necessary.
- Select Save.
Creating Workflow Decisions
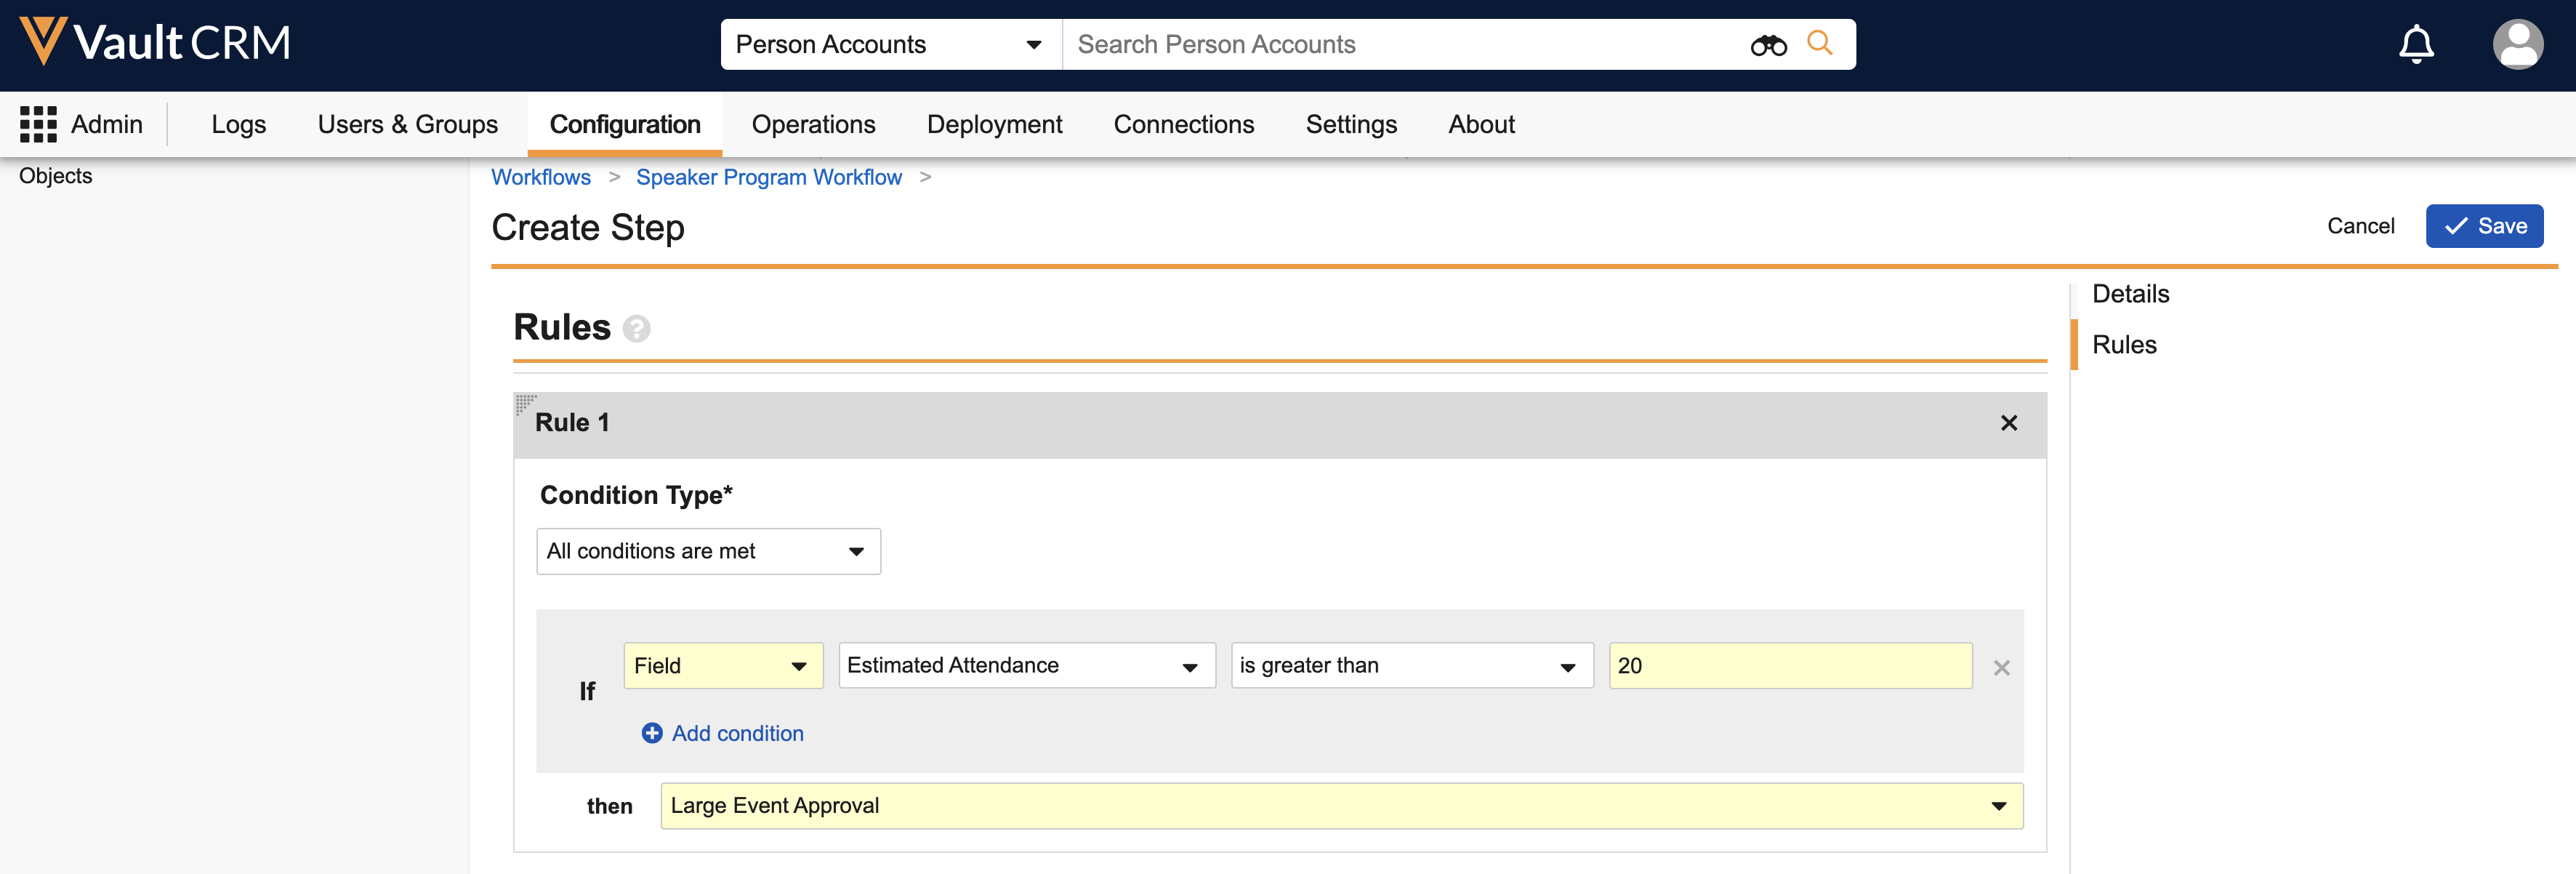
Decisions are steps in the Object Workflow resulting in differing outcomes based on verdicts from a previous step or the values of fields on the event. For example, an event exceeding a certain estimated attendance may go through a different approval process than an event that does not.
Workflow Decisions comprise of a series of rules that are checked automatically when the event reaches the Decision in the Workflow, as well as a final Else clause that is used if the event does not meet any of the rule criteria.
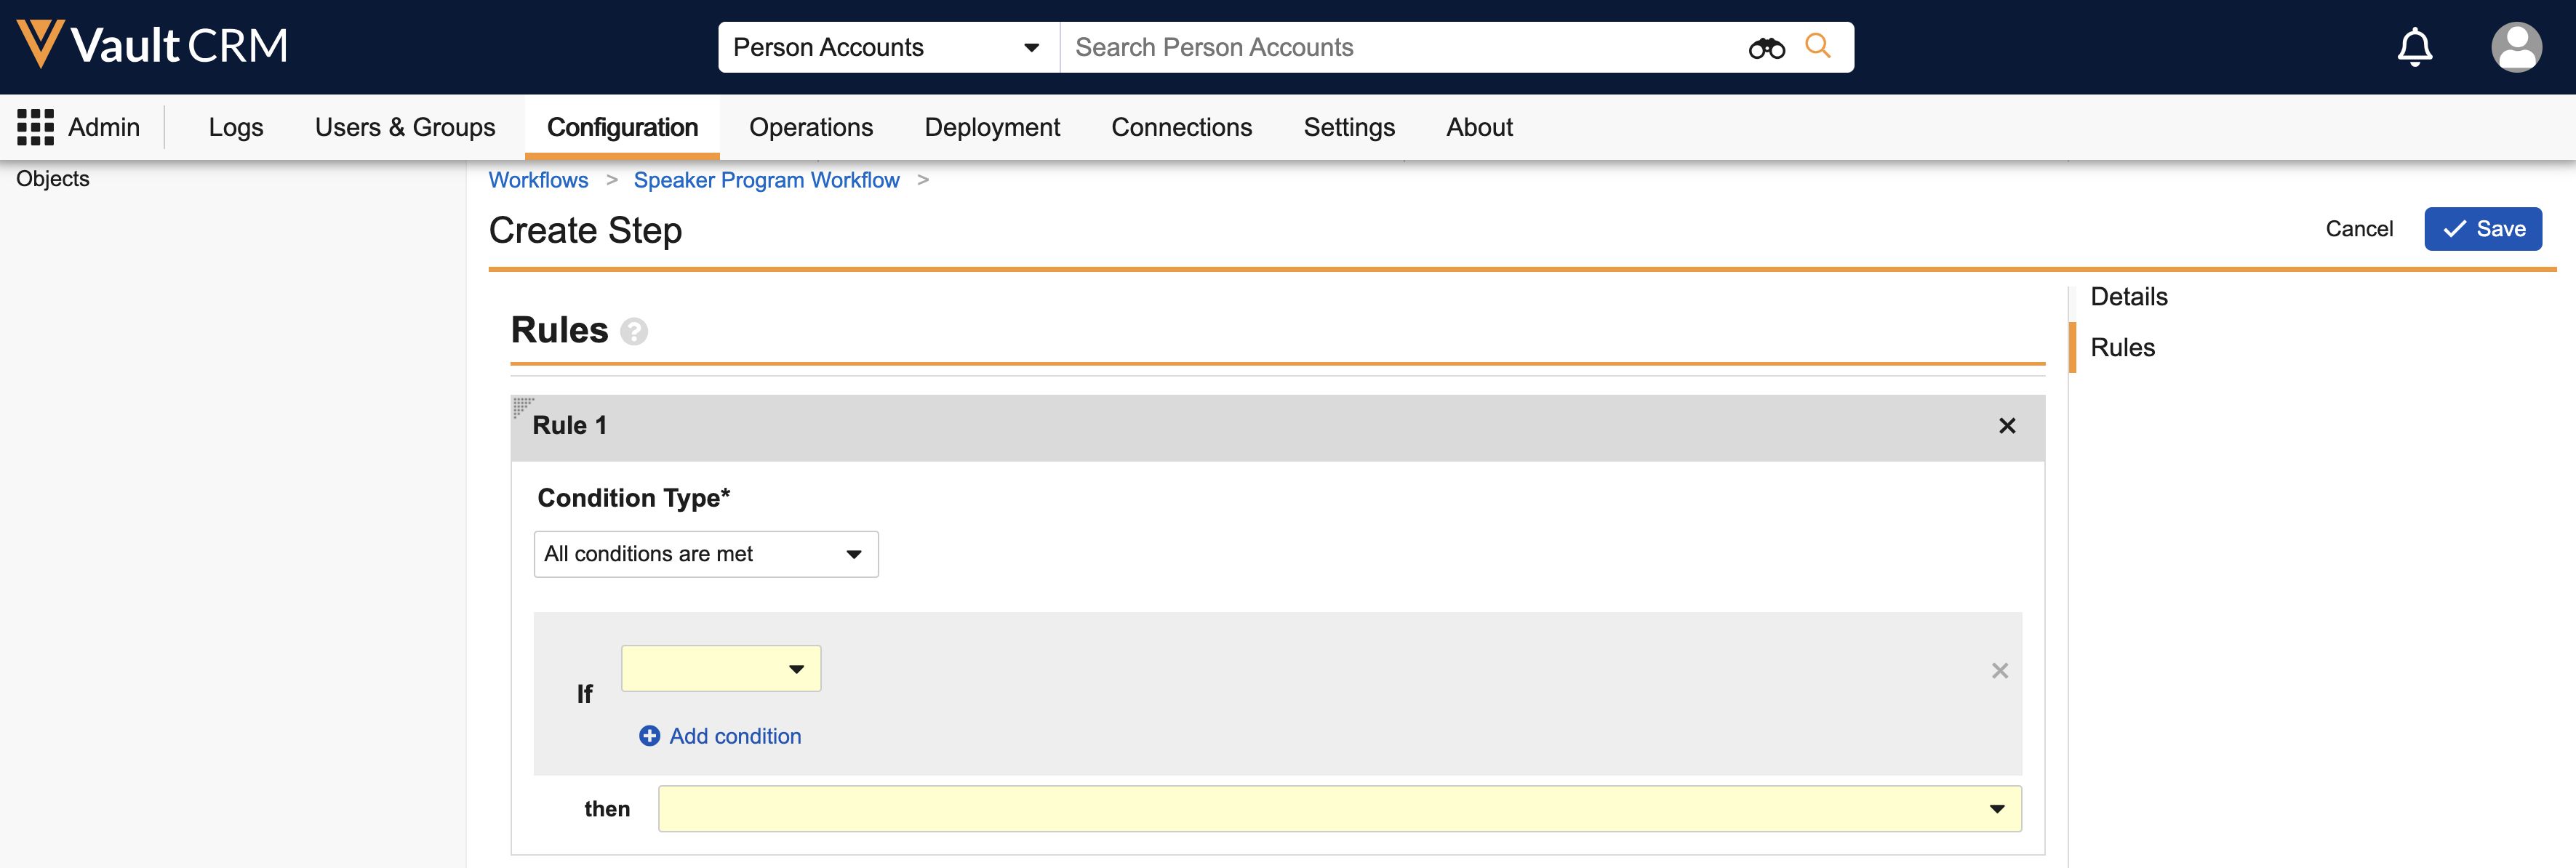
To define a Decision's rules:
-
Select the + Create Rule button in the Rules section of the Step.
-
Select the appropriate If criteria. Available values are:
- Field – Evaluates the rule based on one or more fields from the event
- Task – Evaluates the rule based on the verdict of a related Workflow Task
- Select the appropriate field or task.
- Select the appropriate condition. Available values are dependent on the selected field or task.
-
Use the then picklist to select or create the next step that occurs if the rule evaluates as true.
-
Select the + Create Rule button to create additional rules as needed. Rules are checked in the order they display in the Rules section, so business admin users should ensure rules are ordered correctly.
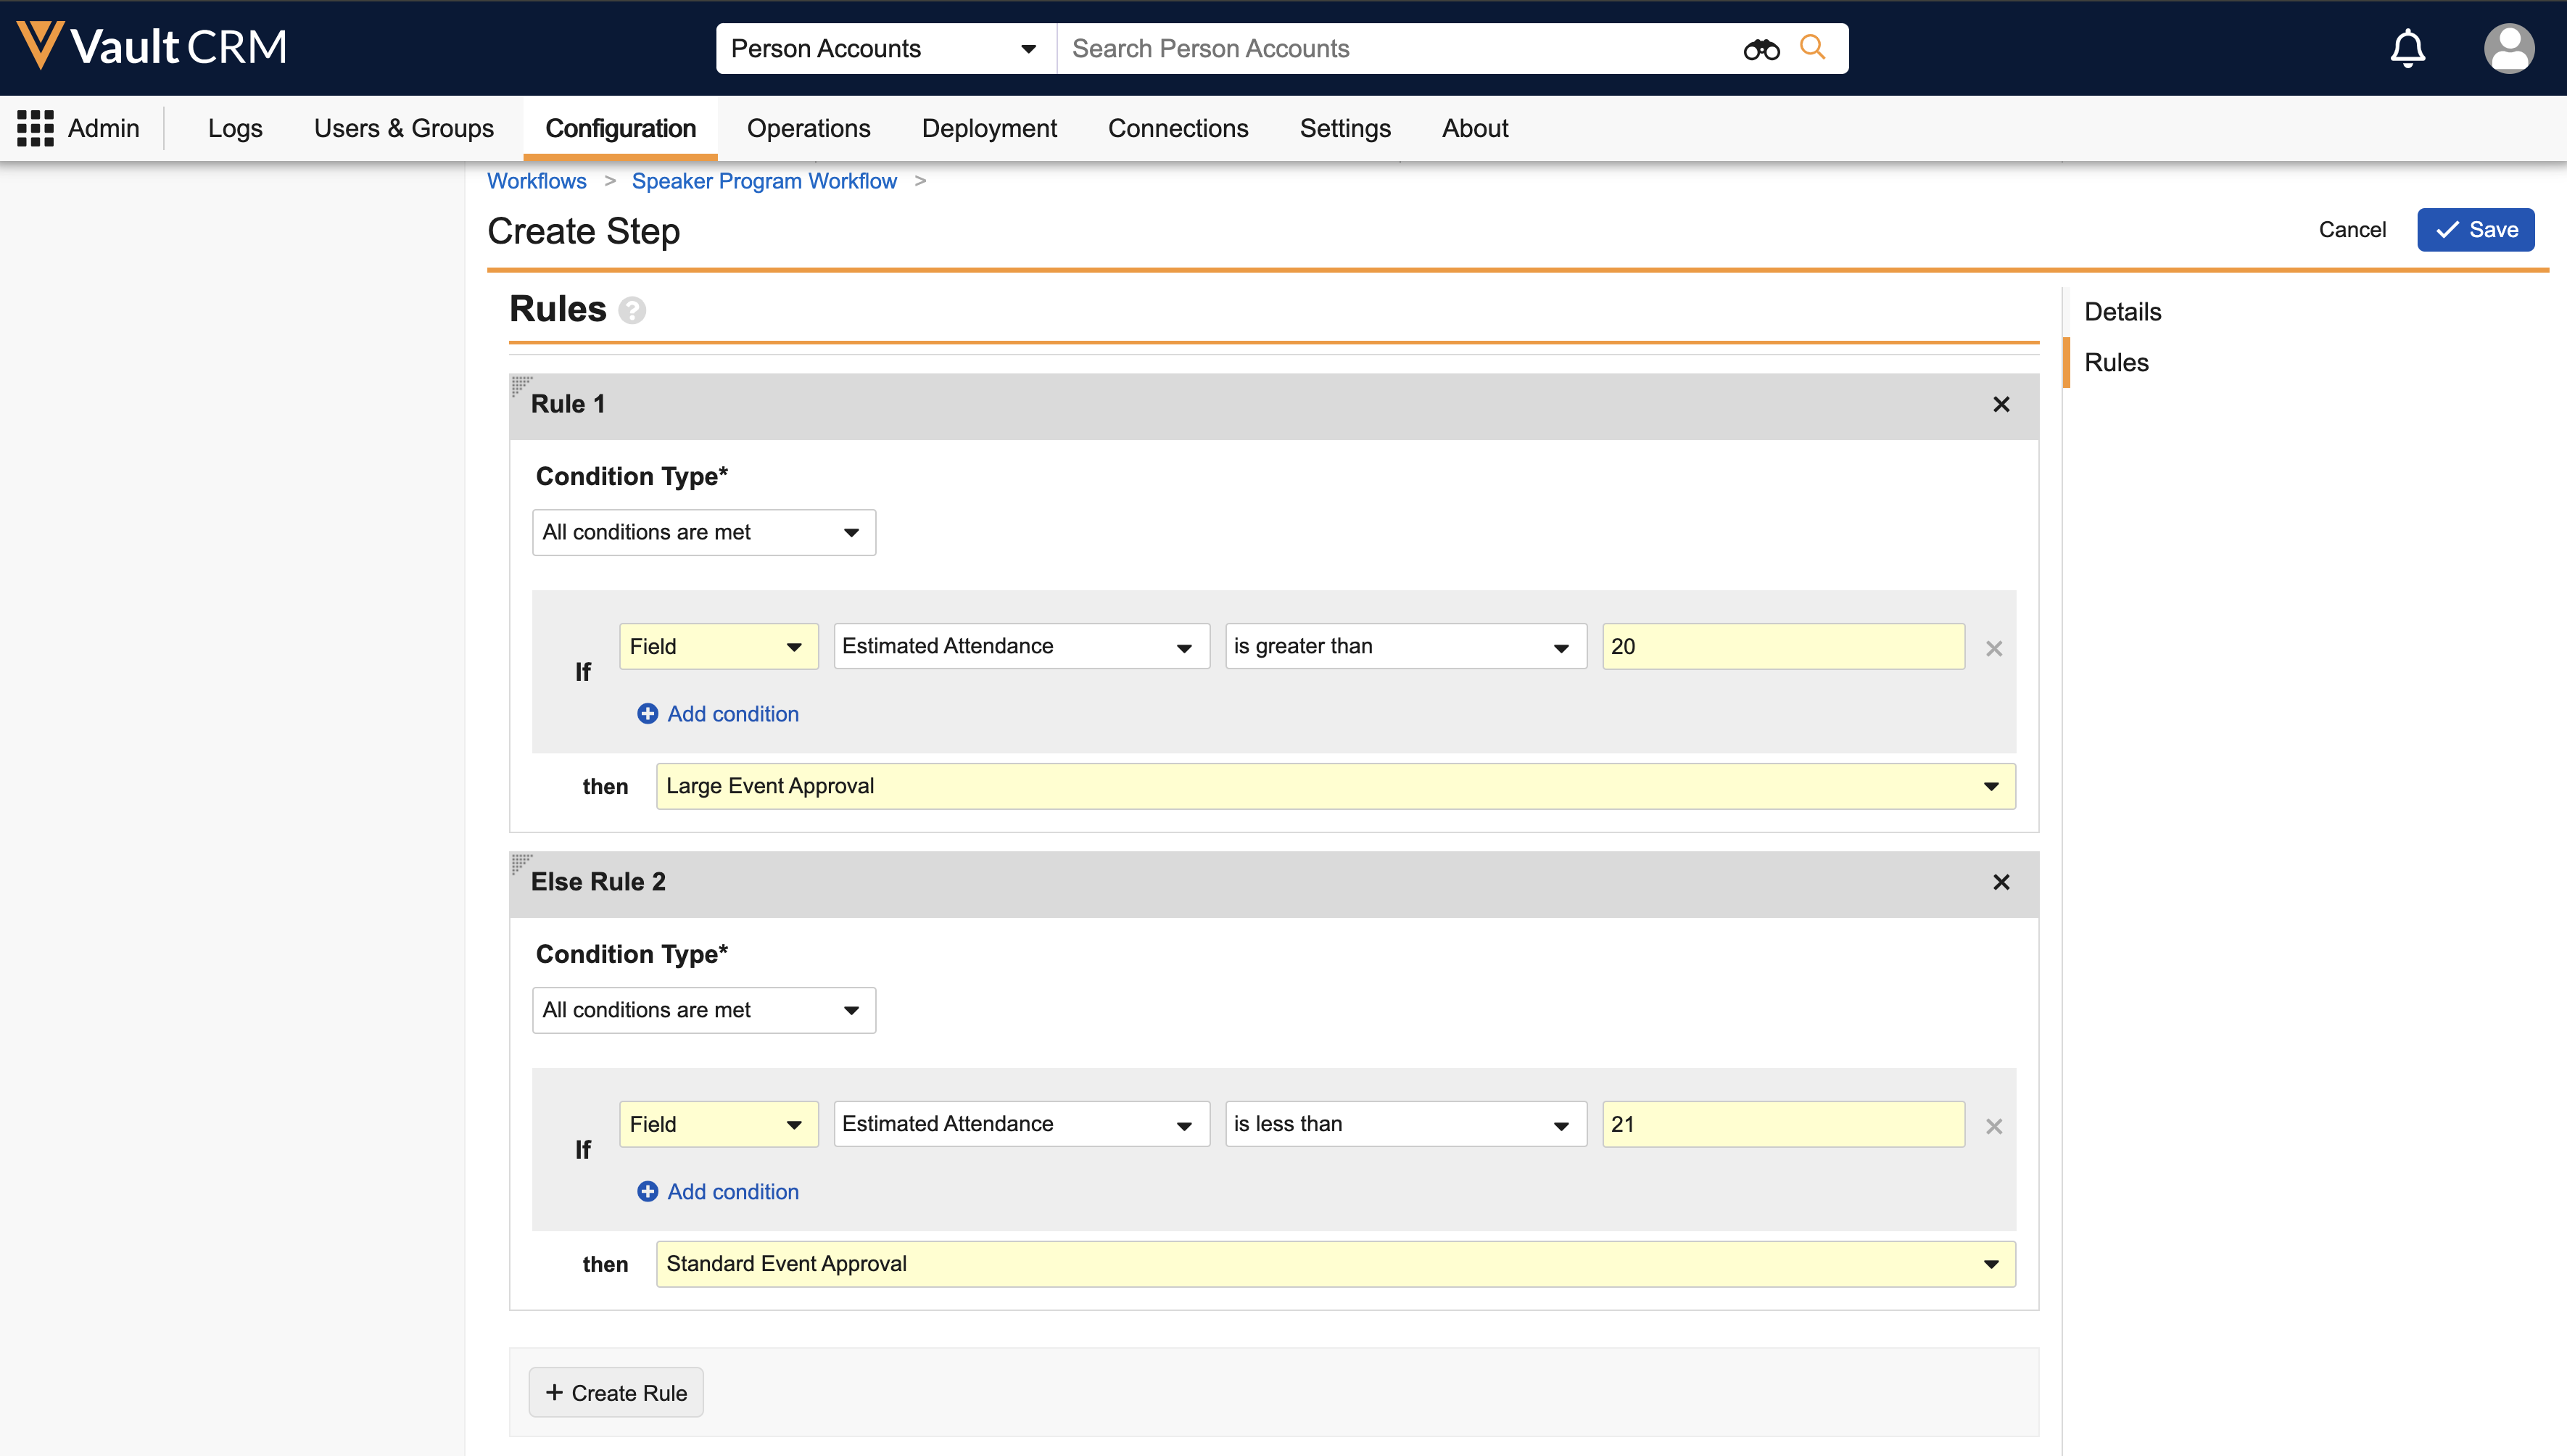
- Select Entry Criteria Not Met in the final Else rule. See Creating the Entry Criteria Not Met System Action for more information.
- Select Save.
Creating Workflow Tasks
Workflow Tasks are actionable items assigned to a user or group that must be completed in order to progress the event to the next step of the Workflow.
Two distinct types of task can be created for event approval processes:
- Tasks for an approver, for example, approving or rejecting an event
- Tasks for the event owner to select participants
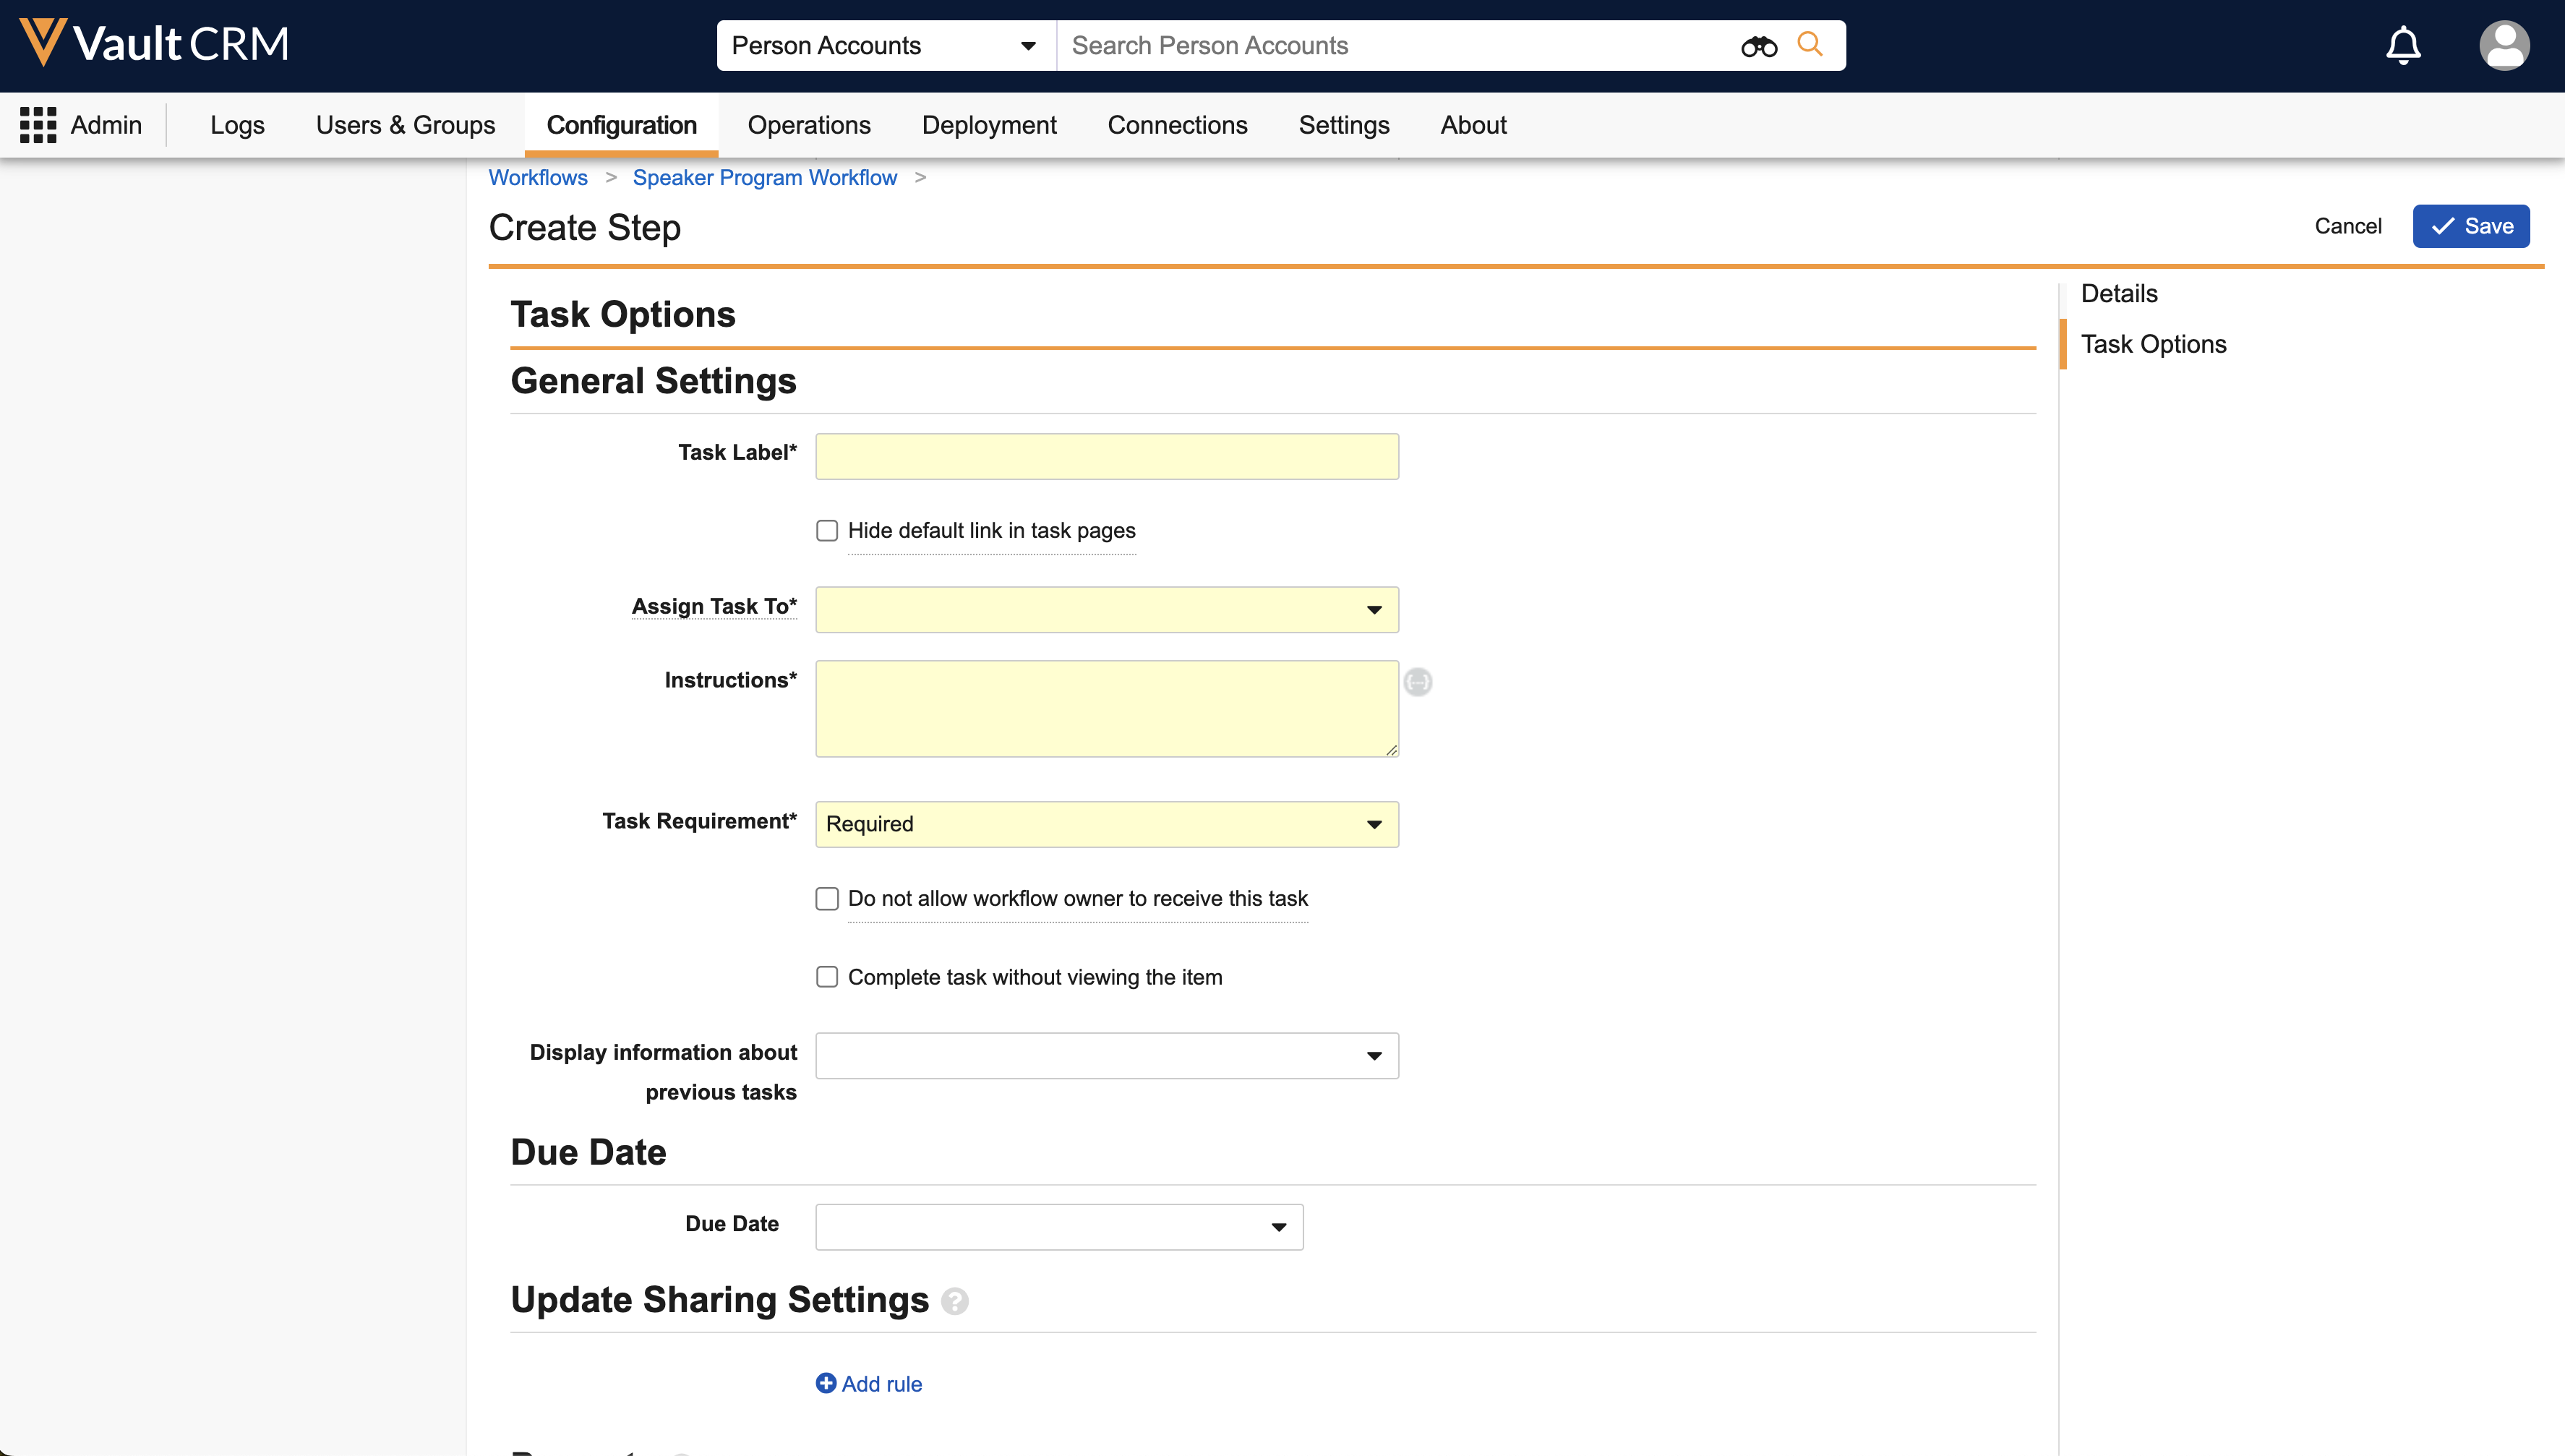
To define a Workflow Task for approvers:
-
Navigate to the Task Options section of the step.
-
Populate the following fields:
- Task Label – The name of the task as it displays to assignees
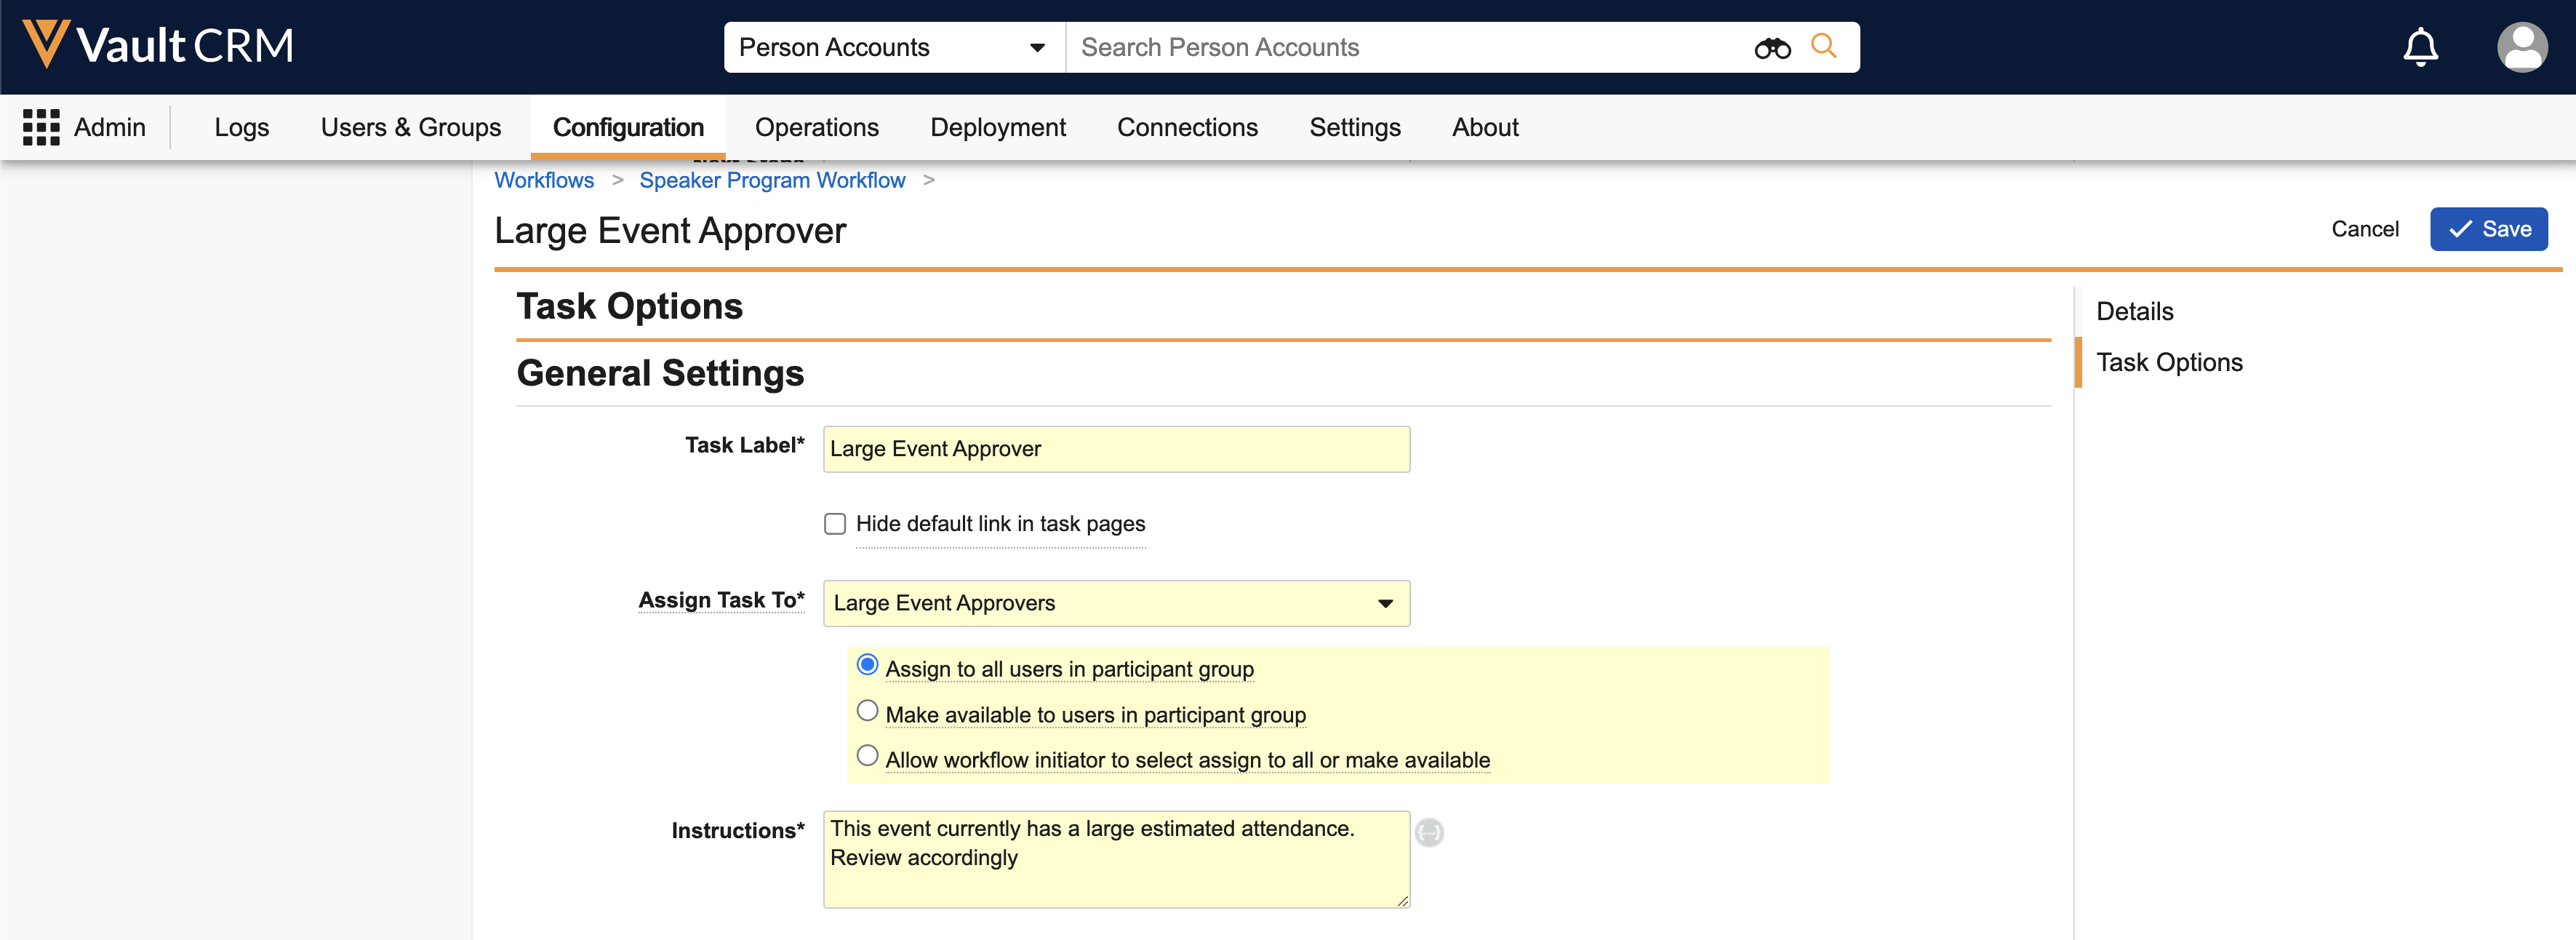
- Assign Task To – Select the appropriate participant group, then select the appropriate Task Assignment option. If the task is able to be assigned to a Vault Group, the following Task Assignment options are available:
-
Assign to all users in a participant group – Every user in the Vault Group is assigned the task. All users in the group must complete the task in order for the Workflow to proceed.
-
Make available to users in participant group – An Accept Task banner displays for every user in the Vault Group. A user in the Vault Group must first accept the task, then complete the task in order for the Workflow to proceed.
Business admin users can also utilize Short-Circuiting Workflow Tasks to enable a single user in a Vault Group to immediately complete the assigned task.
This is the recommended option for tasks assigned to the following Start Steps:
- Allow workflow initiator to select participants
- Allow workflow task owners to select participants
- Use Vault user group as participants
- Instructions – Enter instructions guiding assignees on how to evaluate and complete the task
-
Task Requirement – Select Required
- Due Date – Enables defining a due date for the assigned task. See Due Dates for more information on the different types of due date calculations
- Prompts – The following types of prompts are supported:
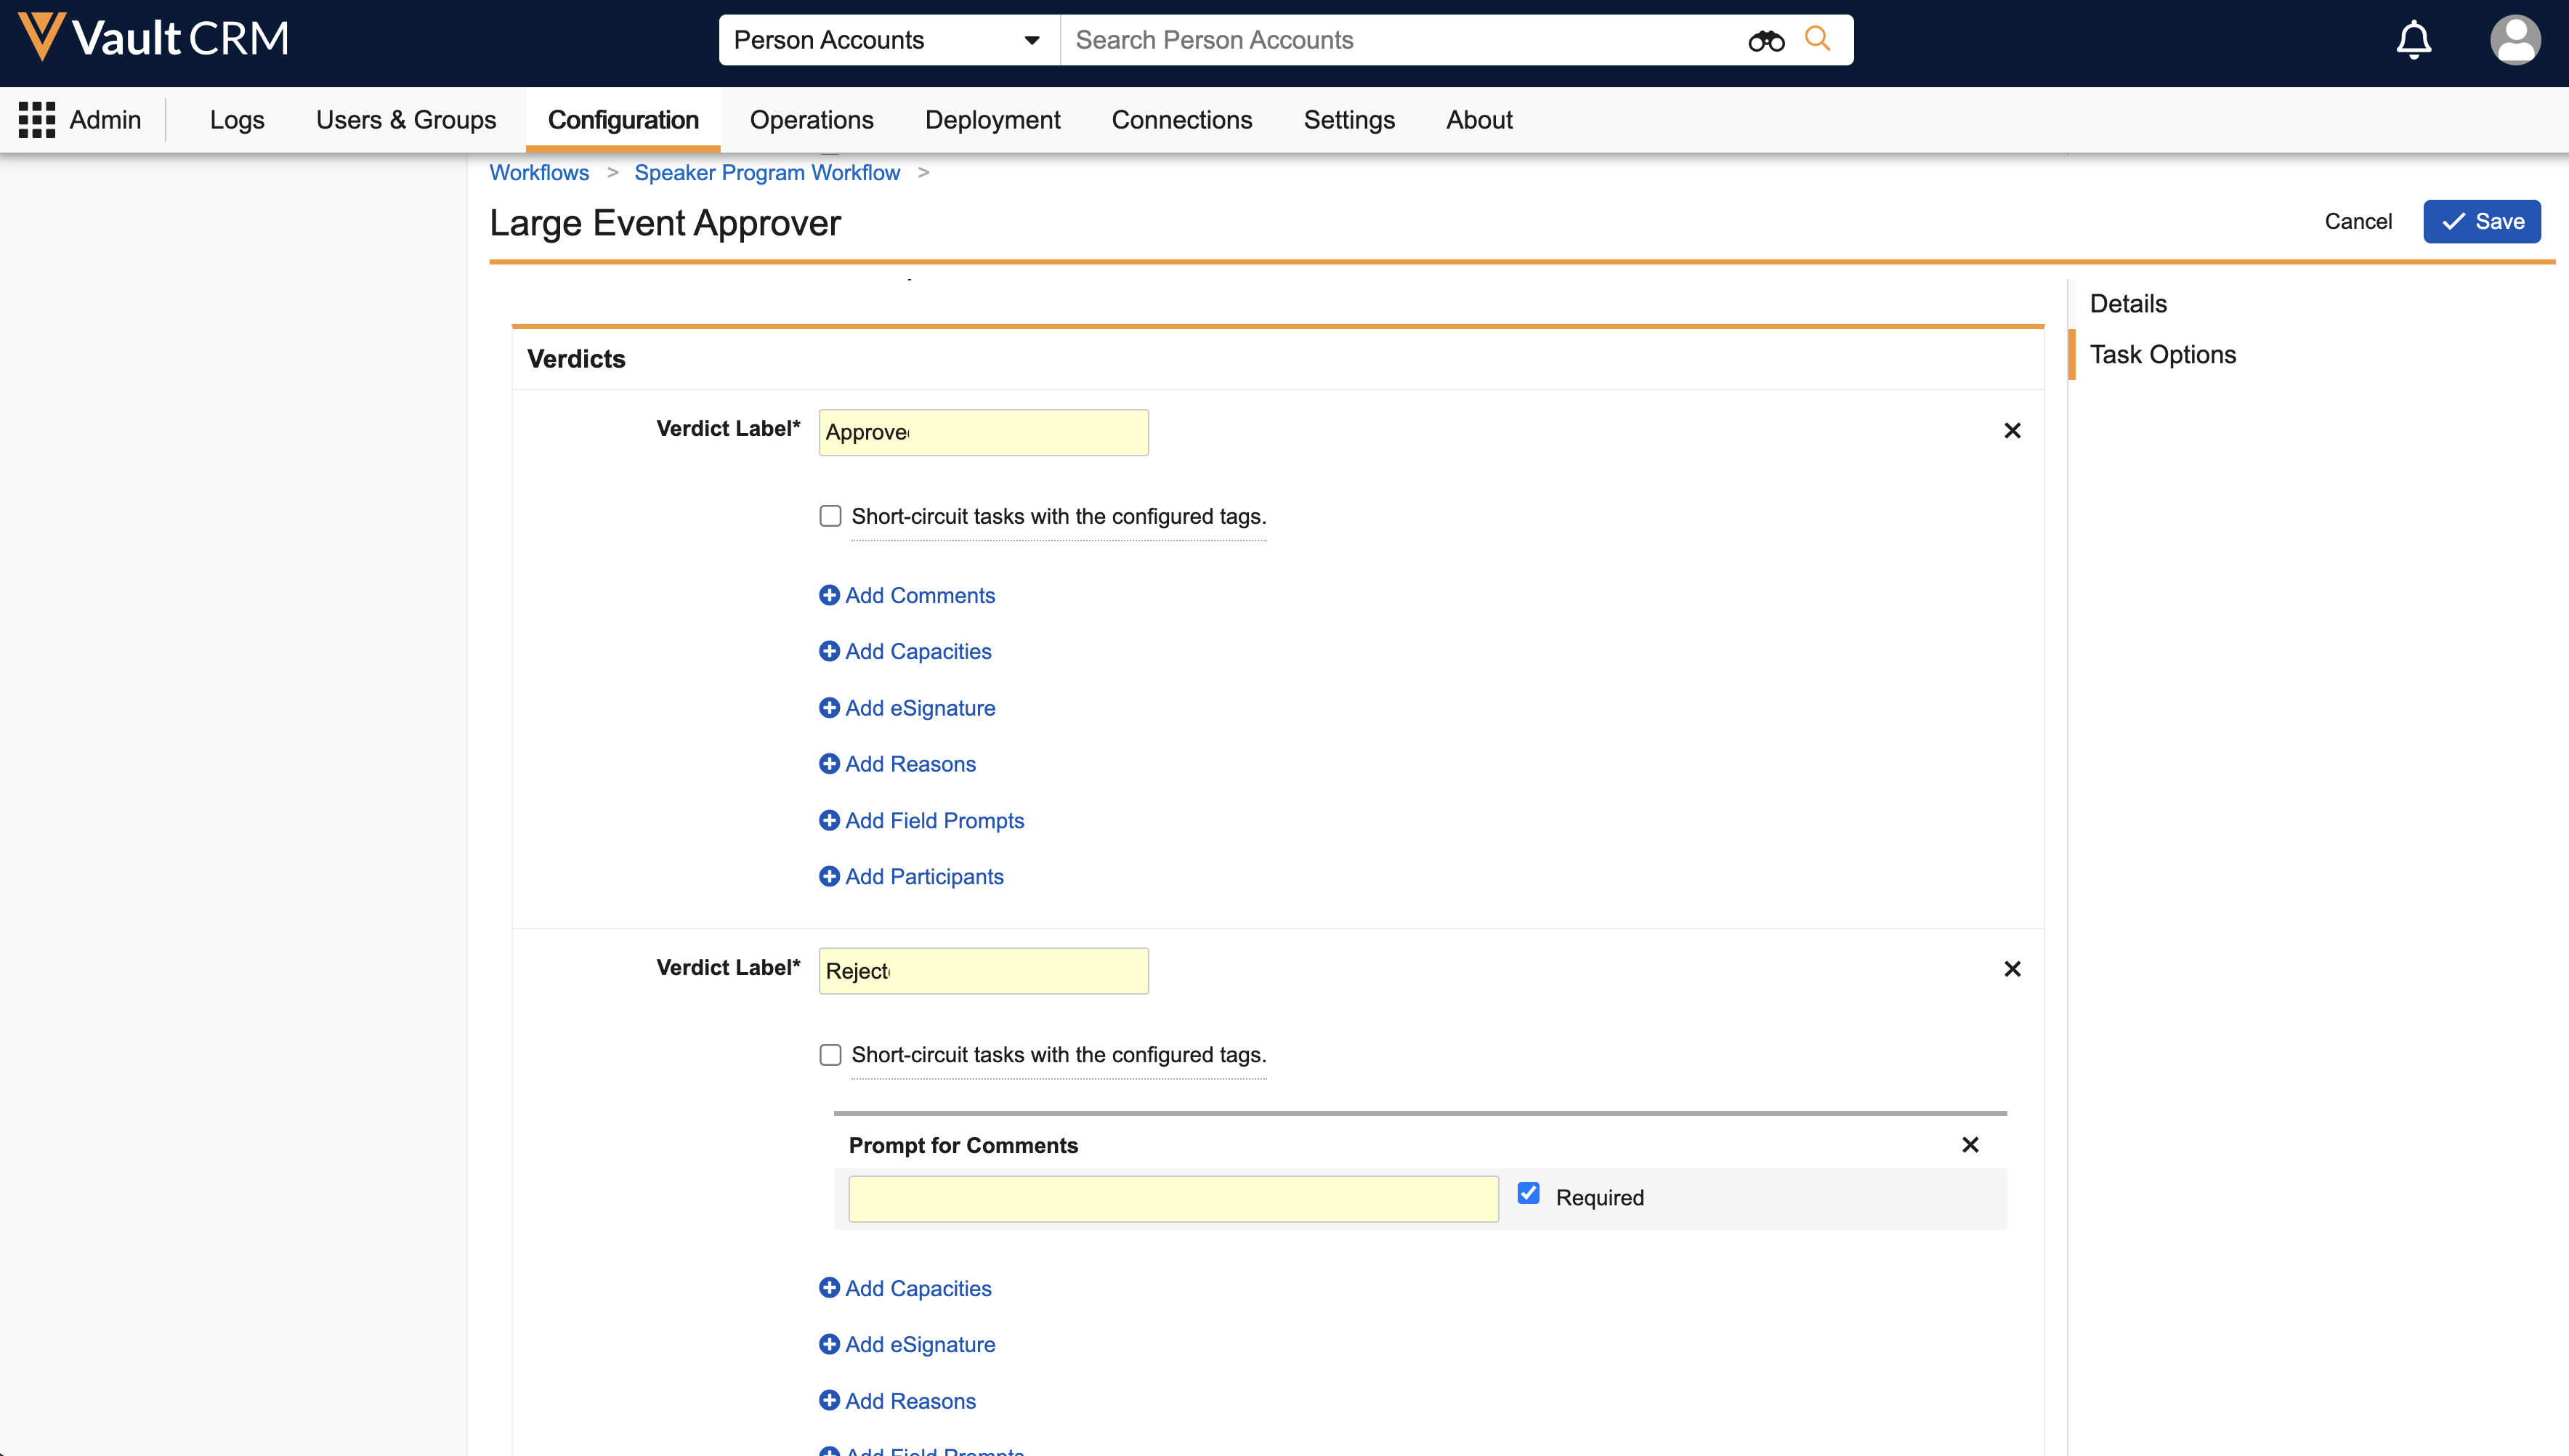
- Prompt for Comments – Enables assignees to provide comments when closing a task. Business admins can also select the Required checkbox to make comments required.
-
Prompt for Verdicts – Enables a picklist of defined outcomes when closing a task, for example, Approved or Rejected. Task verdicts determine subsequent steps in the Workflow by creating a Decisions as the next step. See How to Set Up Verdicts for more information.
Only Add Comments for specific verdicts is supported. Add Capacities, Add eSignature, Add Reasons, and Add Field Prompts are not supported.
- Custom Action – Select Create Event Team Member and Event History from the picklist
Sharing Rules are not supported when creating Tasks.
- Select Save.
To define a Workflow Task for event owners:
- Navigate to the Task Options section of the step.
-
Populate the following fields:
- Task Label – The name of the task as it displays to assignees
- Assign Task To – Select Workflow Owner
- Instructions – Enter instructions guiding event owners on how to complete the task
- Task Requirement – Select Required
- Due Date – Enables defining a due date for the assigned task. See Due Dates for more information on the different types of due date calculations
- Prompts – Select the Prompt for Workflow Participants checkbox
-
Participant Controls – Select the appropriate Participant. Only Participants with the Allow workflow task owners to select participants option selected display in the picklist.

- Custom Action – Select Create Workflow Task Event History from the picklist
Sharing Rules are not supported when creating Tasks.
- Select Save.
Creating Workflow Notifications
Business admin users can create Notification steps that inform specific users or groups via email when a certain step in the Workflow is reached.
To define a Workflow Notification:
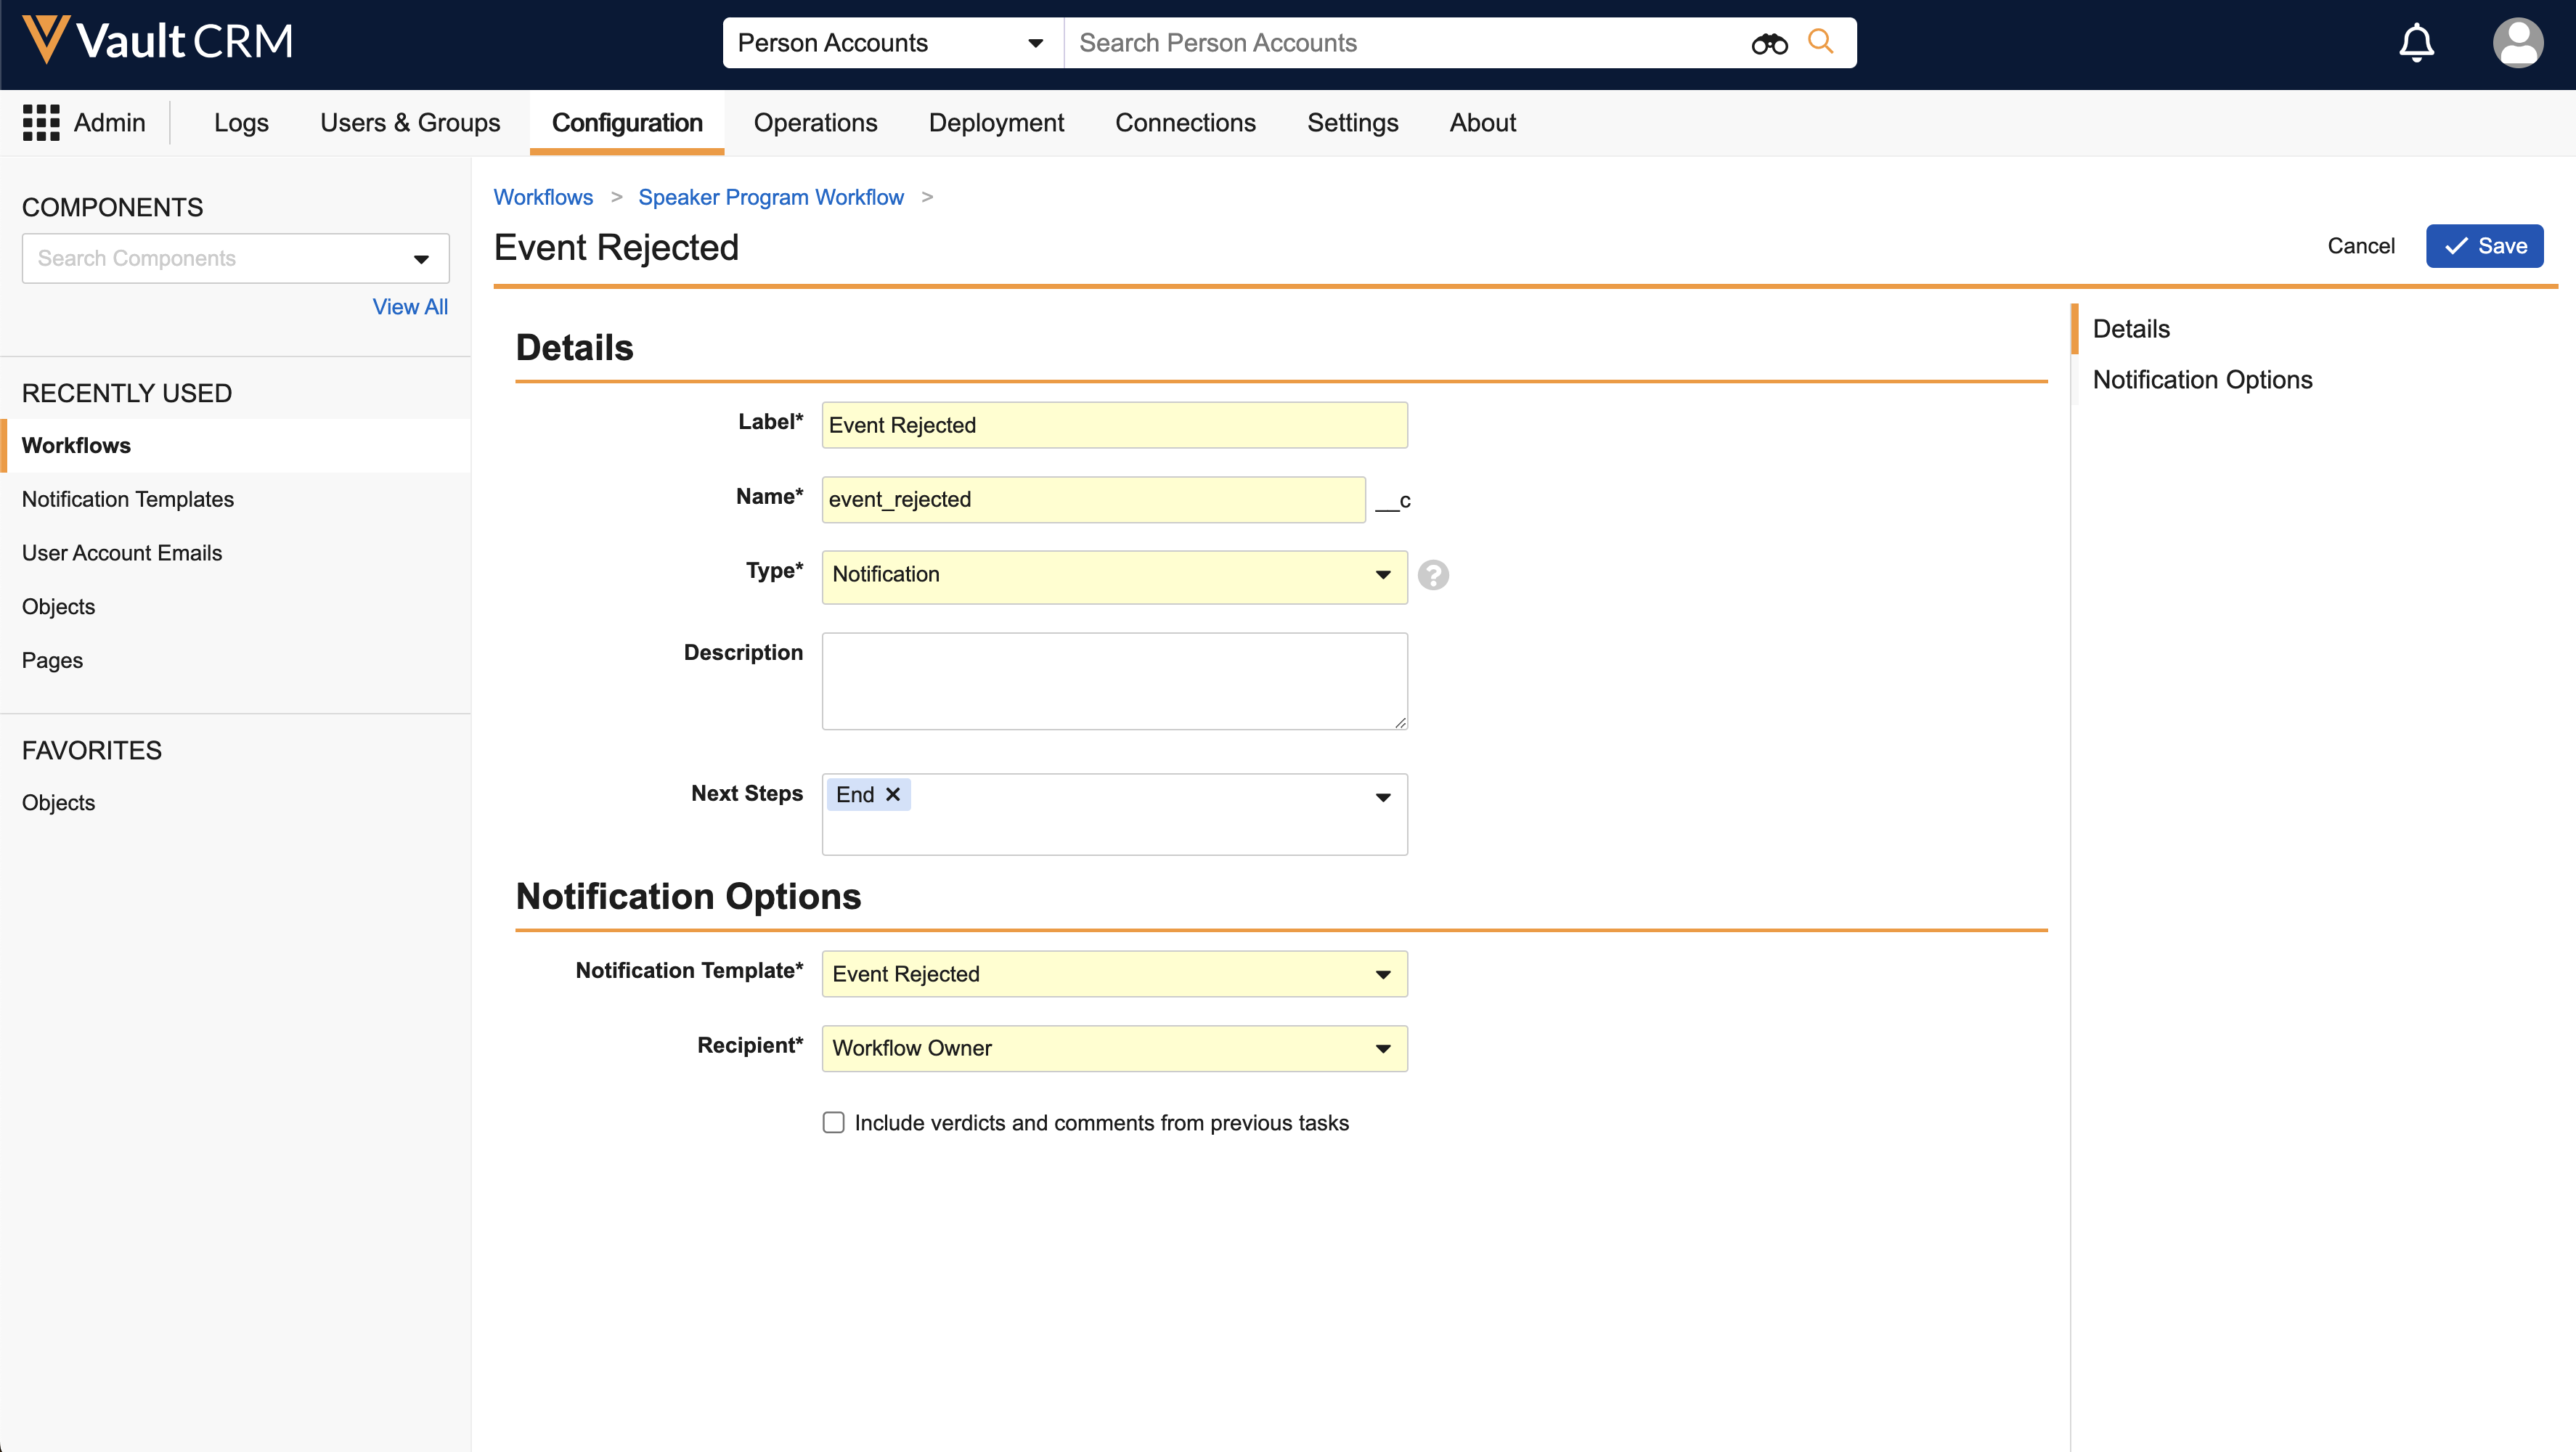
- Navigate to the Notification Options section:
-
Populate the following fields:
- Notification Template – Select the appropriate template. See Creating New Messages for more information on creating notification templates.
- Recipient – Select the appropriate recipient. For example, the Workflow Owner.
- Select Save.
Creating the Cancellation Action
Cancellation Actions are separate Workflow actions that interrupt and exit the Workflow. In Events Management, the Cancellation Action functions as recalling a request for approval, enabling end users to make subsequent edits to an event.
To create a Cancellation Action:
- Select the Create button in the Cancellation Actions section of the Workflow.
-
Select the Create Rule button.

-
Populate the following fields:
- Condition Type = Always
- Performs Actions = Update field
- Fields = Event Status
- Set to value = ‘requested__v’
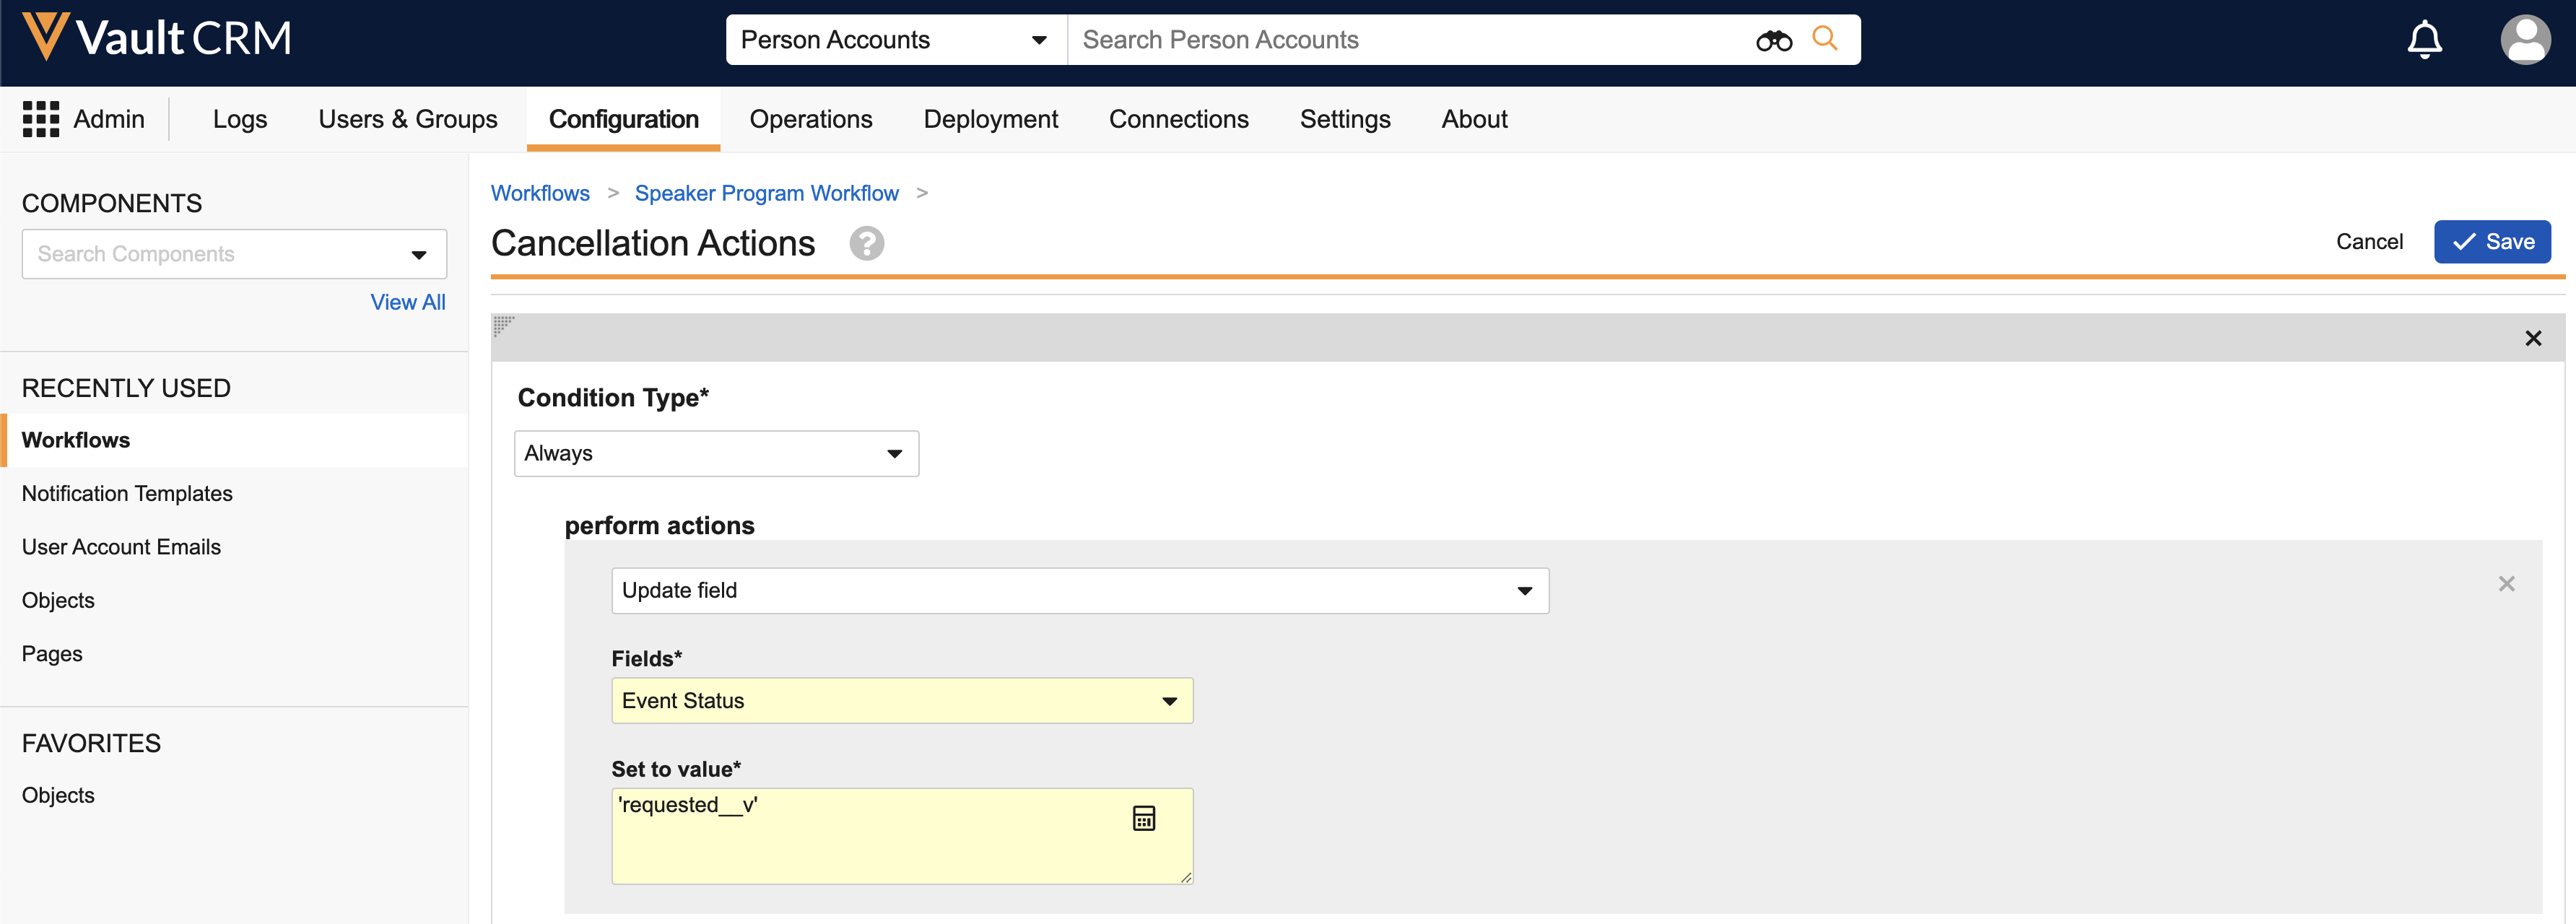
- Select Save.
See Cancellation Actions for more information.
Configuring Object Workflows for Delegate Approvers
To configure an Object Workflow to support Delegate Approvers:
-
Ensure one of the following supported Add Participants options is selected when defining Participant Controls:
- Allow workflow initiator to select participants
- Allow workflow task owners to select participants
- Use user reference field as participant – Ensure Delegated Approver ID is added as one of the reference fields

-
Ensure Make available to users in participant group is selected for the Assign Task To field for the appropriate Workflow Tasks.

Delegates are not supported when the participant control uses a group and when a group is selected as an approver. Delegates are not supported if the Workflow Task is configured as Assign to all users in a participant group.
Editing Event Actions to Initiate Object Workflows
Once created, Object Workflows must be referenced by the appropriate em_event_action__v records. When end users select an Event Action that is associated with an Object Workflow, the approval process as defined by the workflow initiates.
When using an Object Workflow, the event's status is set by the Object Workflow, not the Event Action.
Populate the following fields on the appropriate em_event_action__v records:
- button_name__v – Select the appropriate button name
- vault_workflow__v – Select the appropriate Object Workflow associated with the em_event_lifecycle__v lifecycle
- ending_status__v – Select Vault Workflow
- action_type__v – The following values are available:
- Submit for Approval – Initiates the Object Workflow
- Recall Approval Request – Cancels the Workflow via a Cancellation Action
-
entry_criteria_not_met_message__v – Select or create the appropriate message__v record that displays to users if Object Workflow entry criteria are not met
Ensure the message__v record's name contains only alphanumeric and underscore characters.
The following table is an example of two Event Actions created to interact with Workflows, one for initiating the Workflow, and one for initiating the Workflow’s Cancellation Action.
|
Field |
Submit for Approval Action |
Recall Approval Request Action |
|---|---|---|
|
button_name__v |
Submit for Approval |
Recall Approval Request |
|
vault_workflow__v |
Speaker Program Workflow |
n/a |
|
ending_status__v |
Vault Workflow |
|
|
action_type__v |
Submit for Approval |
Recall Approval Request |
|
entry_criteria_not_met_message__v |
Approval_Criteria_Error;;Example |
n/a |
Initiating Object Workflows as
End users can initiate an Object Workflow by selecting the configured Event Action from the event's All Actions menu.
If the Workflow’s initial step is a task prompting for Workflow Participants, end users are immediately assigned a task to select the approver to assign the next stage of review.
Reviewing Events for Approval
When approvers are assigned a task to review an event, a banner displays on the em_event__v record informing users of the pending task.
Approvers can select the Complete button on the banner to complete the task, including providing any comments or verdicts, depending on how the task was created.
If Delegate Approvers are configured for the assigned approver, they are added to the event as an em_event_team_member__v record with the same role as the approver. The Delegate Approver can Accept and Complete the task on behalf of the assigned approver.

Users can view the designated delegate approver on the em_event_history__v record in the delegate_approver_participant__v field, and the next approver in the next_approver_participant__v field.
End users can initiate approval processes using Object Workflows by selecting the configured Event Action, for example the Submit for Approval button, from the event's All Actions menu.
If the Workflow’s initial step is a task prompting for Workflow Participants, end users are prompted to immediately select the approver to assign the next stage of review.
If anything interrupts this process prior to the end user selecting Submit for Approval, for example a loss of internet connection or the device running out of battery, end users can restart this task when they view the event again by selecting the Select Approver button in the All Actions menu.
Although initiating Object Workflows is supported on the iPad, all stages of review and approval are only supported on the Browser platform.

