Managing Patient Adherence Check-Ins
To efficiently manage and scale support programs, users can utilize the Adherence module to track patient journeys and conduct check-ins. This ensures consistent outreach, improves adherence rates, and provides a structured method for Patient Educators to plan and document interactions.
Who can use this feature?
- End Users - Browser
- Using Patient Adherence Check-Ins
- Users require a Patient CRM License
Configuring Patient Adherence for
To configure this feature:
- Ensure Configuring Patient CRM is complete.
- Navigate to Admin > Users & Groups > Permission Sets.
- Select the appropriate permission set.
- Select the Objects tab.
-
Grant the following permissions:
Object Object Permission Object Types Fields Field Permission Adherence (adherence__v) CRED All All Edit Check-In Activity (check_in_activity__v) CRED All All Edit Check-in Detail (check_in_detail__v) CRED All All Edit Patient Journey (patient_journey__v) RE All - adherence_cadence_timeframe__v
- number_of_cadence_timeframes__v
Edit - Navigate to Admin > Configuration > Objects > patient_journey__v > Layouts.
-
Place the following fields on the appropriate layouts:
- adherence_cadence_timeframe__v
- number_of_cadence_timeframes__v
- Navigate to Admin > Configuration > Application Profiles.
- Create a new application profile named Adherence Tab.
- Navigate to Admin > Users & Groups.
- Add the Adherence Tab application profile to all appropriate users.
- Navigate to Business Admin > Objects > Console Application Settings.
- Select Create.
- Select Patient Center as the object type.
- Select Next.
-
Populate the following fields:
- Name - Adherence
- console_tab_access__v - Adherence
- console_application_profile__v - Adherence Tab
- Select Save.
-
Ensure the customized adherence workflow has the following criteria set as required:
- Patient Educator is required on the Care Team
- Patient Journey cadence fields are marked as required
Using Patient Adherence Check-Ins as
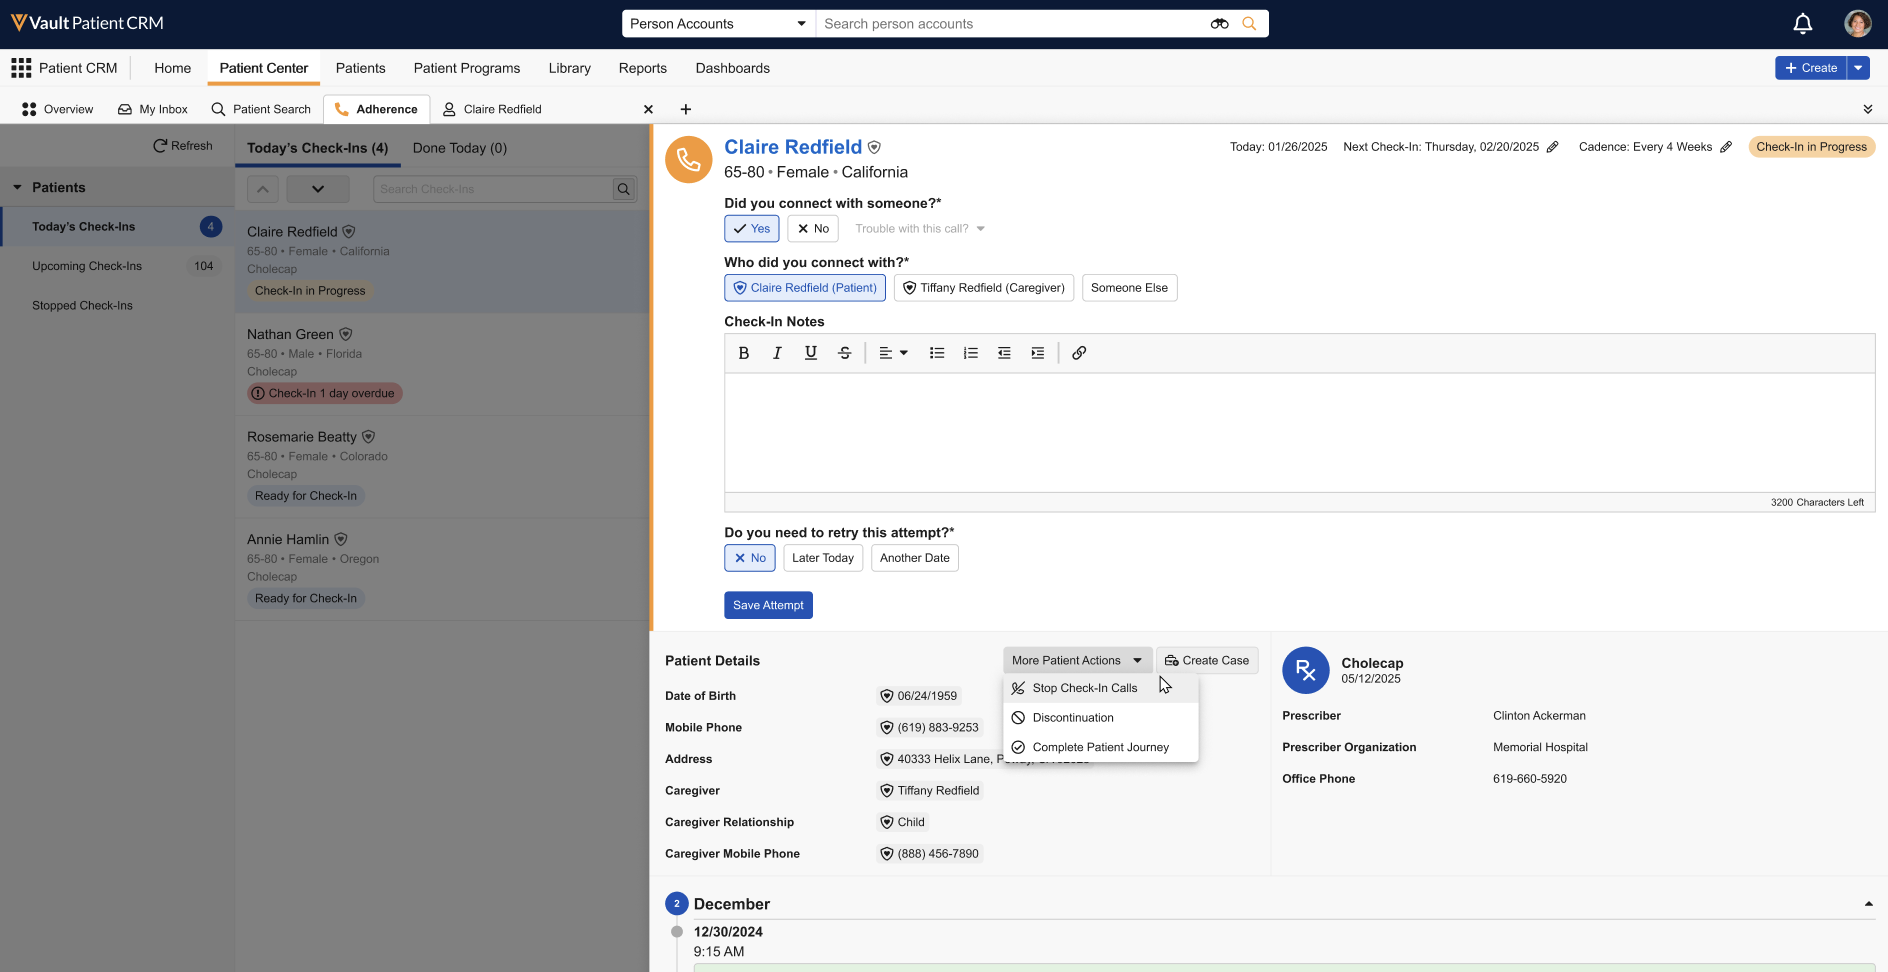
Users can view scheduled check-ins, conduct calls, and manage patient journey adherence directly from the Patient Center.
The patient card on the Adherence tab only displays to the user responsible for check-ins.
When patients are enrolled in check-in calls, an Adherence section displays in the appropriate Patient Journey sub-tab on the Patient Detail page.
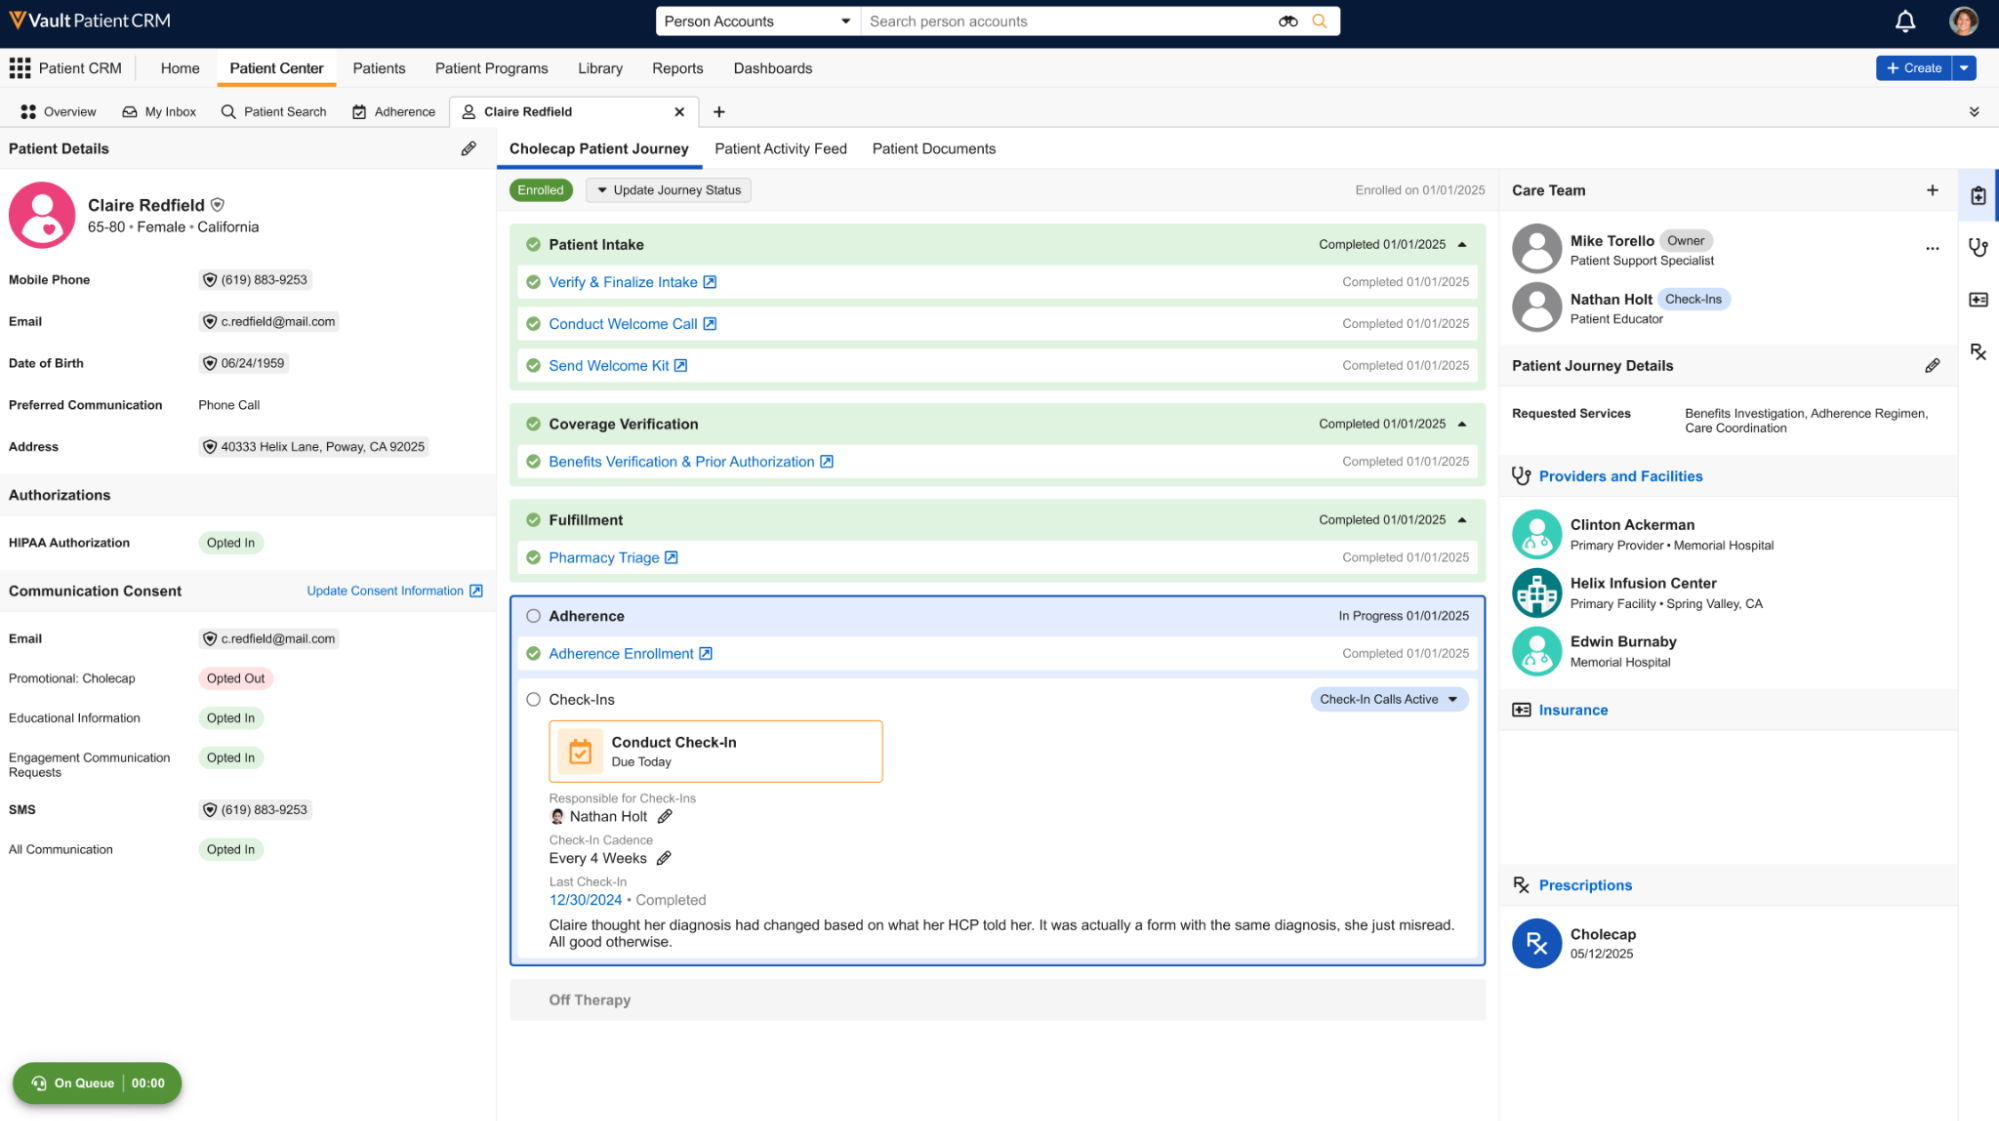
Within this section, end users can perform the following actions:
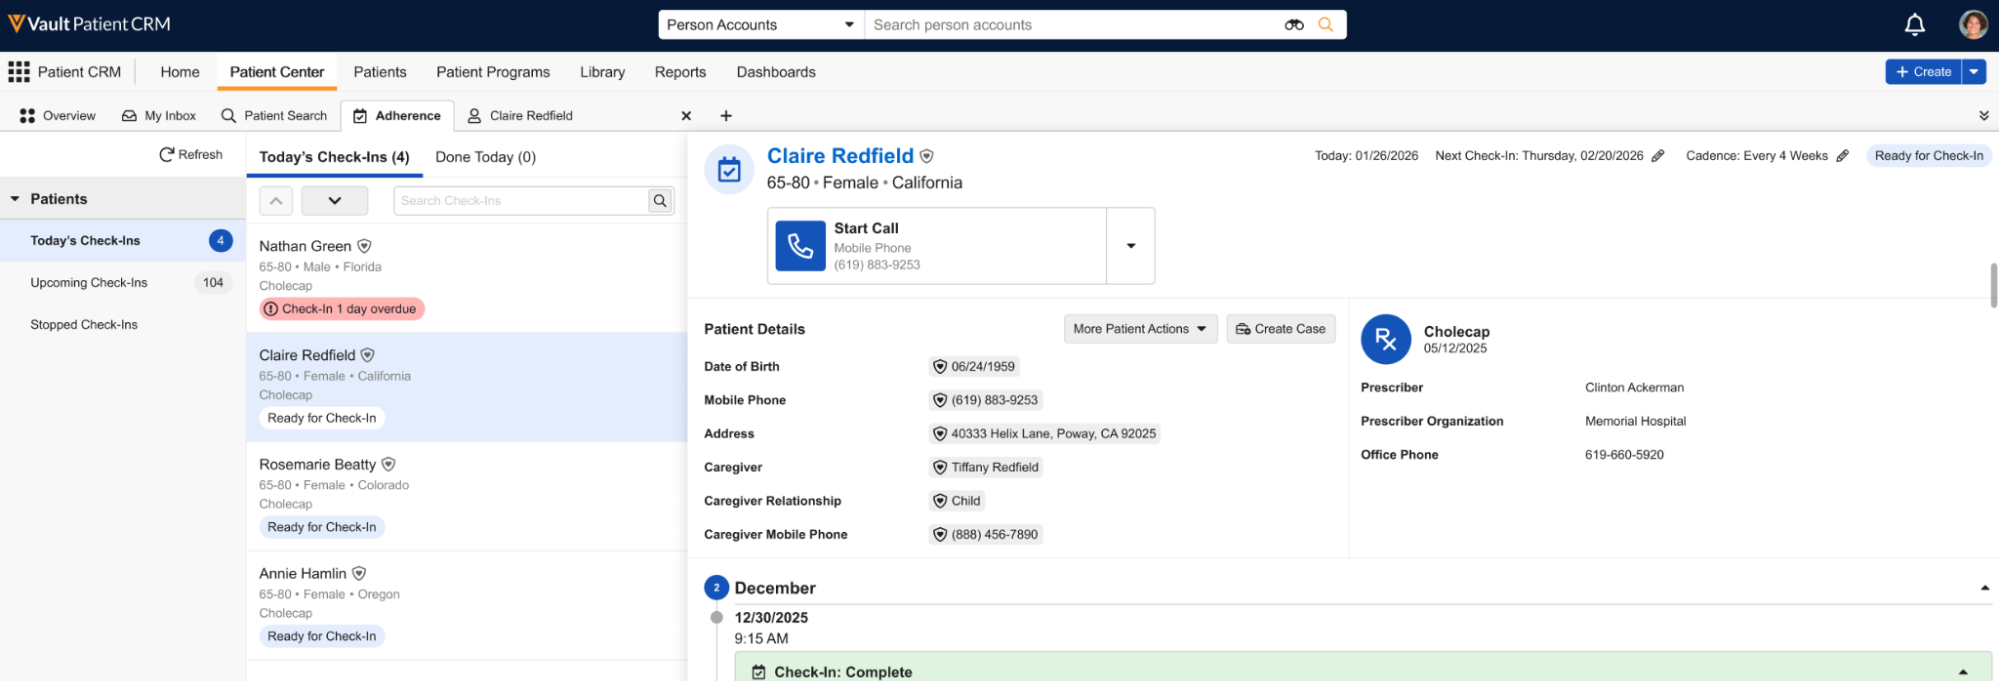
- Update the user responsible for check-ins – Select the Pencil icon in the Responsible for Check-Ins section
- Update check-in cadence – Select the Pencil icon next to the Check-In Cadence section. See Modifying Check-In Cadence for more information.
- Stop or Restart check-ins – Select the appropriate option from the More Patient Actions menu. See Stopping and Restarting Check-Ins for more information.
- Initiate a check-in – Select the Conduct Check-In button. See Conducting a Check-In for more information.
Accessing Check-Ins
To access assigned check-ins, select the Adherence tab.
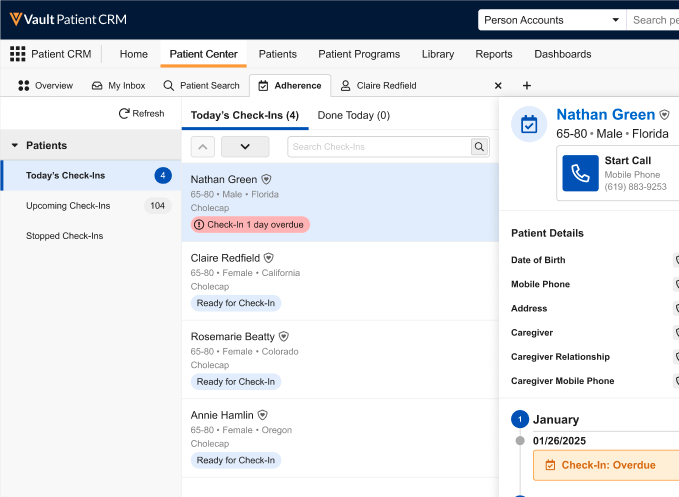
The following views are available:
- Today's Check-Ins – Displays tasks scheduled for the current date or overdue tasks
- Upcoming Check-Ins – Displays future scheduled interactions
- Stopped Check-Ins – Displays patients removed from the adherence program or patients whose associated Patient Journeys have been either discontinued or marked as complete
Conducting a Check-In
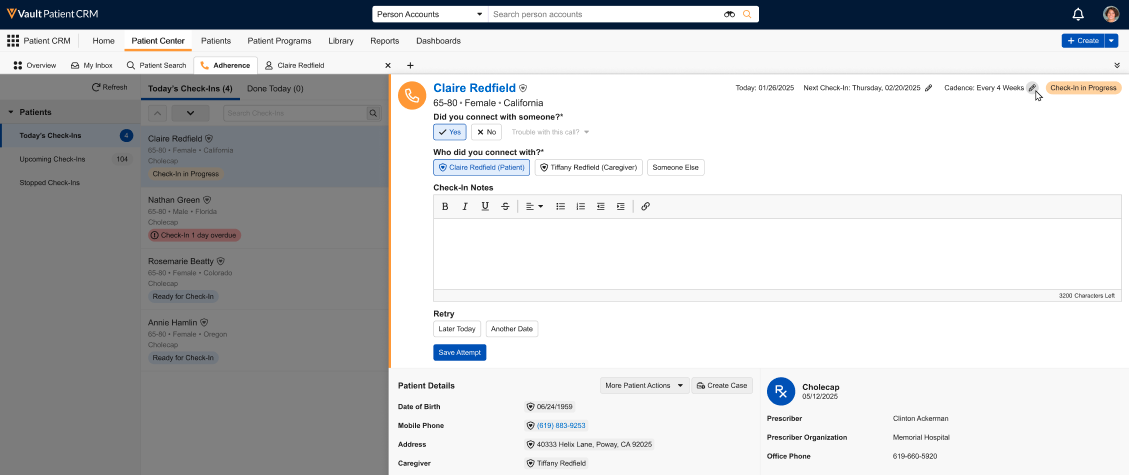
To perform a check-in call using a standalone phone or other form of external telephony:
-
Select the appropriate patient card from the Adherence tab.
- Select Start Call.
- Select Yes in the Did you connect with someone? Section.
- Select the appropriate patient or patient care team member contacted for the check-in.
-
Enter Check-In Notes to capture secure comments, if appropriate.
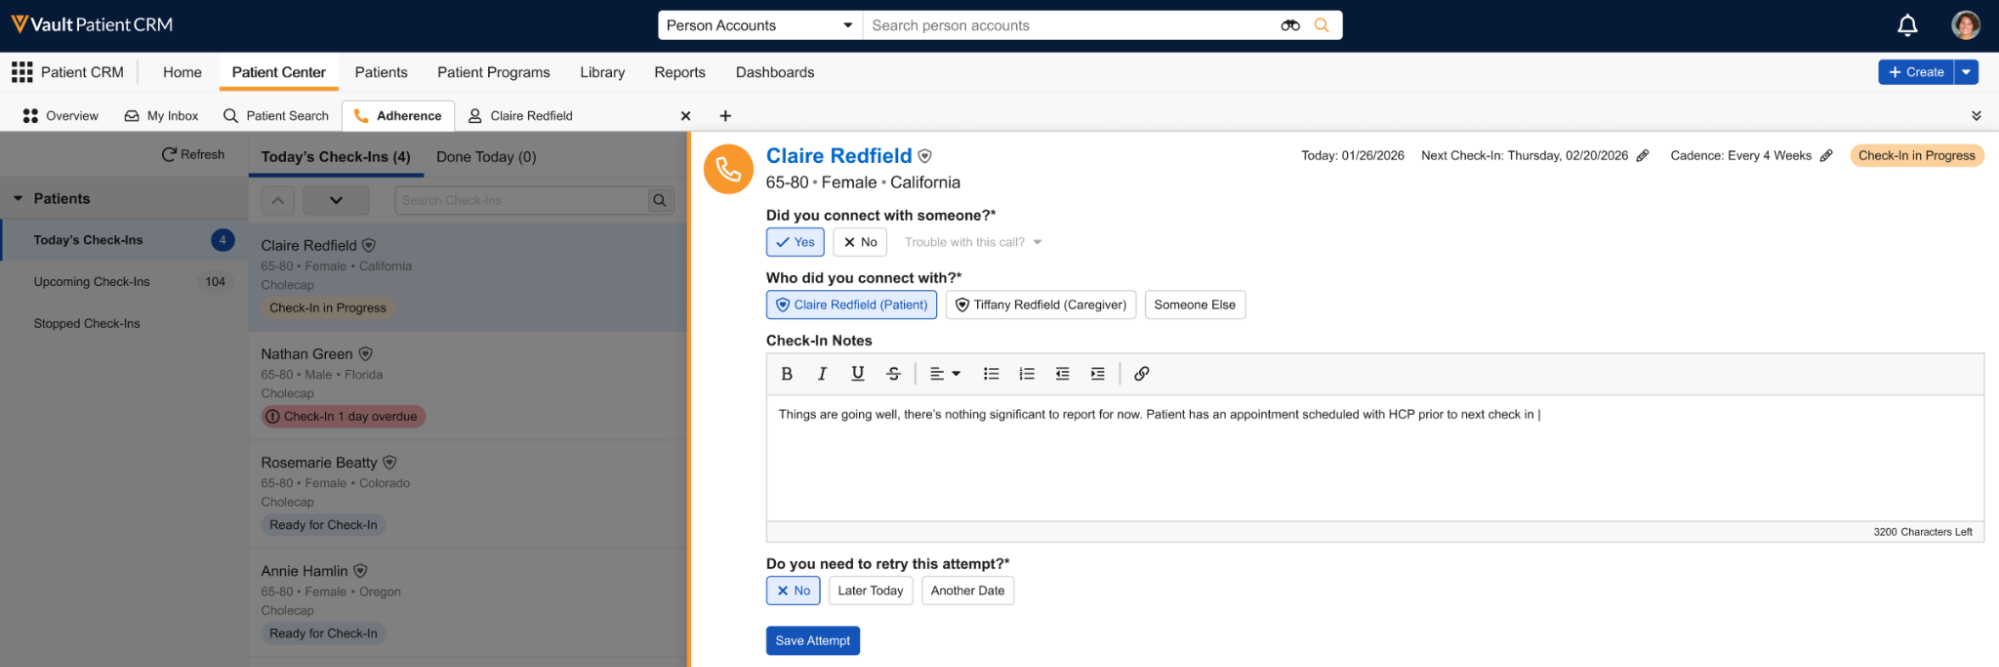
- Select Save Attempt.
Additionally, end users can quickly mark the check-in as complete from the patient card:
-
Select the drop-down menu next to the Start Call button in the patient card.
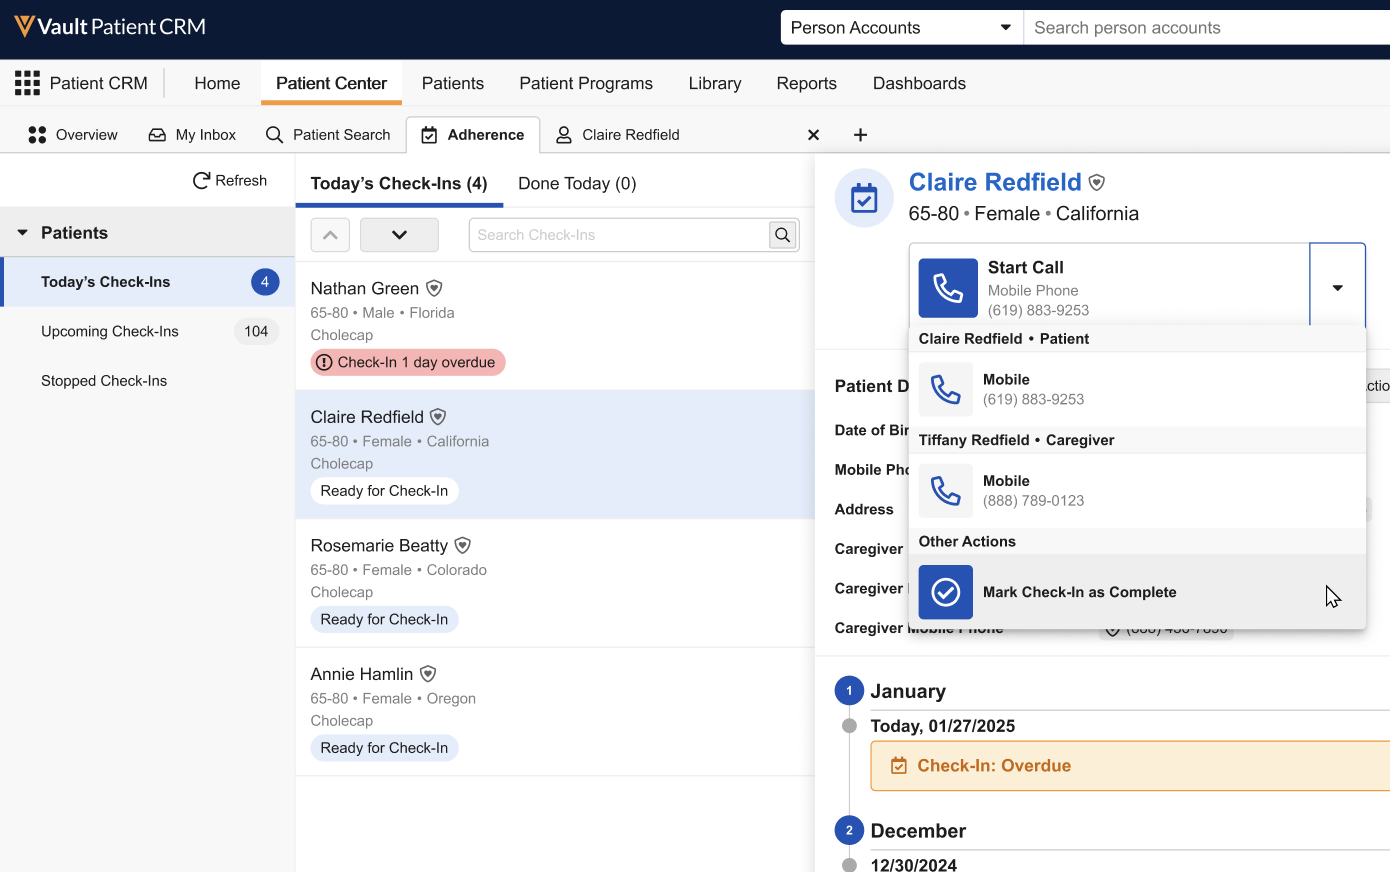
- Select Mark Check-In as Complete.
- Enter any check-in notes, if applicable.
- Select Continue.
Completed check-ins can be reviewed in the Done Today sub-tab.
Rescheduling Check-Ins
End users can also reschedule a check-in:
- Navigate to the appropriate patient card within the Adherence tab.
- Navigate to the Next Check-In section.
- Select the Pencil icon.
- Select the appropriate reschedule date.
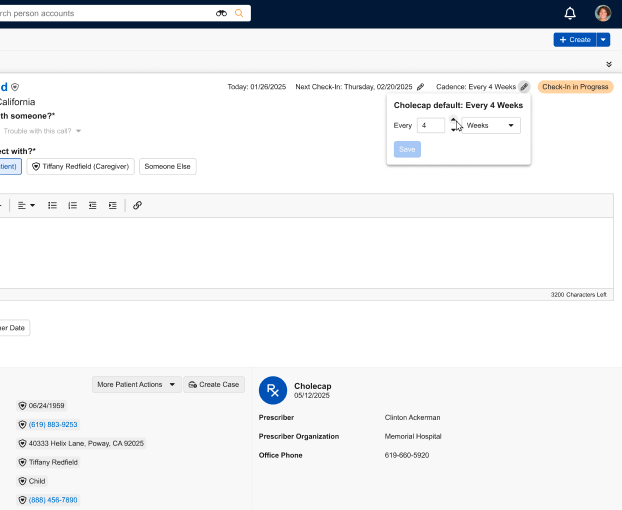
Modifying Check-In Cadence
End users can also define the default journey cadence for a specific patient:
- Navigate to the appropriate patient card within the Adherence tab.
-
Navigate to the Cadence section.
-
Select the Pencil icon.
-
Populate the appropriate timeframe and interval. Available timeframes are:
- Days
- Weeks
- Months
Stopping and Restarting Check-Ins
End users can stop check-ins for a patient by selecting Stop Check-In Calls from the More Patient Actions menu in the following locations:
-
The Patient Journey sub-tab of the appropriate Patient Detail
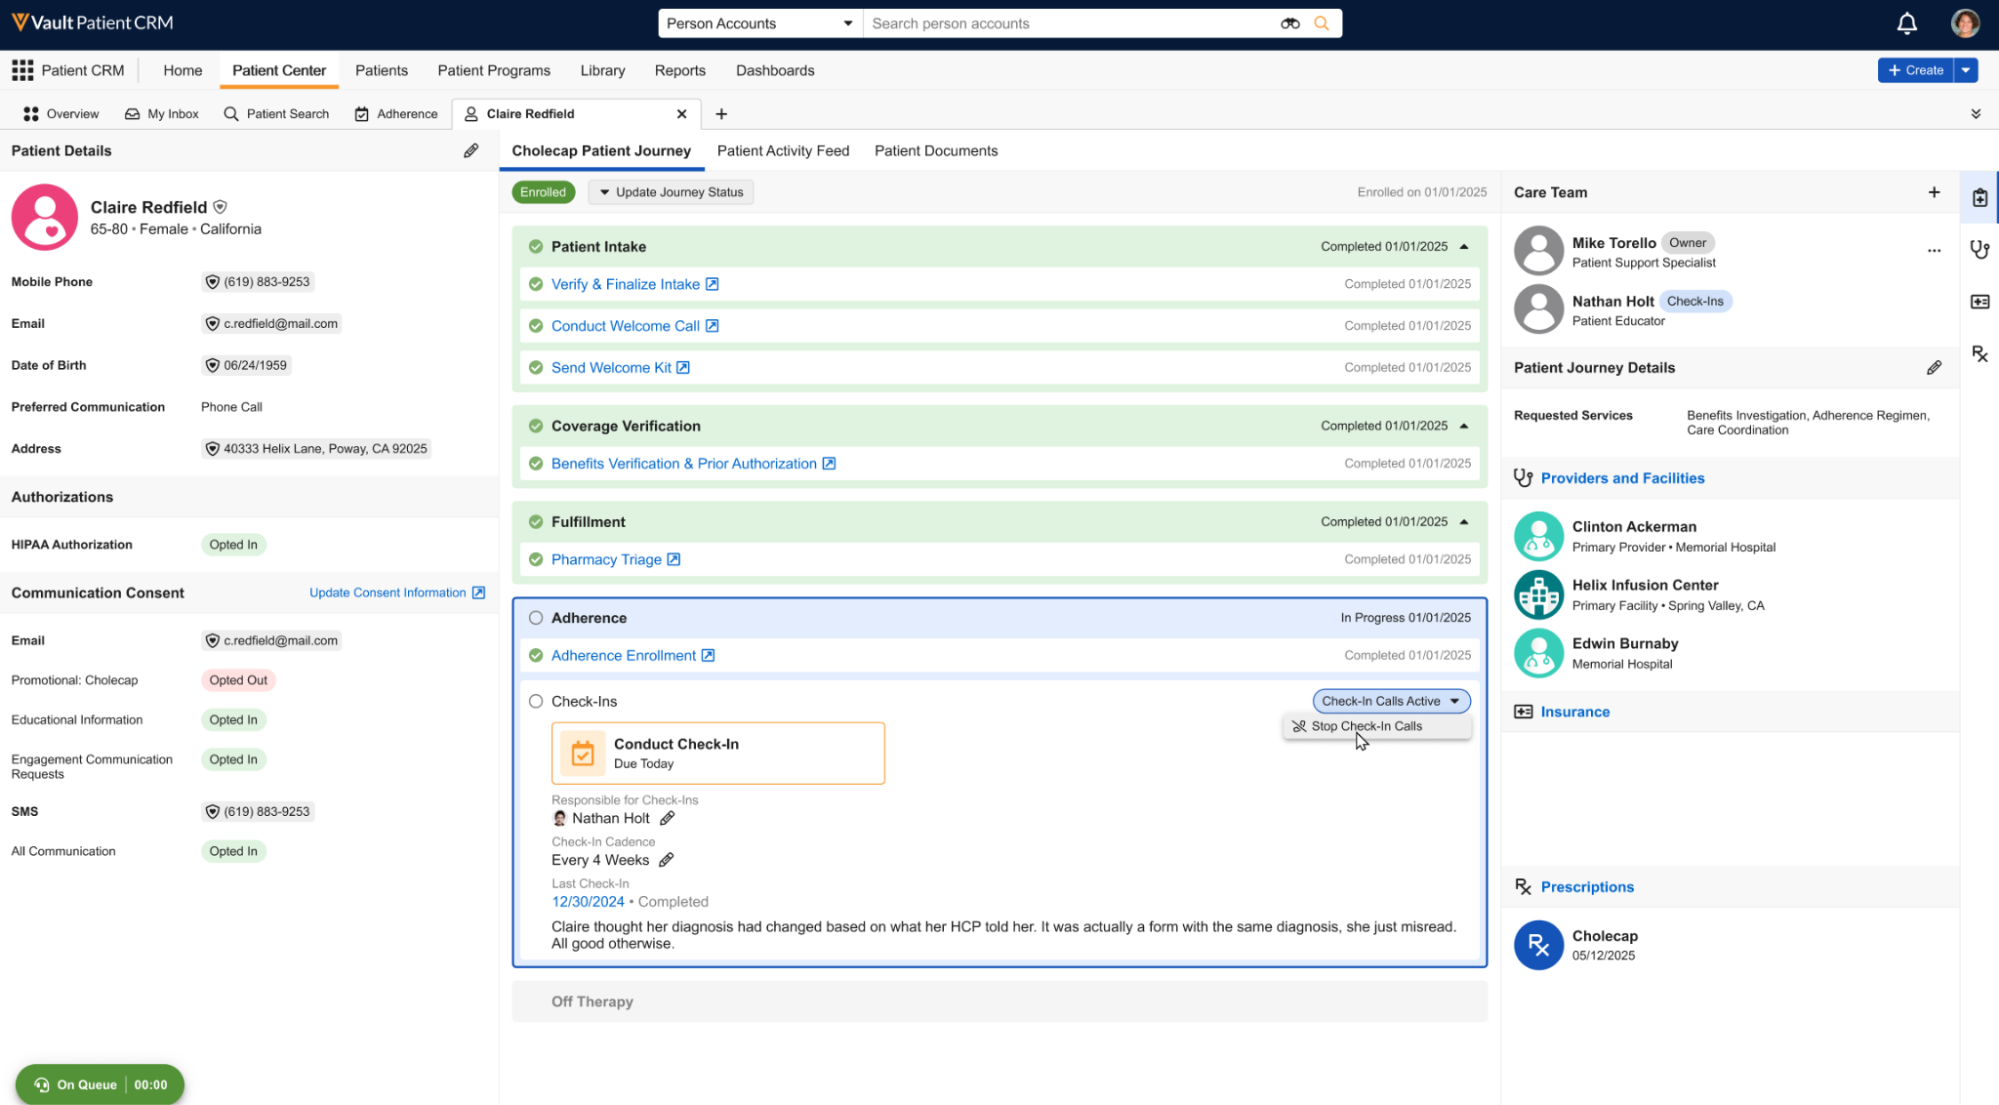
-
The patient card within the Adherence tab
Users can also restart stopped check-ins by selecting Restart Check-In Calls in the More Patient Actions menu from the same locations.

