Using Service Center
Service Center Representatives (SCRs) track customer issues by creating cases, entering case notes to provide details, and updating the case state to reflect the progress toward resolution. They can view a timeline of the entire case history, and comment on case notes and timeline entries. Service Center presents all of these details in a single screen to give SCRs the information they need to provide efficient contact resolution.
Service Center may also be integrated with telephone capability and Microsoft Teams integration:
- For information on managing phone calls within Service Center, refer to Using Veeva Omnichannel for Service Center
- For information on using Microsoft Teams within Service Center, refer to Microsoft Teams Channels for Service Center
- For information on using Microsoft OneNote within Service Center, refer to Microsoft OneNote for Service Center
Who can use this feature?
- SCRs - Browser
- Viewing the Overview Tab
- Creating a New Case
- Opening an Existing Case
- Managing Cases
- Users require a Service Center license
Configuring Using Service Center for
To configure this feature, ensure Configuring Service Center is complete.
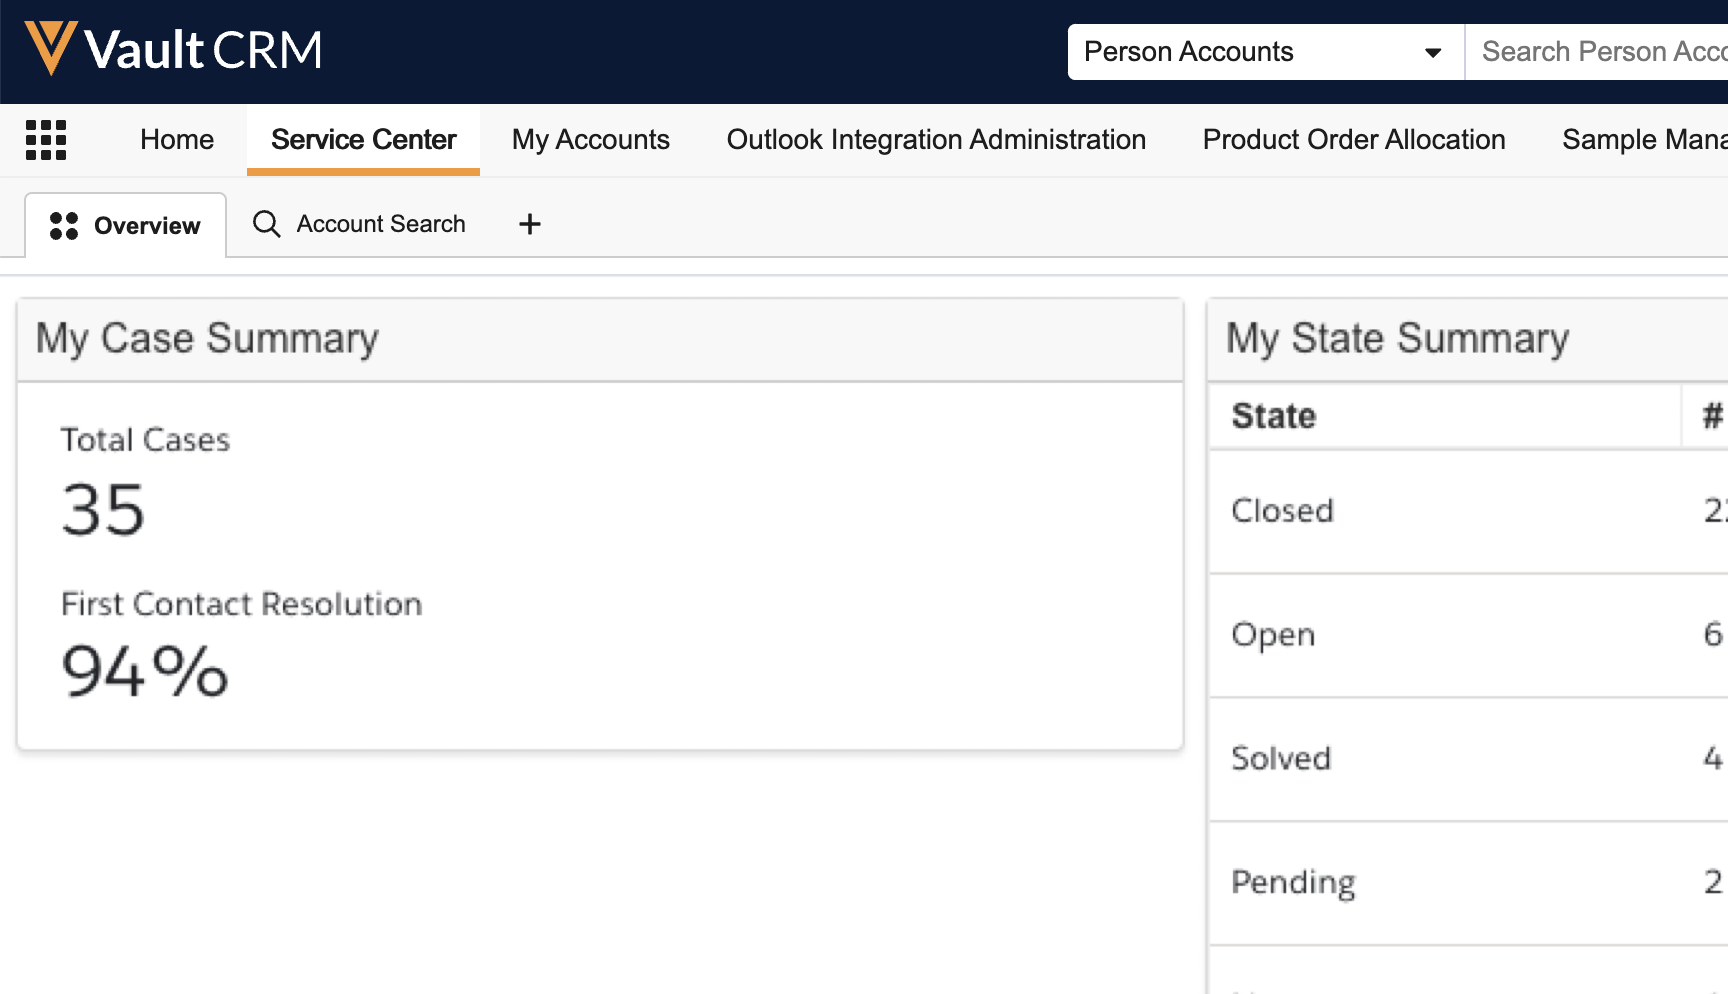
Viewing the Overview Tab as
The Overview tab provides a 30-day rolling summary of the following Key Performance Indicators:
- My Cases - View of all my assigned active cases, grouped by queue
- Group Cases - View of all service center cases across all users, grouped by queue
- Closed Cases - View of all closed cases, grouped by queue
- Group Summary - Shows First Contact Resolution and breakdown of all cases by type, queue, severity, and status
The Overview tab is powered by Vault CRM’s X-Pages feature.
The Overview tab is not updated in real time. Users must reload the tab to view updated data.
Creating a New Case as
SCRs can create new cases for tracking each issue needing to be addressed. Cases can be created from the Account Search tab or from the + Create button.
Refer to Account Search for Service Center for details on creating a new case from the Account Search tab.
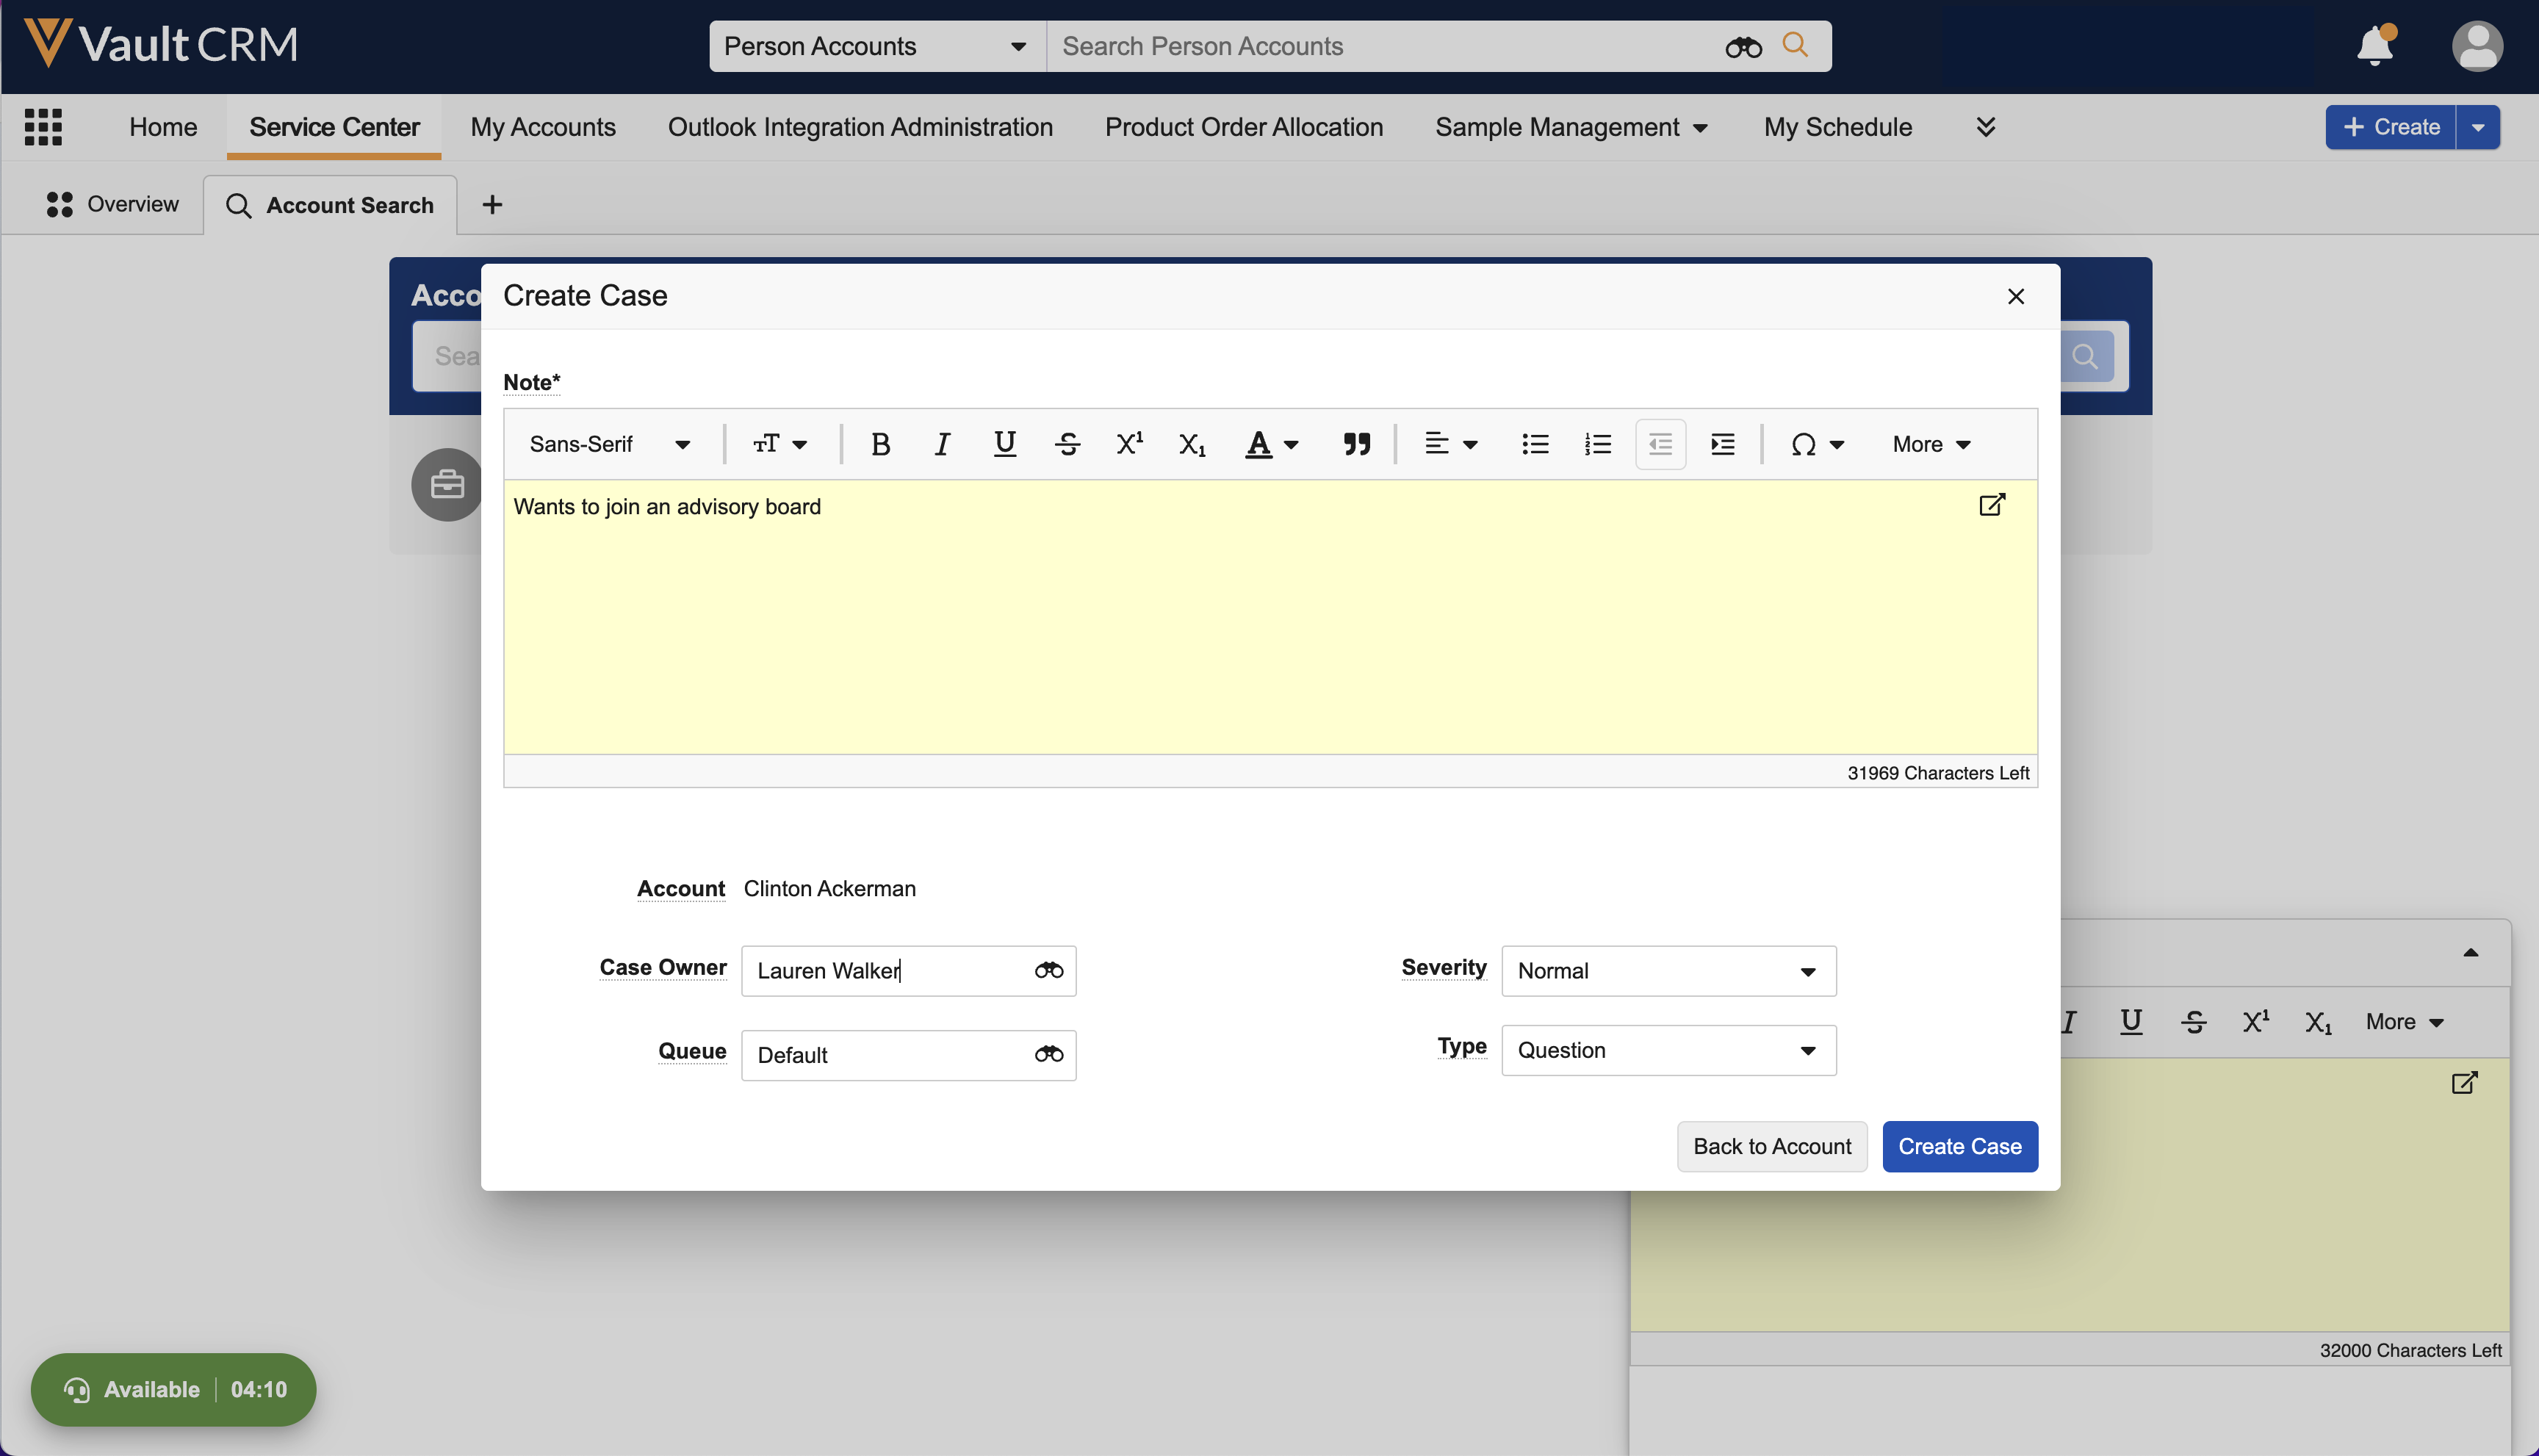
To create a new case from the + Create button:
-
Enter + Create from the upper right corner of Service Center. The Create Case dialog displays.

-
Enter a description of the issue in the Note field.
The Continue to Case Details button is disabled if you do not add any text in the Note field.
- Select an Account. If you do not know the account, expand the Unresolved Contact Information section and enter the Name, Email, and Phone of the caller.
- Select a Contact Type. This is so follow-up communication can be directed to the appropriate person:
- Select Account if the call is from the HCP
- Select Associate if the call is from an associate of the HCP (nurse, receptionist, etc.) who is calling on behalf of the HCP
- Select User if the call is from someone within your organization who is reporting an issue on behalf of the HCP
-
Select Continue to Case Details. The Case Owner field auto-populates with the SCR's name.
-
Select a Queue for processing the case. The Default queue is selected by default, but you may select a different queue if other options are listed.
- Select the Severity of the case (Low, Normal, High, or Urgent) according to your organization's definitions of those terms.
- Select the Case Type.
- Question - A case resulting from an inquiry, for example, "Who is the rep assigned to my territory?" or "Do I have any more sample allocations?"
- Incident - A case resulting from an event or occurrence, for example, "My samples were damaged during shipment"
- Task - A case created to assign and track work for an Account, for example, "Update Dr. Ackerman's address"
-
Select Create Case. The case tab displays. The case number assigned to the case displays on the tab, along with the phrase New Case.
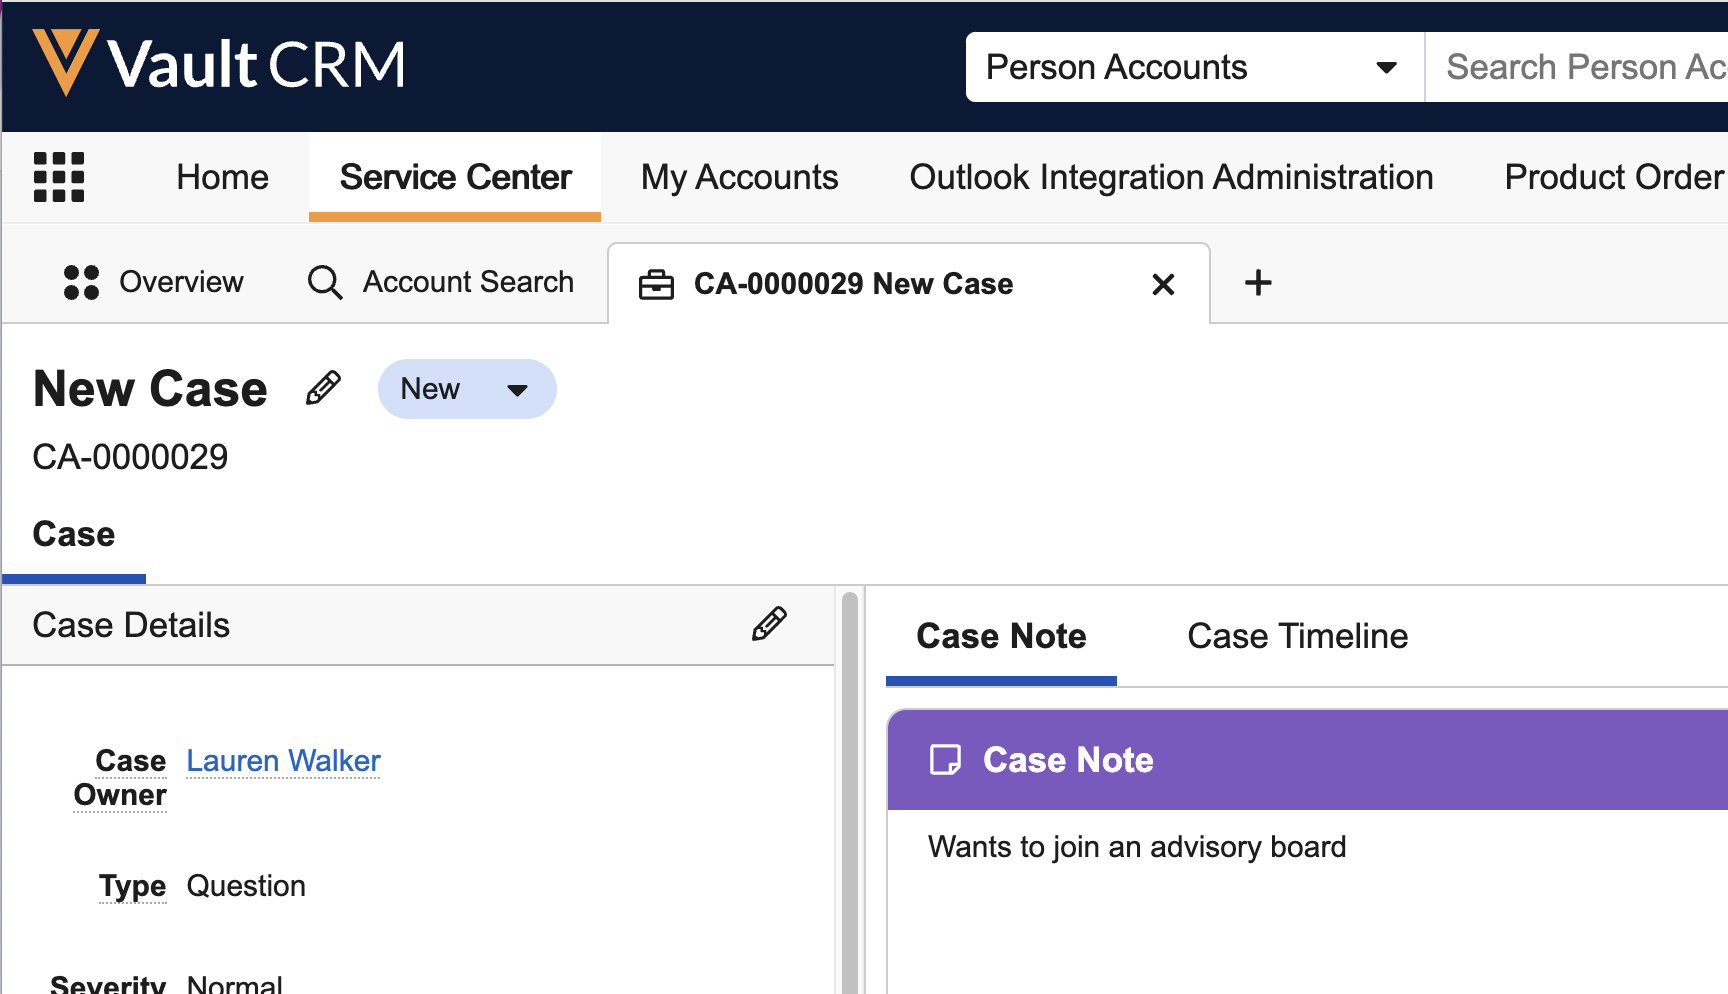
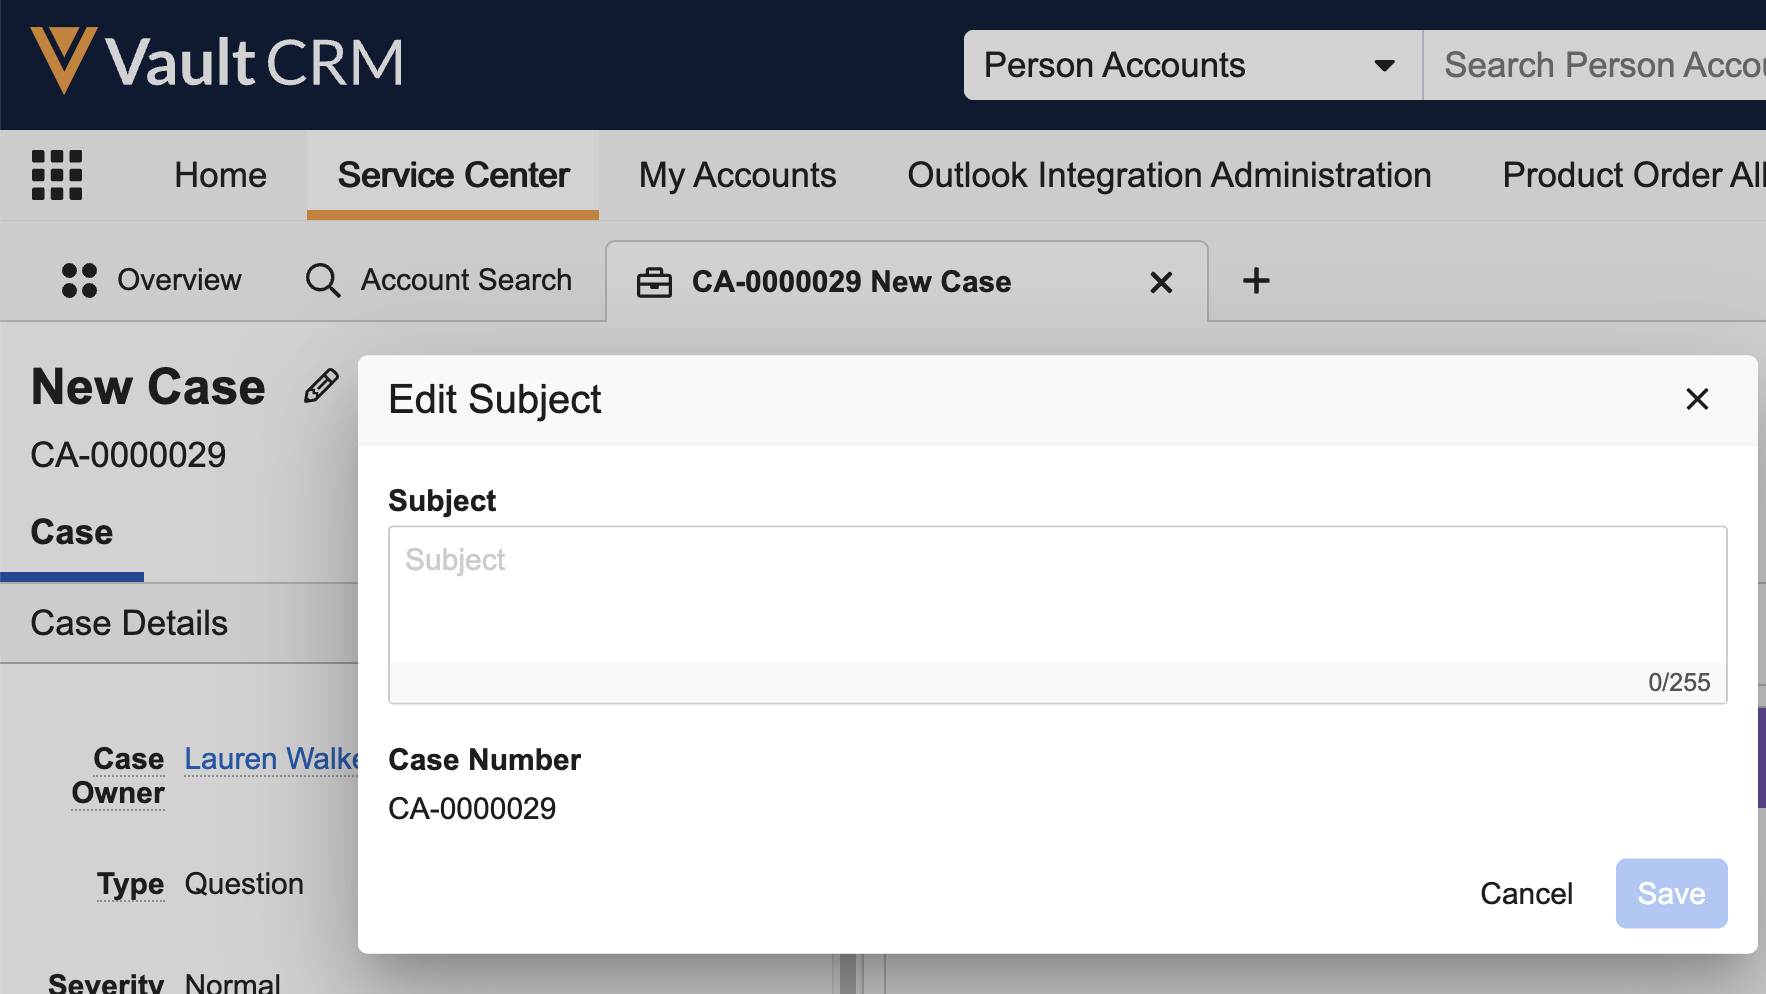
-
Select the Edit icon next to New Case to change the subject to a phrase describing the case.
Opening an Existing Case as
-
Select the + icon in the upper left corner of Service Center next to the Account Search tab.
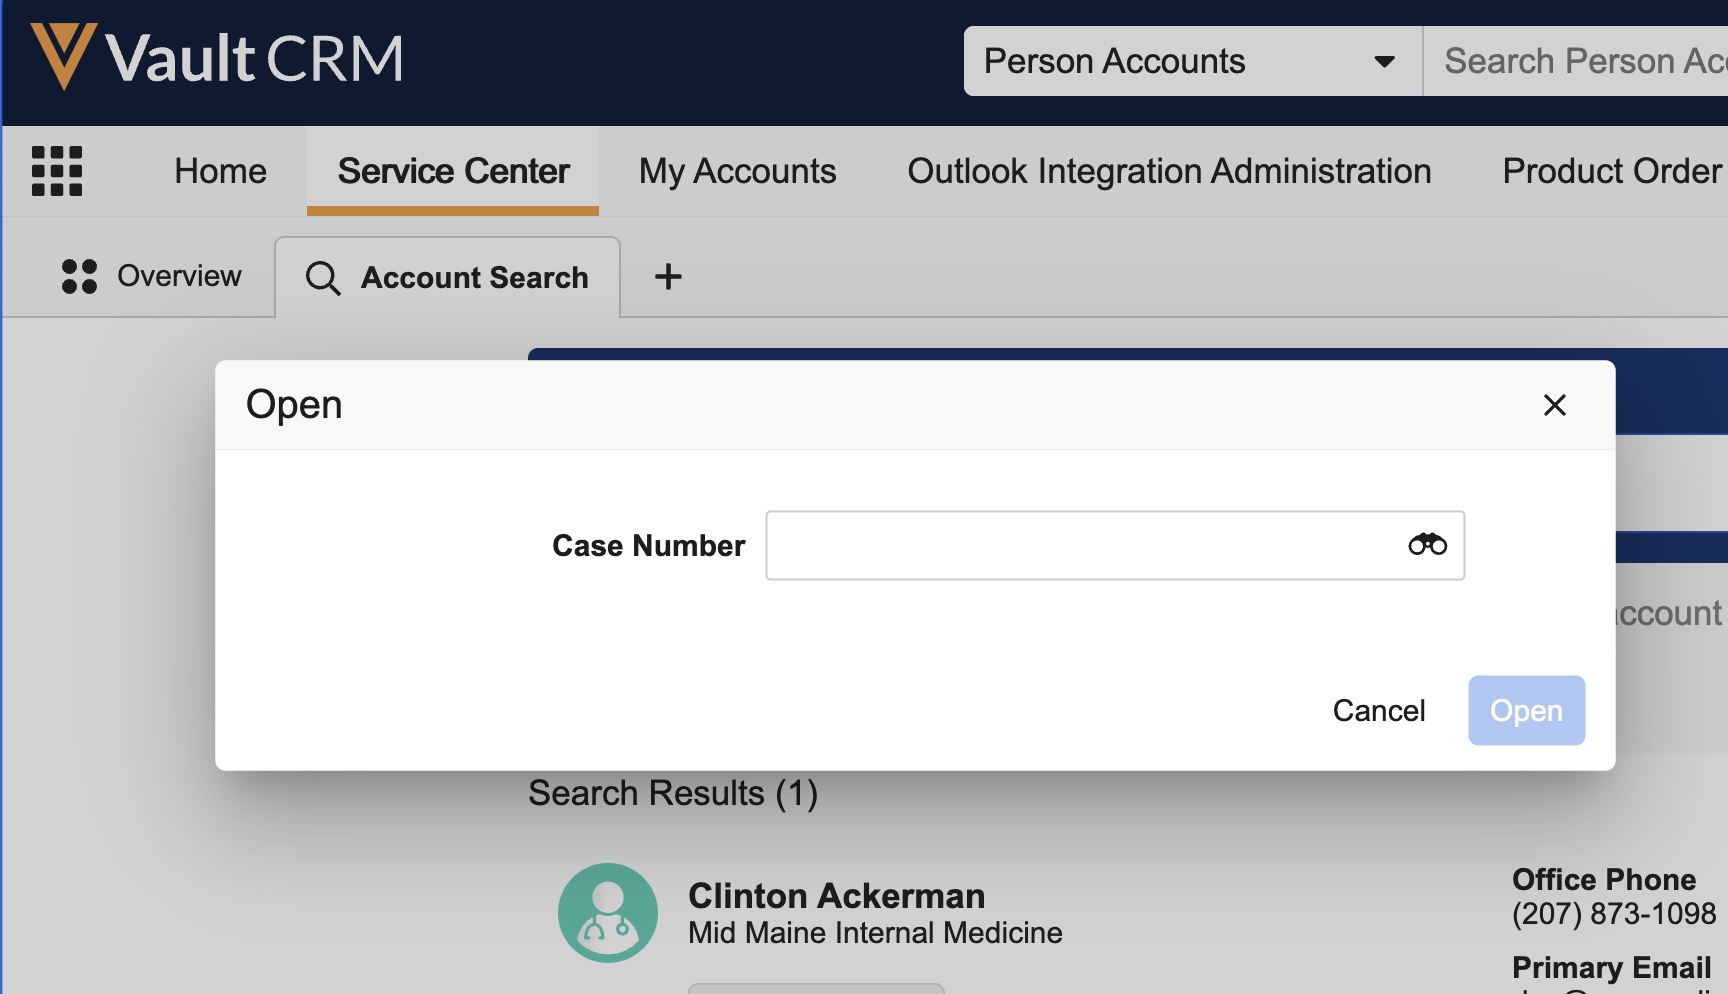
-
Enter text or select the binocular icon in the Open dialog to search and filter for the desired case.
- Select the case from the search results.
- Select Open. The case tab displays.
Managing Cases as
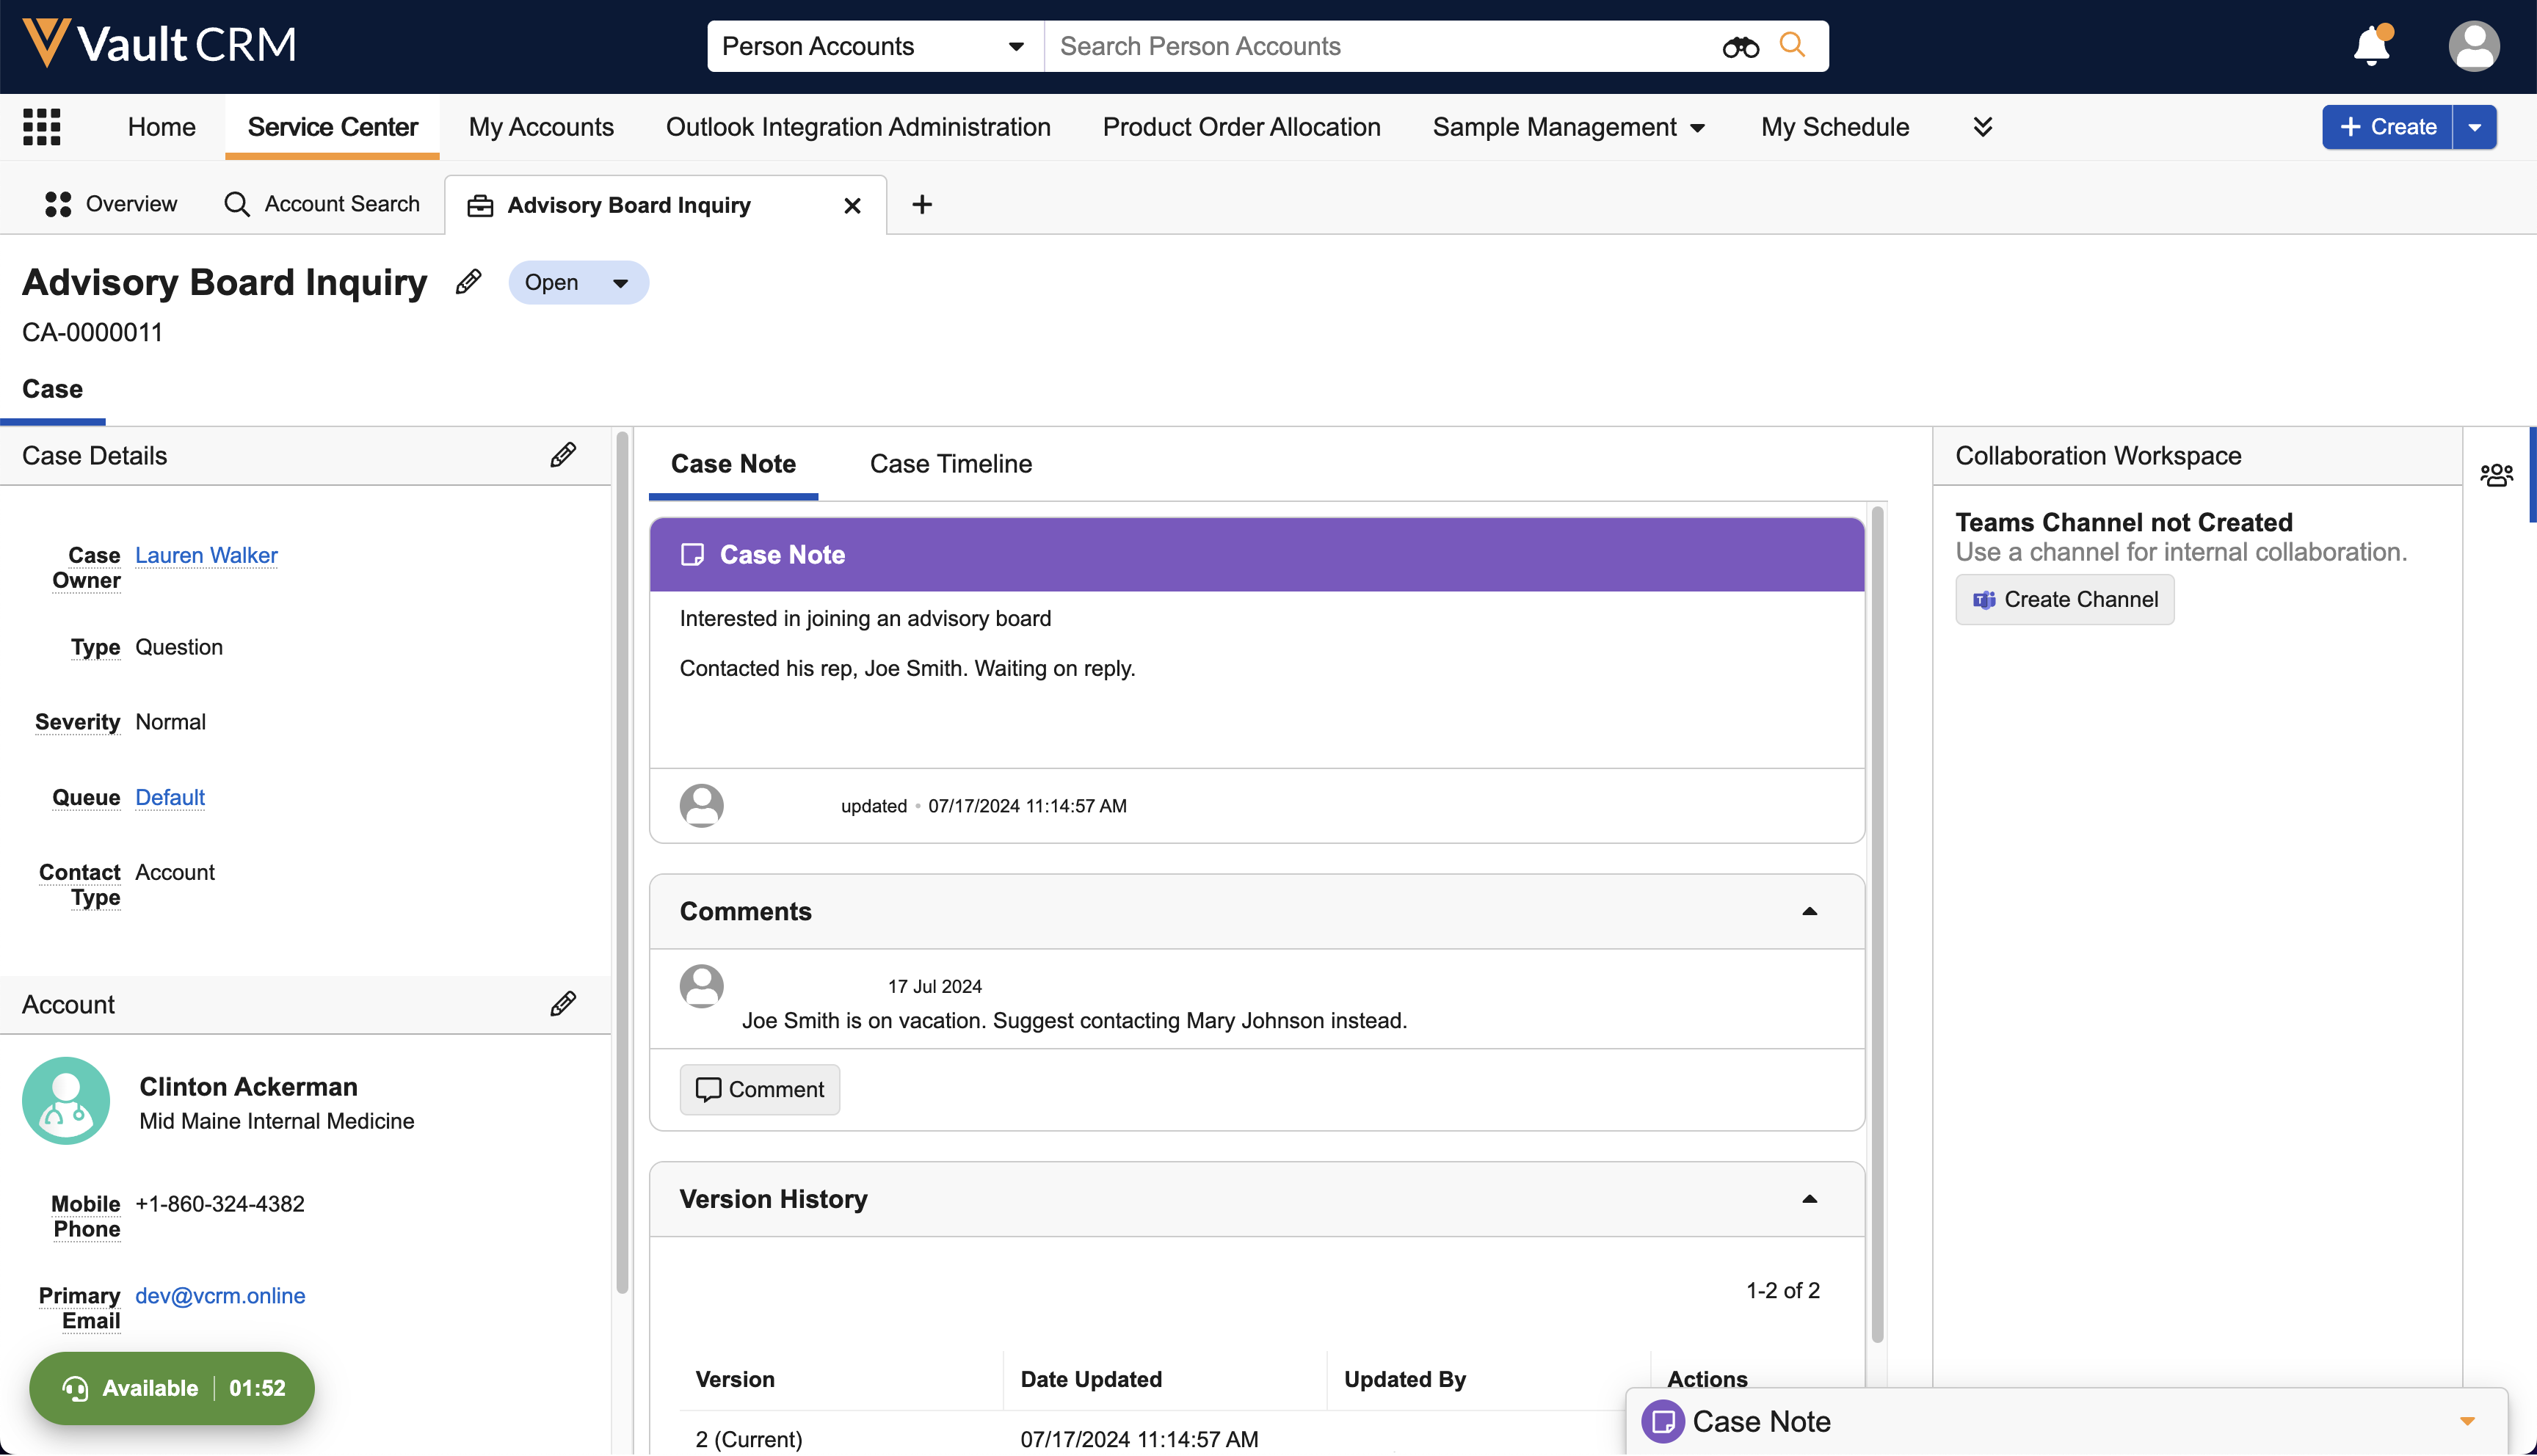
Navigating the Case Tab
Each case tab is divided into three panels. The left panel displays customer details. The right panel provides a modal for entering case notes (unless Microsoft OneNote is enabled) plus a Collaboration Workspace for Microsoft Teams and Microsoft OneNote. The center panel displays those case notes along with a detailed history of the case.
Viewing/Editing Customer Contact Details
- Case Details
- This pane contains the Case Owner, Type, Severity, and Contact Type
- Select the Edit icon to change the selections for the fields
- Case Contact
- If the Contact Type for the call is Associate or User, a Case Contact pane displays contact information for the associate/user. If the Contact Type is Account, this pane does not display.
- Select the Edit icon to assign a different Case Contact
- Account
- This pane displays contact information for the HCP
- Select the Edit icon to assign a different account
The edit functionality for the left pane is only for modifying the details of the ticket, not for editing any account information. If you need to edit an account record and have the required permissions, you can leave Service Center, make the changes to the account, then return to Service Center.
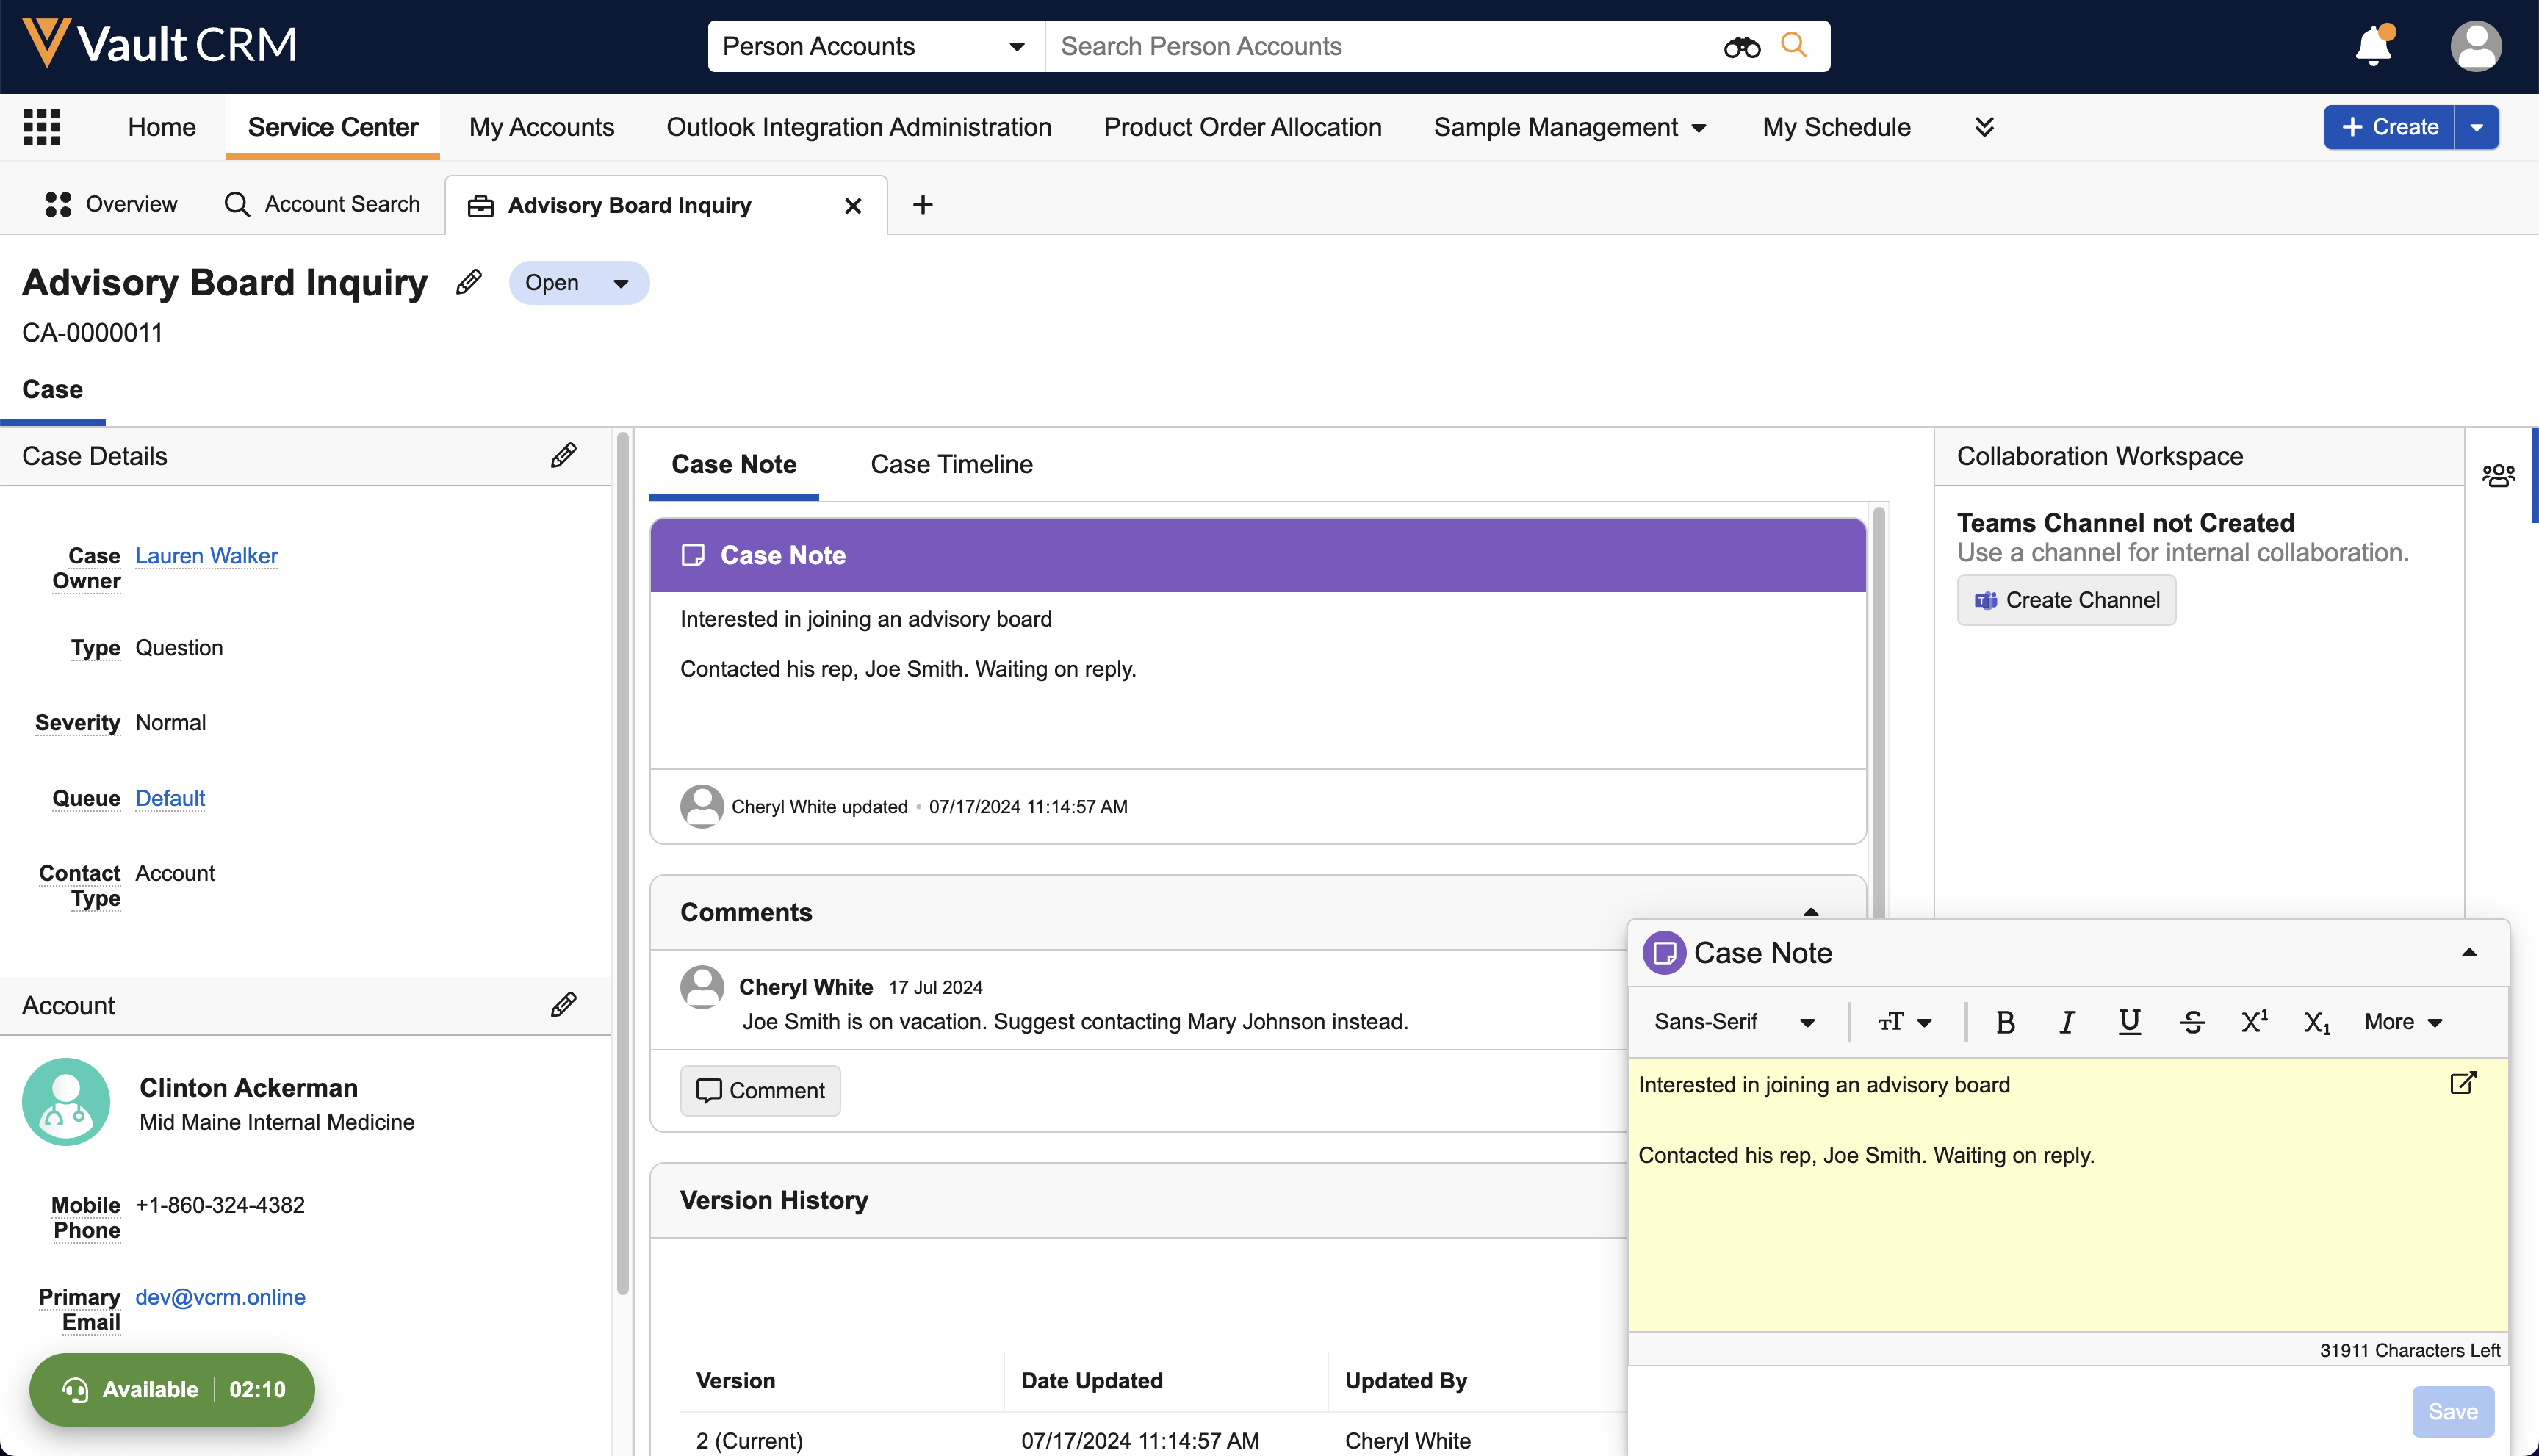
Entering Case Notes
If Microsoft OneNote is enabled, the process for entering case notes is different. See Microsoft OneNote for Service Center for details.
- Case Notes are versioned. The persistent Case Note modal displays in the lower right corner of the focused case tab and displays the current version of the case note.
- Enter information about the case in the Case Note modal, then select Save to save any changes to the case note
- To add additional case notes, type the note in the Case Note modal beneath the previously entered note, then Save. The new note displays in the Case Note tab in the center panel.
- The Case Note modal can be expanded or collapsed as needed
When Microsoft OneNote is enabled, the Timeline does not include the Version History displayed for standard case notes.
Viewing Case Notes (excludes Microsoft OneNote)
Navigate to the Case Note tab in the center pane:
- The top section displays the current version of the Case Note
- The middle section provides a collaborative section for users to add comments related to Case Notes
- Version History is provided at the bottom of the Case Note tab
Case notes cannot be entered directly into the Case Notes tab. They must be entered through the Case Note modal in the lower right corner or through Microsoft OneNote.
Viewing Case Timeline
- The Timeline tab provides a detailed history by listing every change made to the case and who changed it
- Updated Case Details, Case Contact, or Account
- Updated Case State (New, Open, Pending, On Hold, Escalated, Solved, or Closed)
- New or updated Case Note
- New Timeline comment
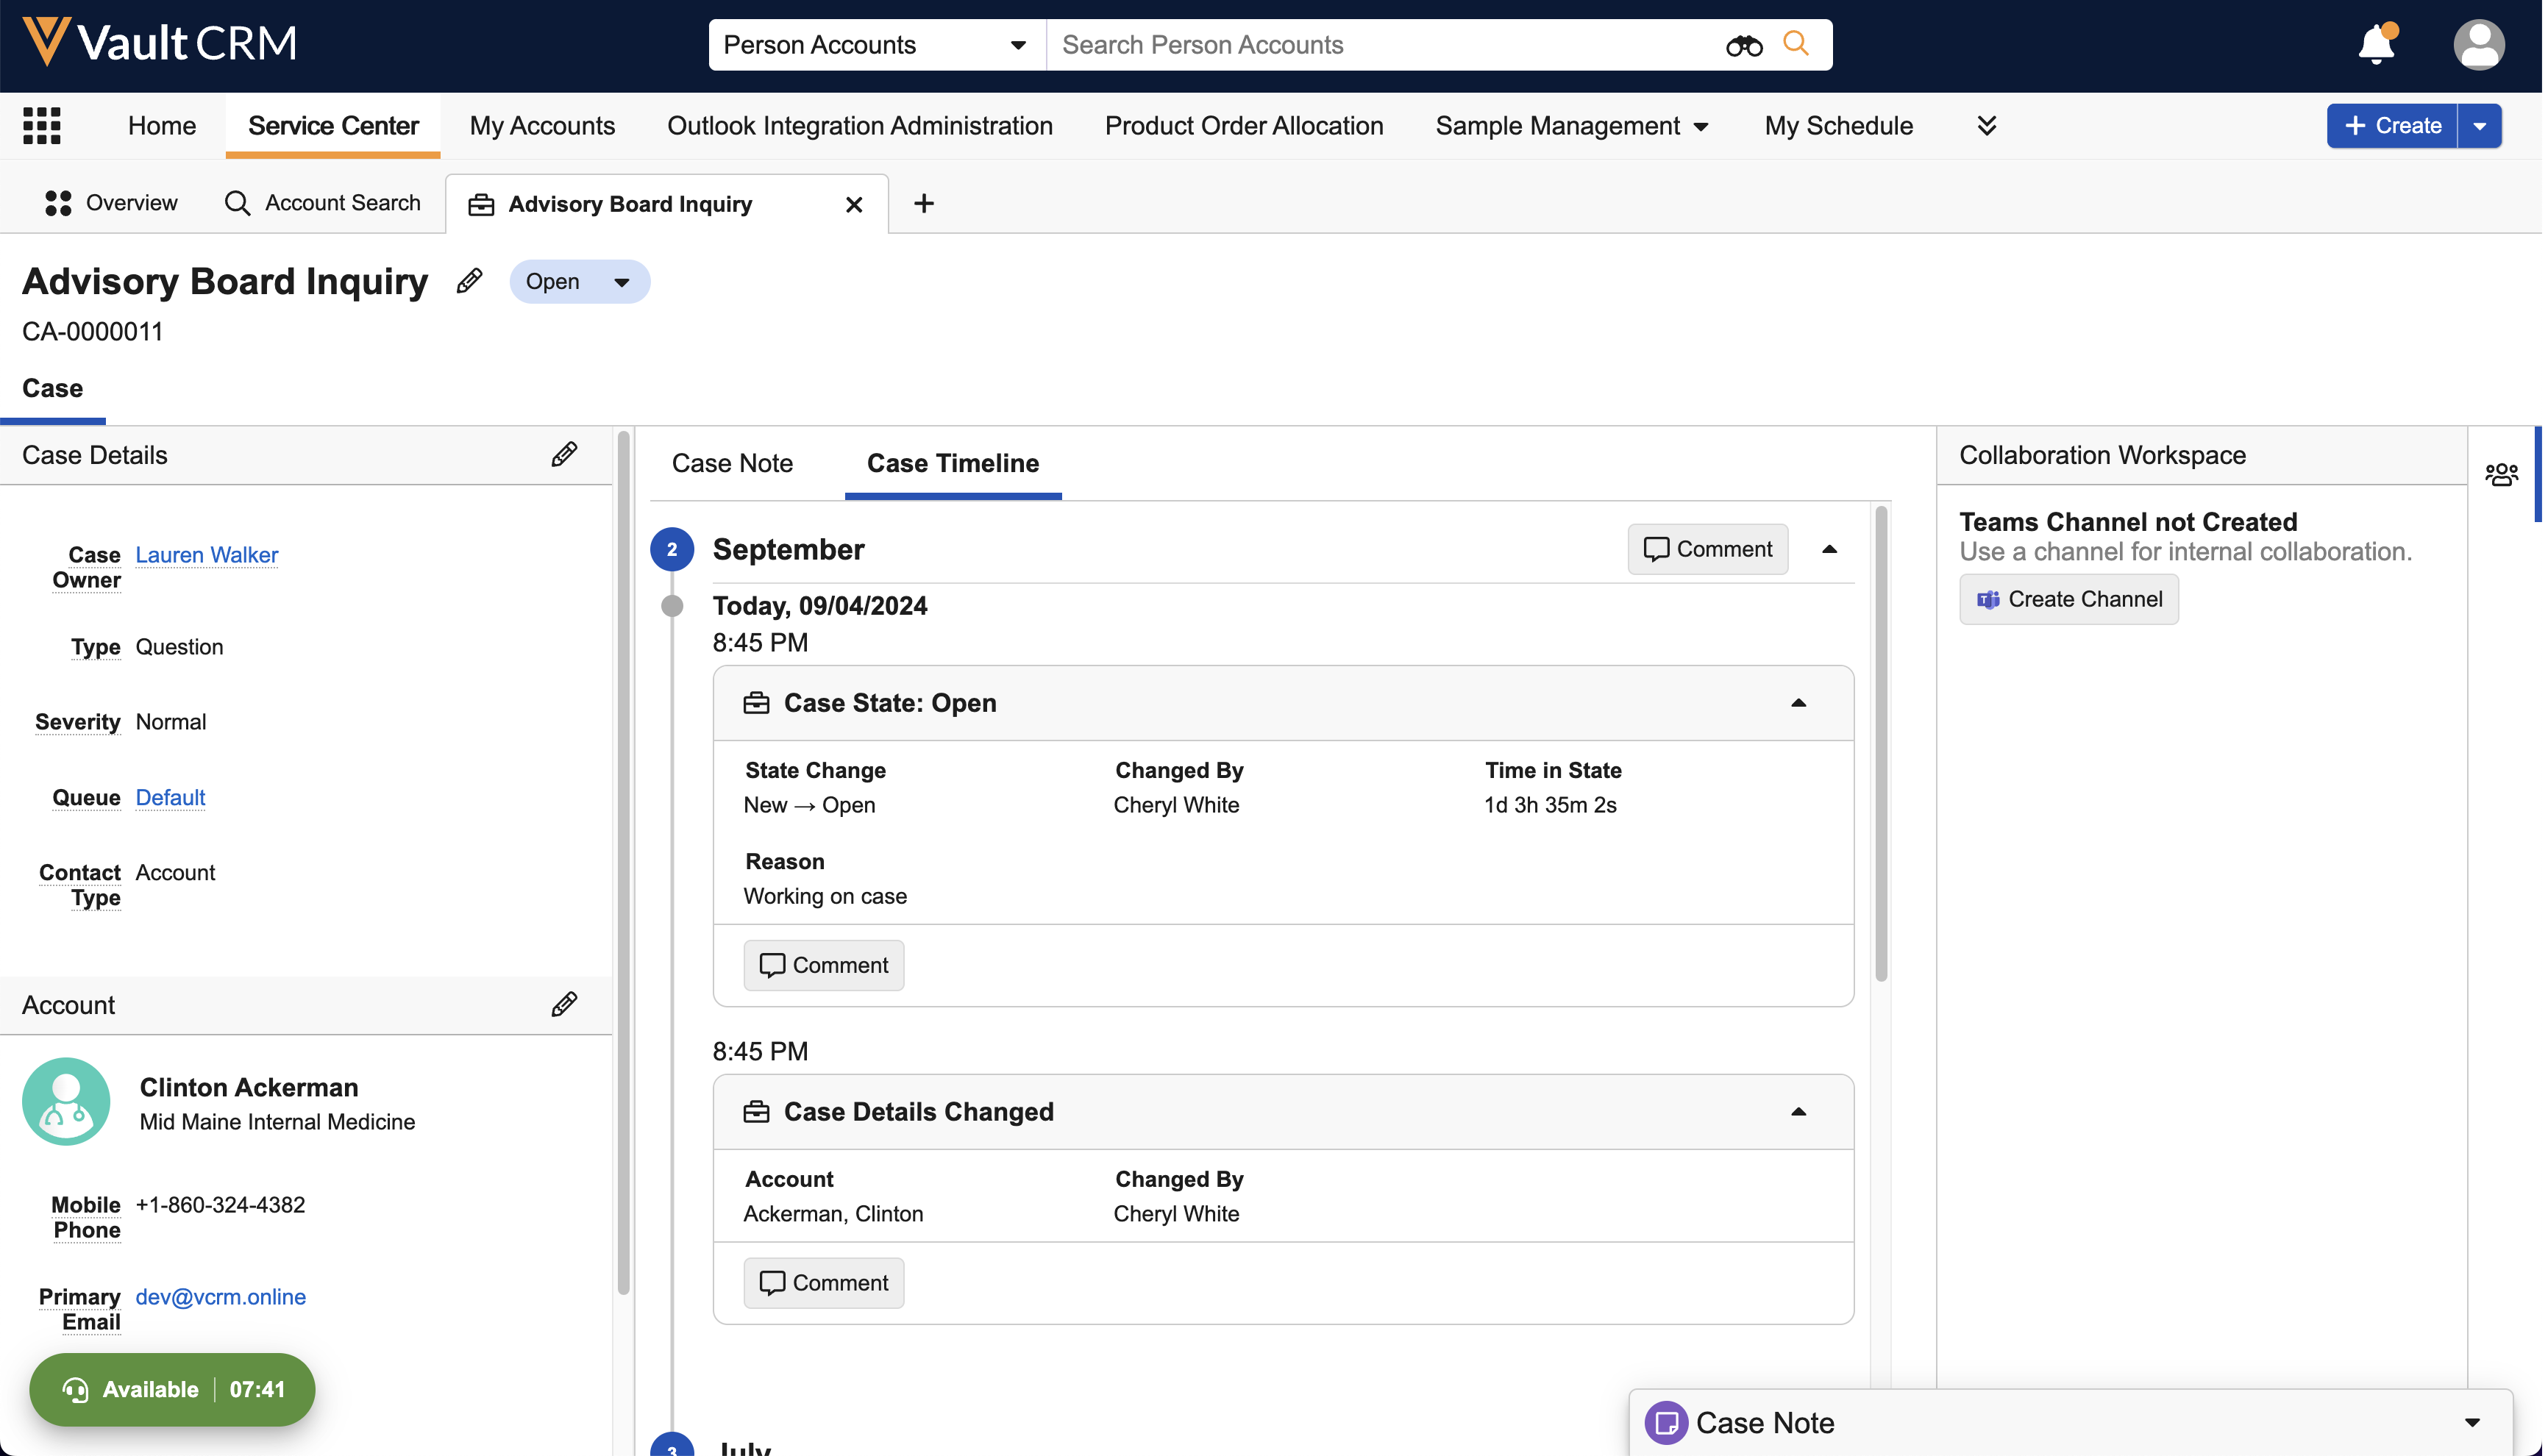
- When a case is moved from one state to another, the length of time spent in the previous state is indicated on the Timeline
- Timeline records for telephone calls include a Talk Time field displaying the length of the call. Talk Time is calculated as the duration of the call from Answer to Disconnect.
- Select the heading for a Timeline record to collapse or expand the record. If an entire month is collapsed, select the Comment link to expand it.
Commenting on the Case Note or Timeline
- Select the Comment button for any item on the Case Note tab or Case Timeline tab.
- Enter the comment in the text box.
- For Timeline comments, check the Public Comment box if appropriate. If the box is not checked, only internal users can see the comment.
-
Select Save.
Users can only edit comments they create.
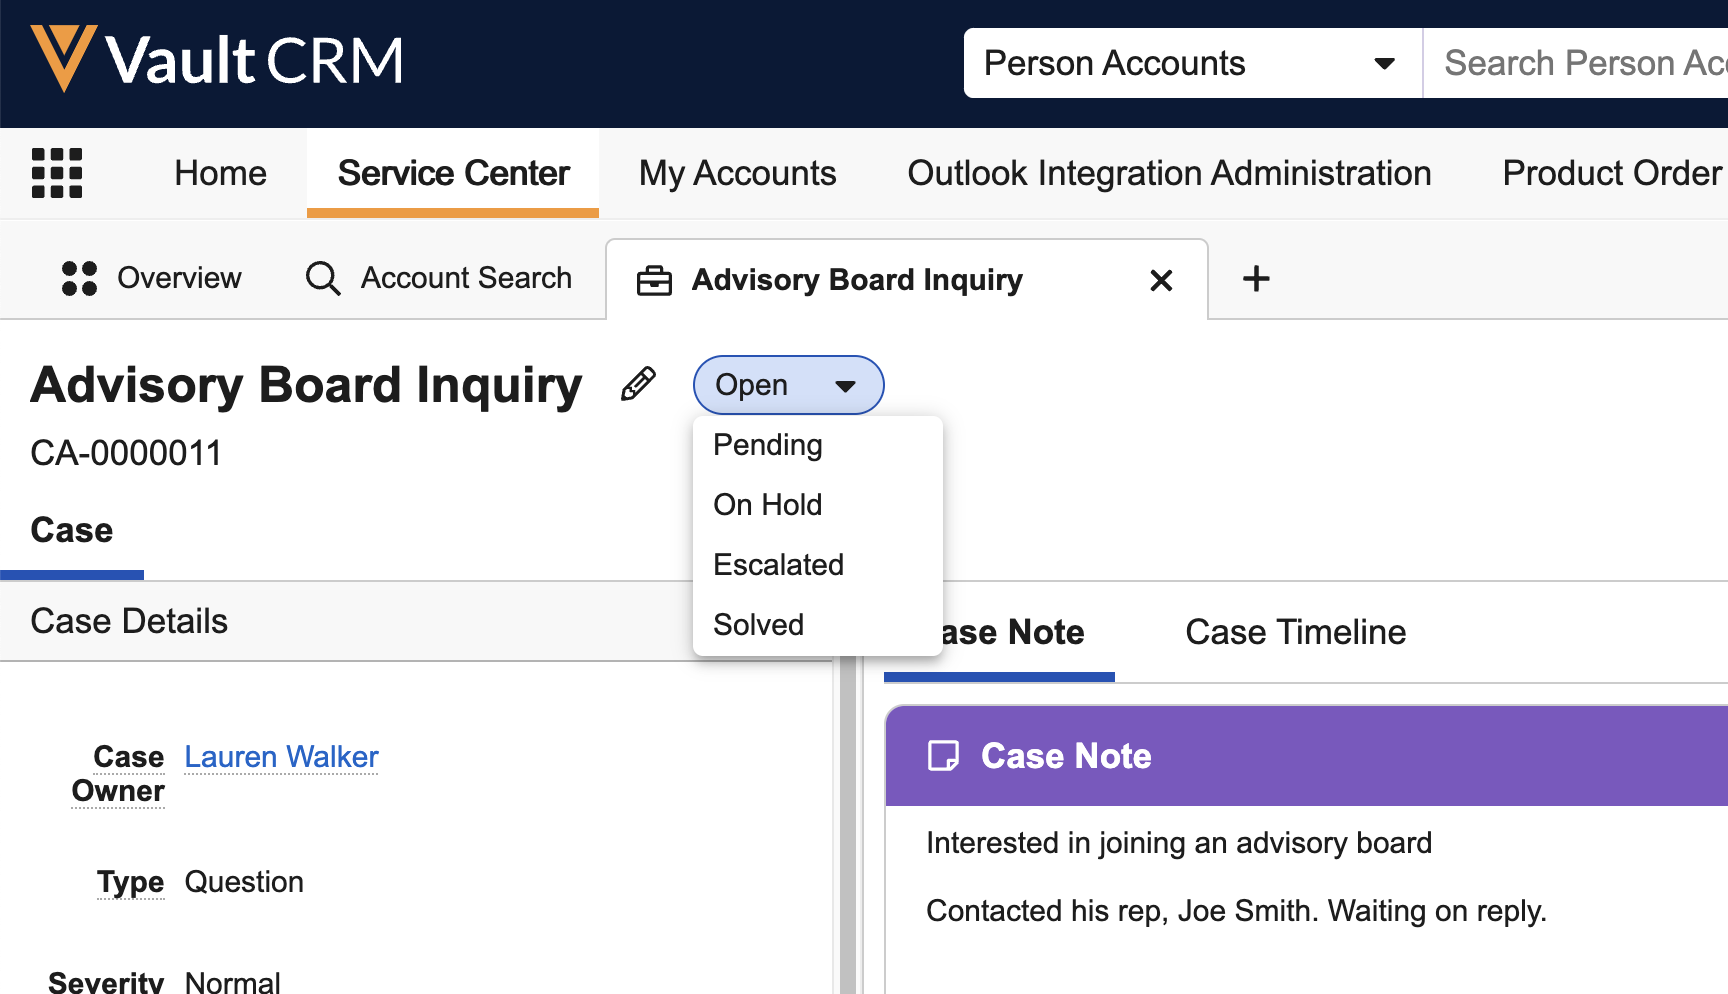
Changing the Case State
A button in the upper left corner of the case tab indicates a case’s current state (New, Open, Pending, On Hold, Escalated, Solved, or Closed). Select from the drop-down list to move the case to a different state.
SCRs are warned if they attempt to move a case to Solved status if a draft email is detected. This allows SCRs to complete any unfinished tasks before closing a case.
- A case created from within the Account Search results during an Omnichannel call has an initial status of Open. Otherwise, the initial case status is New.
- A case must have an Account, a Case Owner, and a Queue associated with it before you can move it from New to Open
- The only state a New case can move to is Open
- A case moved from New can never return to New
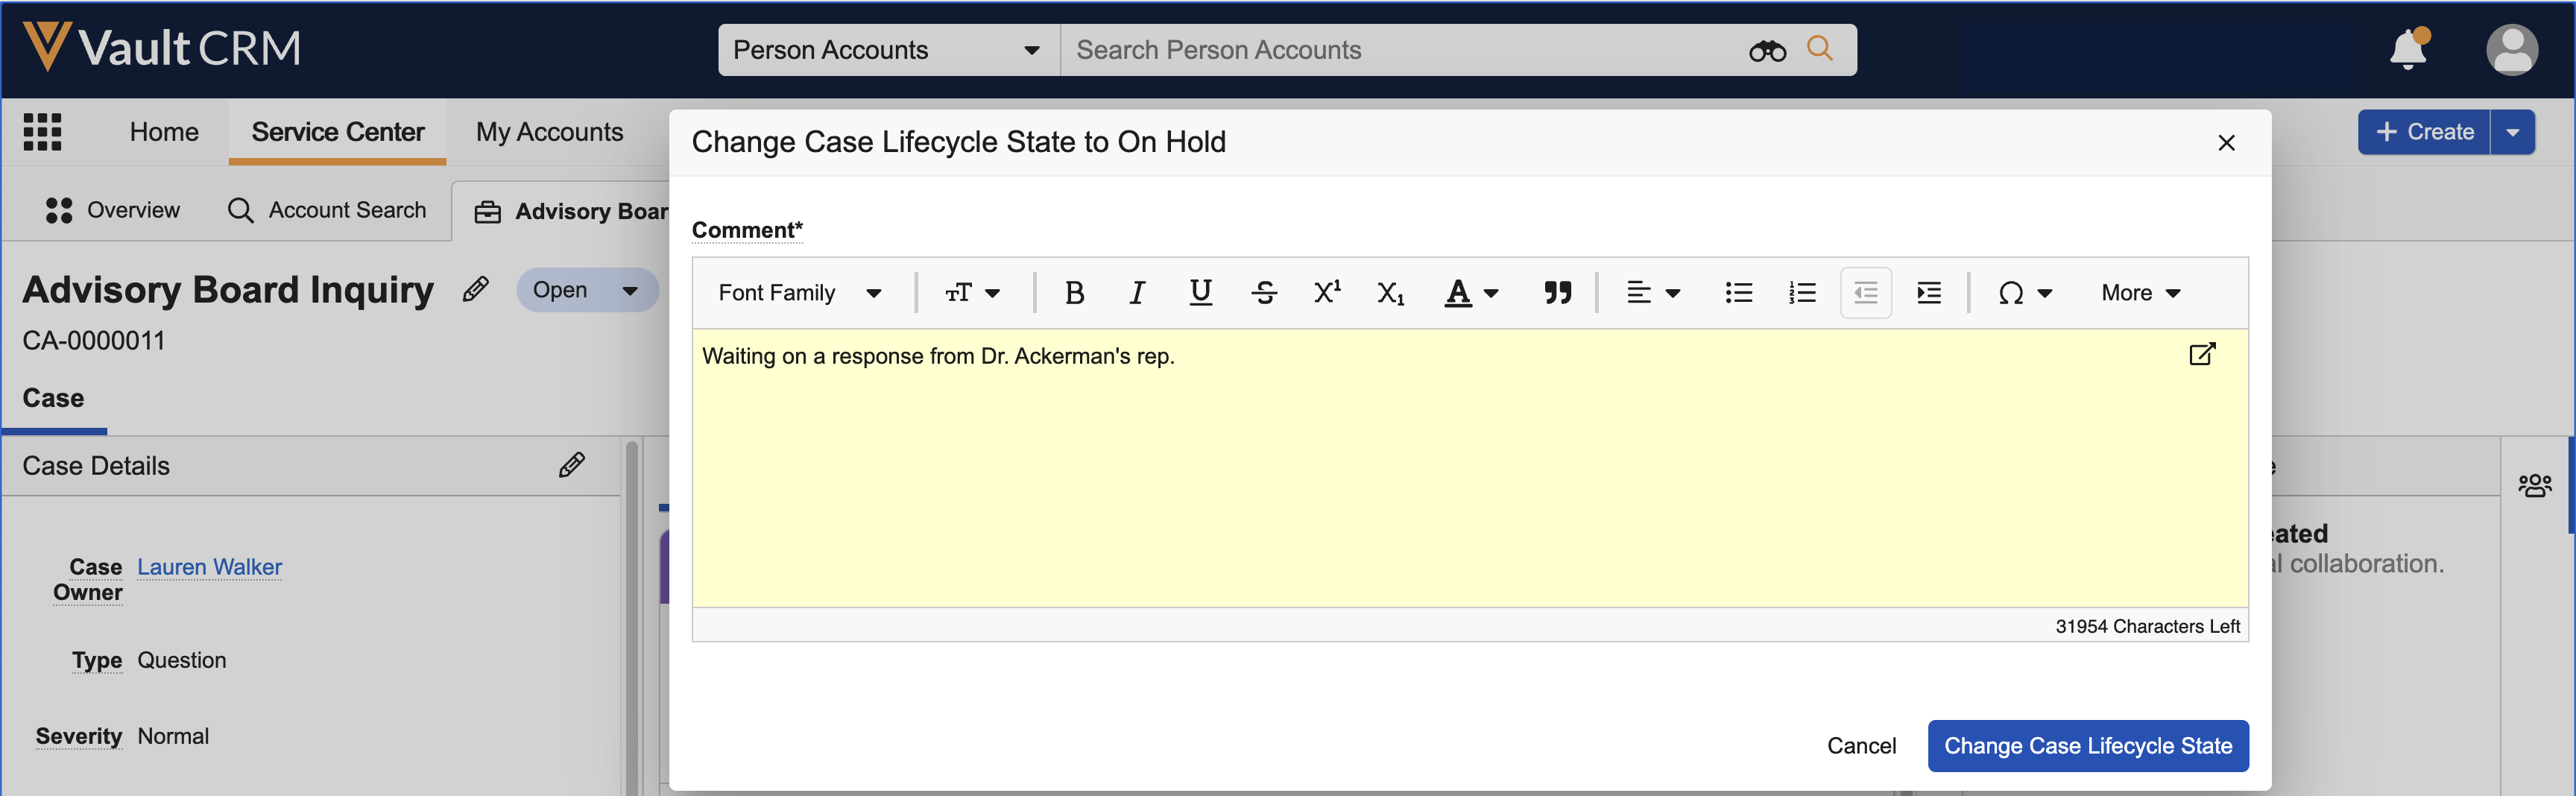
- When you move a case from one state to another, you are prompted to enter a comment about why you are changing the state. You must enter a comment before you can save the new state.
- You cannot move a case to Closed yourself. Solved cases automatically move to Closed after a length of time designated by the Business Admin. Until the time limit is reached, you can reopen a Solved case if needed.
- The only edit you can make to a Solved or Closed case is to add a comment to the Case Closed Summary on the Timeline
- You cannot reopen a closed case
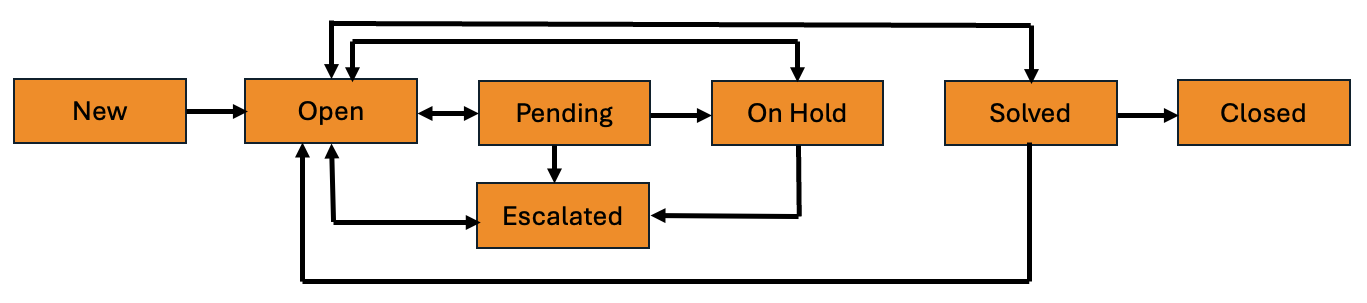
- The following chart shows the available paths for moving from one state to another:
Case Tab Behavior
When users leave Service Center and then return to Service Center using the same device and browser, any previously open case tabs display.
Copying URLs
You can copy the URL for a case tab and share it with others who have Service Center licenses. Selecting the URL opens a new browser tab with all of the previously open case tabs plus the newly selected case.

