Configuring Territory Feedback
Configuring Territory Feedback for
To configure Integrated Territory Feedback in Align:
- Navigate to Align > Align Admin > Align Settings (Production).
- Edit the appropriate record.
-
Populate the following Align Settings with a comma-separated list of Align API field names from the appropriate objects:
-
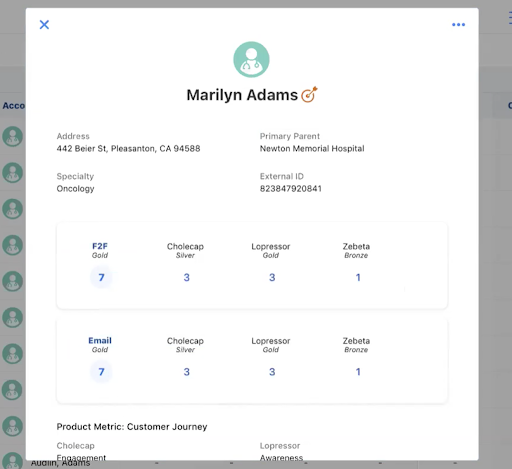
feedback_account_assignment_columns__v – List of fields on the following objects that display on the Account Profile of Integrated Territory Feedback:
- account__v
- address__v
-
product_metric__v – Product metrics for any products assigned to the model territory display as long as the Product Assignment is active during the model's planned publish date
For example: account__v.last_name_cda__v, account__v.specialty_1__v, account__v.country__v
-
account_card_fields__v – List of fields that display on the Account Profile of Integrated Territory Feedback
The following objects are supported:
- account__v
- address__v
- product_metric__v
For example, account__v.name__v, product_metric__v.trx__v, account__v.specialty_1__v,address__v.name__v
-
- Navigate to the appropriate aln_project__v record.
-
Populate the feedback_instructions__v field with instructions for users. This field displays in the Instructions section in the Territory Feedback tab in Vault CRM.
This field supports Markdown formatting. When entering a value in this field, a preview of the formatted text displays below the field entry area.
- Navigate to the Configuration tab of the Vault Administration page.
-
Edit the challenge_reason__v picklist on the following objects:
- mc_cycle_plan_target__v – Defines the list of reasons for challenging a target
- aln_account_territory_model__v – Defines the list of reasons for challenging an account assignment
- Select Save.
- Configure the Approval Process.
Defining the Default Feedback State
Admins can define a feedback state that all territory models in a project. Whenever the project is placed in the Feedback Review state, all territory models in the project are automatically placed in the defined default state. This saves the user from having to manually set the correct lifecycle state for each territory hierarchy.
To configure the default lifecycle state, populate the default_feedback_state__v field on the project. To use the out-of-the-box pre-configured approval workflow, select Feedback as the default feedback state.
Customers still must create the approval mapping for each field force model and specify lifecycle states there, since this assigns lifecycle states to different users, who may require the assignment to participate in the feedback process.
If a Model Territory’s lifecycle state is manually changed, it does not automatically move into the default feedback state when the project is moved into the Feedback Review State.
Defining Default MC Cycle Channel Goals
Default channel and product goals automatically populate when an end user creates an Add Target challenge during Territory Feedback, enabling them to avoid having to enter the goals manually.
To define the default goals for an MC Cycle Channel:
- Edit the appropriate mc_cycle__v record.
-
Populate the following fields for the appropriate channels and products:
- Default Goal – Enter the appropriate default value that should display to end users when they create an Add Target challenge
- Default Max Goal – Enter the appropriate maximum value that end users should be able to set as a goal. This field is optional.
- Select Save.
To configure this feature:
- Navigate to Admin > Users & Groups > Permission Sets.
- Select the appropriate permission set.
- Select the Objects tab.
-
Grant the following permissions:
Object Object Permission Object Types Fields Field Permission territory_settings__v R All appropriate object types All Fields Read - Navigate to Business Admin > Objects > Territory Settings.
-
Set the align_territory_feedback_mode__v Territory Setting to 2.
Admins can control the position of the tab in CRM using the Tab Visibility feature by adding TerritoryFeedback to the list of tabs in the TAB_NAV_DISPLAY Veeva Message.
- Navigate to Business Admin > Objects > VMobile Object Configurations.
- Enable the appropriate VMOCs for the territory_settings__v object. Veeva recommends cloning the existing VMOC for the veeva_settings__v object and changing the object to territory_settings__v.
- Grant the appropriate users access to the Territory Feedback tab.
Defining Challenge Reasons
Challenge reasons display based on an end user’s input, enhancing the feedback process by only displaying relevant challenge reasons.
To control which challenge reasons display for each type of challenge:
- Navigate Admin > Configuration > Objects > aln_account_territory_model__v > Fields > challenge_reason__v.
- Add or edit all appropriate challenge reasons.
- Navigate to Align > Align Admin > Align Settings (Production).
- Edit the appropriate record.
-
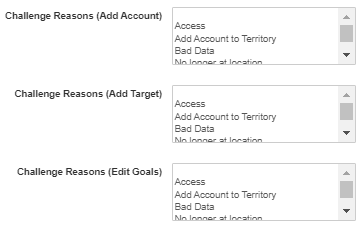
Populate each of the following multiselect picklists with the list of challenge reasons to make available for that challenge type:
- Keep Account
- Add Account
- Add Target
- Edit Goals
- Remove Target
- Remove Account
At least one value of the challenge_reason__v picklist must be specified for each challenge type.
- Populate the Reason Required multiselect picklist with the list of challenge types that end users must provide a reason for making.
Configuring the Approval Process for
Align enables administrators to add or remove steps to the Territory Feedback approval process, as well as control which roles have access to which actions at each step. The Integrated Territory Feedback approval process consists of the following components:
Defining Lifecycle States
Administrators can create and manage lifecycle states for the Integrated Territory Feedback process, enabling greater control over the steps needed to plan and execute the process. The following lifecycle states are available out-of-the-box:
- Draft
- Feedback
- Manager Review
- Territory Feedback Complete
- Approved
- Published
To manage lifecycle states or create new lifecycle states:
- Navigate to Admin > Configuration > Object Lifecycles > Align Territory Model Lifecycle.
- Create all appropriate lifecycle states by selecting the Create button in the States section.
- Add all appropriate application roles by selecting the + button in the Roles section. This allows administrators to control which actions are available to an application role during each lifecycle state.
Defining User Actions
User actions in a lifecycle state controls what actions are available to various application roles. The following user actions are available out-of-the-box:
- View – The associated role can view the Integrated Territory Feedback
- Challenge – The associated role can log challenges in Integrated Territory Feedback
- Review – The associated role can approve or reject challenges. Veeva recommends only granting manager roles access to this action.
- Change State to Manager Review – Reps can submit their feedback to their manager. It is available to Field Reps by default during the Feedback lifecycle state.
- Change State to Territory Feedback – Managers can send a territory model to the Feedback lifecycle state. It is available to managers by default during the Manager Review lifecycle state.
- Change State to Territory Feedback Complete – Managers can send a territory model to the Integrated Territory Feedback Complete state. It is available to managers by default during the Manager Review lifecycle state.
Enabling managers to update the status of the model to Draft is not supported.
These actions are available in the Feedback and Manager Review lifecycle states by default.
To create and assign a user action that alters the project’s lifecycle:
- Select the appropriate lifecycle state from the list of states.
- Select Edit in the User Actions section.
- Select the Add Action button.
- Select Change State to from the drop-down menu.
- Select the appropriate state from the drop-down menu.
- Enter the Action Label.
- Repeat steps 3-6 to create all desired actions in the lifecycle state.
- Select Save.
- Select Edit in the Atomic Security: Actions section.
- Select the Role Override button.
-
Add all appropriate application roles by selecting the + button.
Only roles added to the Object Lifecycle display in this menu.
- Populate the drop-down menu for each action and grant the appropriate access to each role.
-
Select Save.
See Creating User Actions for more information.
Using The Approval Process Matrix
The approval matrix enables administrators to assign application roles to different levels of the territory hierarchy. This determines what actions are available to each user during the feedback lifecycle.
For example, if the District territory hierarchy level is assigned to the Manager application role, all district managers have the permissions granted to that application role. If the Manager application role has access to the View user action during the Feedback state, and the Review user action during the Manager Review state, then all managers can view territory models undergoing rep feedback, and then approve or reject changes once the territory model is ready for manager review.
- Navigate to the Modeling tab.
- Select the appropriate project.
- Select the appropriate field force model.
- Select the Gear icon.
- Select Manage Approval Process.
In the Manage Approval Process section, users can add additional layers of approval:
- Select the Add Row button to add a blank row to the Mass Add table.
- Populate the Hierarchy Level and Application Role fields. See Application Roles for more information.
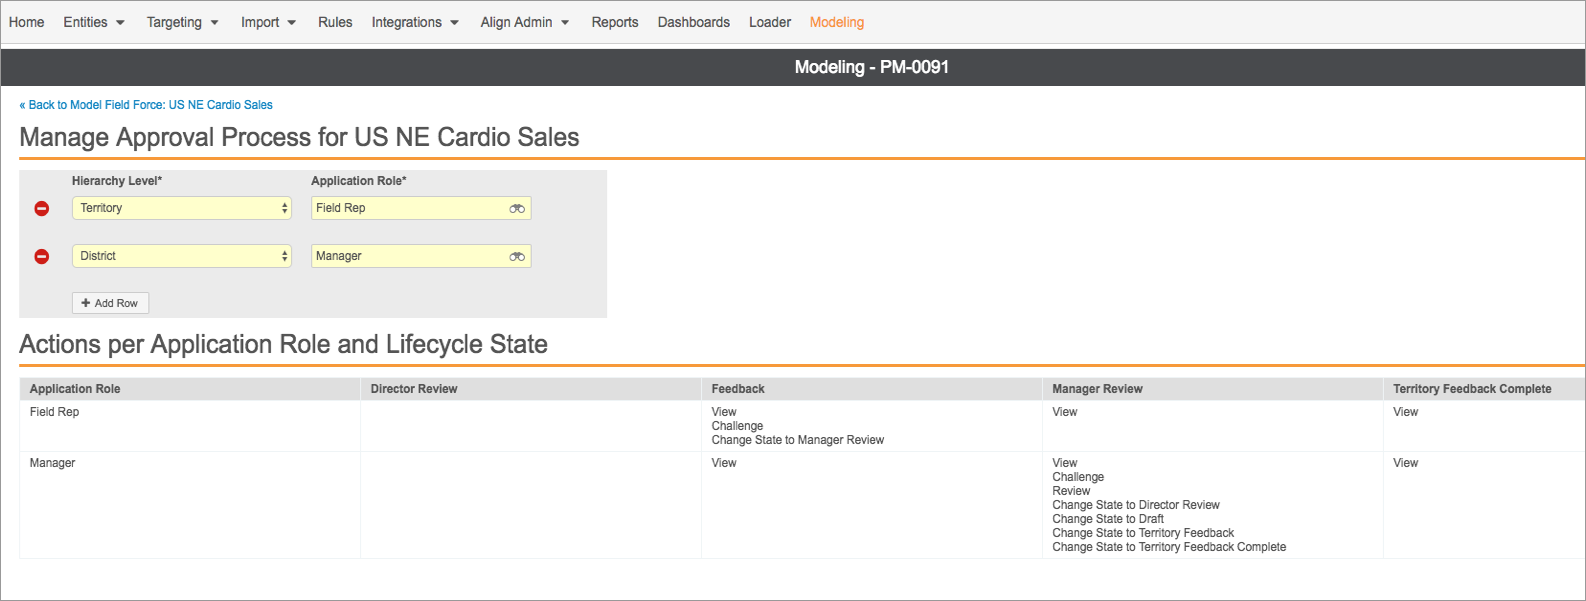
The Actions per Role and Lifecycle State section displays the complete approval process as a matrix in the following format:
| Application Role | Lifecycle State 1 | Lifecycle State 2 |
|---|---|---|
| Role 1 | List of actions Role 1 can take while in Lifecycle State 1 | List of actions Role 1 can take while in Lifecycle State 2 |
| Role 2 | List of actions Role 2 can take while in Lifecycle State 1 | List of actions Role 2 can take while in Lifecycle State 2 |
Defining Approval Rules
Approval Rules can be configured to automatically reject or accept challenges meeting certain criteria to streamline the Integrated Territory Feedback process.
For example, managers may want to automatically approve any interaction goal change for Segment A doctors between 4 and 8 face-to-face visits, but automatically reject setting the goal to 0. Any goal between 0 and 3 is not automatically approved or rejected, and must be reviewed by the manager approval.
To create a new Approval Rule:
- Navigate to the Modeling tab.
- Select the appropriate project.
- Select the appropriate Model Field Force.
- Select Create from the Approval Rules related list.
-
Enter the following information:
- Name
- Rule Type – Select one of two rule types:
- Approval – A challenge meeting this rule’s criteria is approved
- Rejected – A challenge meeting this rule’s criteria is rejected
- Assignment Type – Defines the type of challenge the rule checks:
- Request to Keep
- Request to Remove
- Add Account
- Add Target
- Remove Target
-
Edit Goals
Only one Approval Rule can be created for each Rule Type and Assignment Type combination.
-
Enter the criteria that cause a match on the rule:
- Object – Supported objects are:
- account__v
- product_metric__v
- mc_cycle_plan_target__v
- mc_cycle_plan_channel__v
- mc_cycle_plan_product__v
- aln_territory_model__v
- mc_cycle_plan__v
- Field
- Operator
- Value
- Field Logic Filter
- Enter the Message to display to users when this rule matches. This is only recommended for Rejected type rules.
- Select Save.
Configuring Automated Feedback Handling for
Administrators can configure Align to automatically handle approved challenges. This streamlines the Territory Feedback process by automatically applying approved challenges to the modeling project.
To enable Automated Feedback Handling:
- Navigate to Align > Align Admin > Align Settings (Production).
- Edit the appropriate record.
- Select the automated_feedback_handling__v checkbox.
When a modeling project is moved to a state of Territory Feedback Complete, approved challenges automatically apply to the modeling project with the following behaviors:
-
Remove Account – All associated aln_account_territory_model__v records between the account and territory are end-dated to the planned publish date. An aln_account_exclusion_model__v record is created with the following values:
Field Value account__v Account__v field on the aln_account_territory_model__v record aln_territory_model__v aln_territory_model__v field on the aln_account_territory_model__v record aln_project__v aln_project__v field on the aln_account_territory_model__v record start_date__v planned_publish_date__v on the aln_project__v record end_date__v end_date__v field on the aln_territory_model__v record assignment_type__v account__v exclusion_reason__v feedback__v send_to_crm__v YES - Add Account – The account is added to the territory
- Keep Account – The account remains in the terriory
-
Remove Target – the associated mc_cycle_plan_target__v record and all child records are deleted. An aln_account_exclusion_model__v record is created with the following values:
Field Value account__v Account__v field on the mc_cycle_plan_target__v record aln_territory_model__v aln_territory_model__v field on the mc_cycle_plan_target__v record aln_project__v The current project start_date__v Planned_publish_date__v on the aln_project__v record end_date__v End_date__v field on the mc_cycle_plan__v record assignment_type__v target__v exclusion_reason__v feedback__v send_to_crm__v YES - Add Target – The target remains in the project
- Edit Goals – If one of the target's cycle plan channel or cycle plan product records has a populated feedback_activity_goal__v field, the value stamps on the record's activity_goal_edit__v field or product_activity_goal_edit__v field, respectively.
Once Territory Feedback is complete, Pending challenges are ignored.

