Customizing Key Messages on the Call Report
To tailor Key Messages to an organization’s needs, several customization options are available. These options enable categorizing, tracking, and refining Key Messages over time, making it easier to assess HCP engagement and improve communication strategies.
Key Messages can be customized in the following ways:
- Categories – Organize Key Messages into predefined categories to track which topics were covered during a call and which still need attention
- Detail Groups – Display Key Messages by detail group, helping users identify and select relevant messages for products with multiple indications or species-specific applications
- Reactions – Capture HCP responses to Key Messages as positive, neutral, or negative to monitor HCP reactions and refine messaging over time
- Vehicles – Identify which assets support a Key Message to guide and improve future Key Message delivery
By leveraging these options, organizations can align Key Messages with their communication goals, capture valuable insights to refine messaging, and enhance the overall effectiveness of user interactions with HCPs.
Who can use this feature?
- End Users — Browser, iPad, iPhone, Windows
- Displaying Key Messages by Category
- Displaying Key Messages by Detail Group
- Selecting Key Message Reactions
- Selecting Key Message Vehicles
- Users do not require an additional license
Displaying Key Messages by Category as
For organizations where users are expected to record Key Messages from certain categories during calls, displaying Key Messages by category can make it easier for the user to see which categories they have covered during the call, and which they have not.
Configuring Displaying Key Messages by Category for
To configure this feature:
-
Ensure Configuring Call Reporting is complete.
- Navigate to Admin > Users & Groups > Permission Sets.
- Select the appropriate permission set.
- Select the Objects tab.
- Grant at least Read permission to the category__v field on the key_message__v object.
- Grant Edit permission to the category__v field on the call2_key_message__v object.
- Navigate to Admin > Configuration > Objects > call2__v > Layouts.
- Enable the Categories section attribute for the key_messages__v section control on the appropriate call2__v layouts.
-
Navigate to Admin > Configuration > Objects > key_message__v > Fields.
- Ensure the appropriate Key Message categories are available as picklist values for the category__v field on the key_message__v and call2_key_message__v objects. The category__v picklist values determine which categories are available for Key Messages. Picklist values can be added or modified as needed.
- Navigate to Business Admin > Objects > key_message__v.
-
Populate the category__v field for each appropriate key_message__v record.
Using Displaying Key Messages by Category
Key Messages are grouped by the categories specified in the Categories field. For example, Efficacy, Safety, Tolerability, Efficiencies, and General. The category name displays in parentheses after the product name. The Key Message picklist is filtered to only include Key Messages specified for the particular product and category.

Displaying Key Messages by Detail Group for
For users who promote products with different indications or products which are intended for different species, featuring the Detail Group on the call report helps distinguish between Key Messages for each application of the product.
For example, a product is indicated for both poultry and equine use. Each of these different applications has a different detail group defined, and different Key Messages associated with it. On the call report, Key Messages for the equine detail group display separately from Key Messages for the poultry detail, ensuring clarity and easy selection for end users.
Configuring Key Messages by Detail Group
To configure this feature:
- Ensure Configuring Call Reporting is complete and Detail Groups are configured.
- Navigate to Admin > Users & Groups > Permission Sets.
- Select the appropriate permission set.
- Select the Objects tab.
- Ensure users have Edit permission to the detail_group__v field on the call2_key_message__v object.
- Navigate to Admin > Configuration > Objects > call2_key_message__v > Layouts.
- Place the detail_group__v field on the appropriate call2_key_message__v layouts.
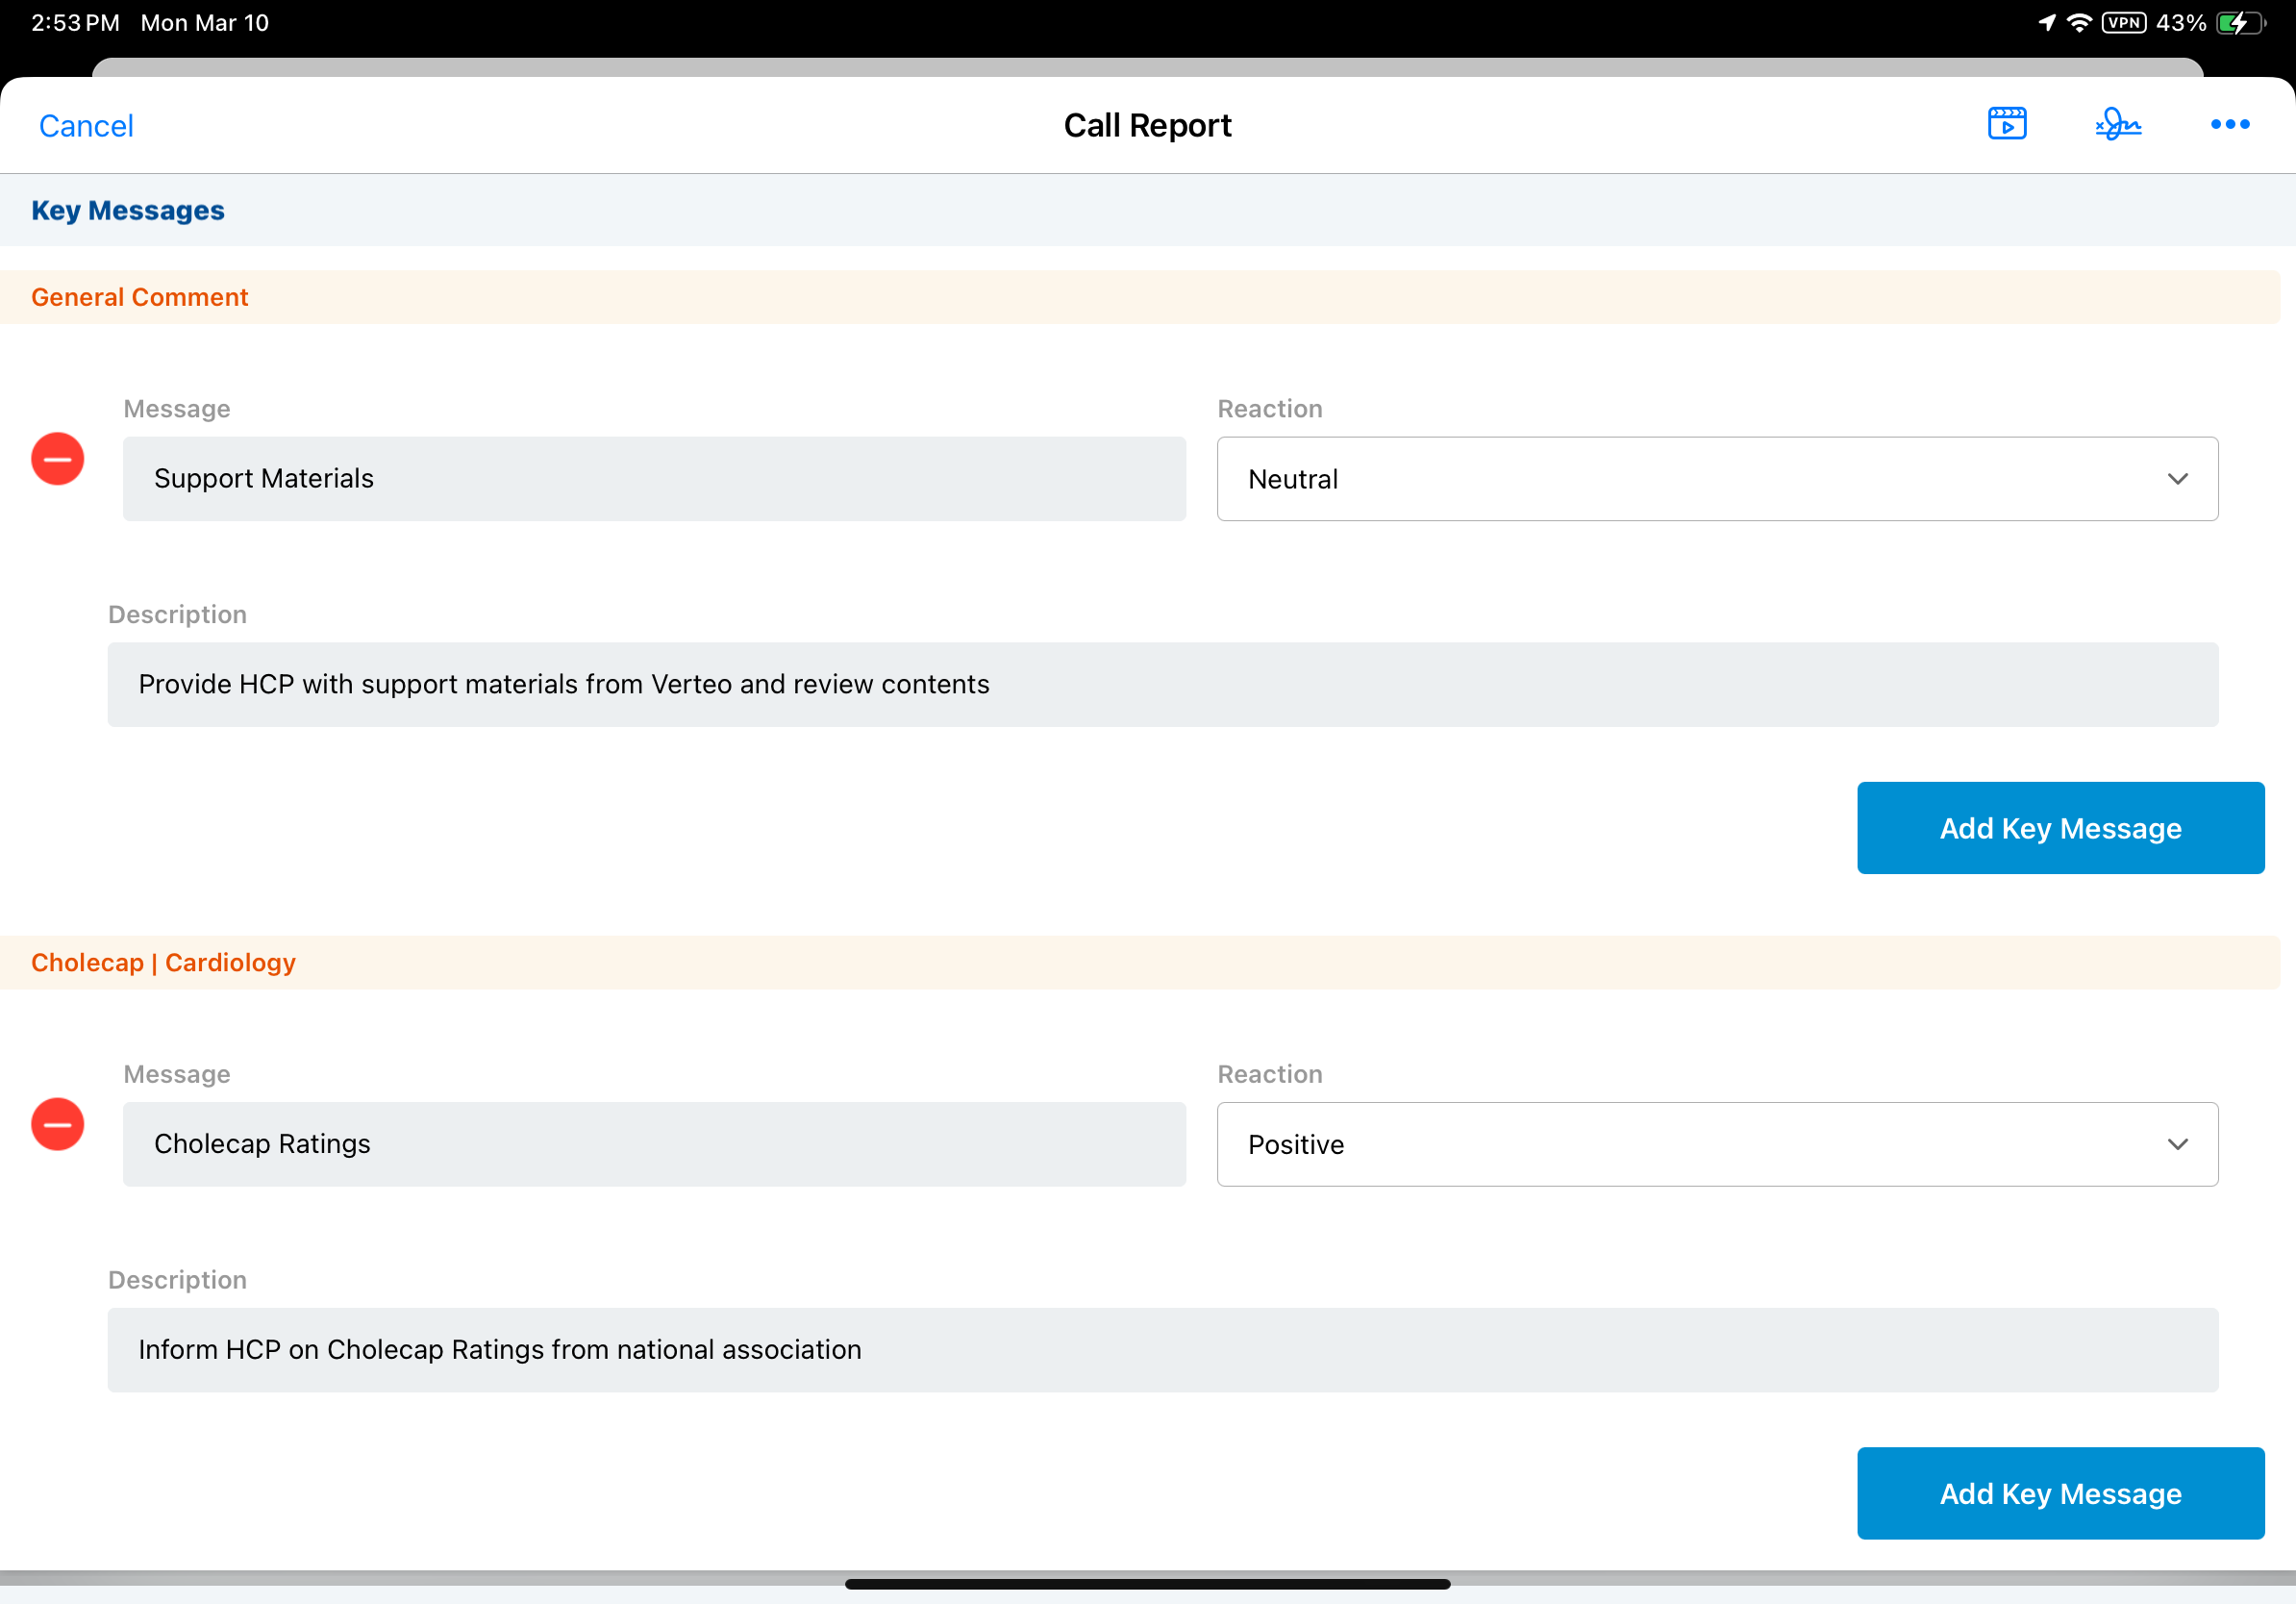
Displaying Key Messages by Detail Group
Displaying detail groups on the call report helps users quickly identify and select the relevant Key Messages when promoting products with different uses or for different species.
On the call report, the General Comment subsection displays first with Key Messages not associated with a product, detail topic, or detail group. Additional subsections display in the following order, based on the selected detail topics or products:
- Detail topics
- Detail topics with detail groups
- Detail products
- Detail products with detail groups
Detail group names display after the detail topic or product name, separated by a vertical bar. For example, Cholecap | Cardiology.
Selecting Key Message Reactions as
Users select a reaction for each Key Message to indicate whether the HCP's reaction to the message was positive, neutral, or negative. This enables users and organization to understand which Key Messages HCPs prefer and refine messaging accordingly.
Configuring Key Message Reactions
To configure this feature:
- Ensure Configuring Call Reporting is complete.
- Navigate to Admin > Users & Groups > Permission Sets.
- Select the appropriate permission set.
- Select the Objects tab.
- Grant Edit permission to the reaction__v field on the call2_key_message__v object.
- Grant Read permission to the reaction__v field on the key_message__v object.
- Navigate to Admin > Configuration > Objects > call2_key_message__v > Layouts.
- Add the reaction__v field to the appropriate call2_key_message__v layouts.
Configuring Custom Key Message Reactions
To use custom reaction options instead of the standard reaction options (positive, neutral, negative, none), complete the following additional configuration:
- Navigate to Admin > Users & Groups > Permission Sets.
- Select the appropriate permission set.
- Select the Objects tab.
- Grant Read permission to the custom_reaction__v field on the key_message__v object.
- Grant Edit permission to the custom_reaction__v field on the call2_key_message__v object.
- Navigate to Business Admin > Objects > key_message__v.
- Populate the custom_reaction__v field on the appropriate key_message__v records with a comma-delimited list of custom reactions. If the custom_reaction__v field is empty, the default values from the reaction__v field picklist are used (positive, neutral, negative, none).
Disabling Key Message Reactions
To disable the reaction picklist:
- Navigate to Admin > Users & Groups > Permission Sets.
- Select the appropriate permission set.
- Select the Objects tab.
- Remove users’ Read permission for the reaction__v field on the call2_key_message__v object.
The reaction picklist does not display on the call report if users do not have at least Read permission for the reaction__v field.
Using Key Message Reactions
Users select a reaction for each Key Message to indicate whether the HCP's reaction to the message was positive, negative, or neutral. To change reaction options, business admin users can add or modify values in the Reaction picklist on the call report. If custom reactions are enabled, custom reaction options display in the Reaction field, instead of the standard reactions.

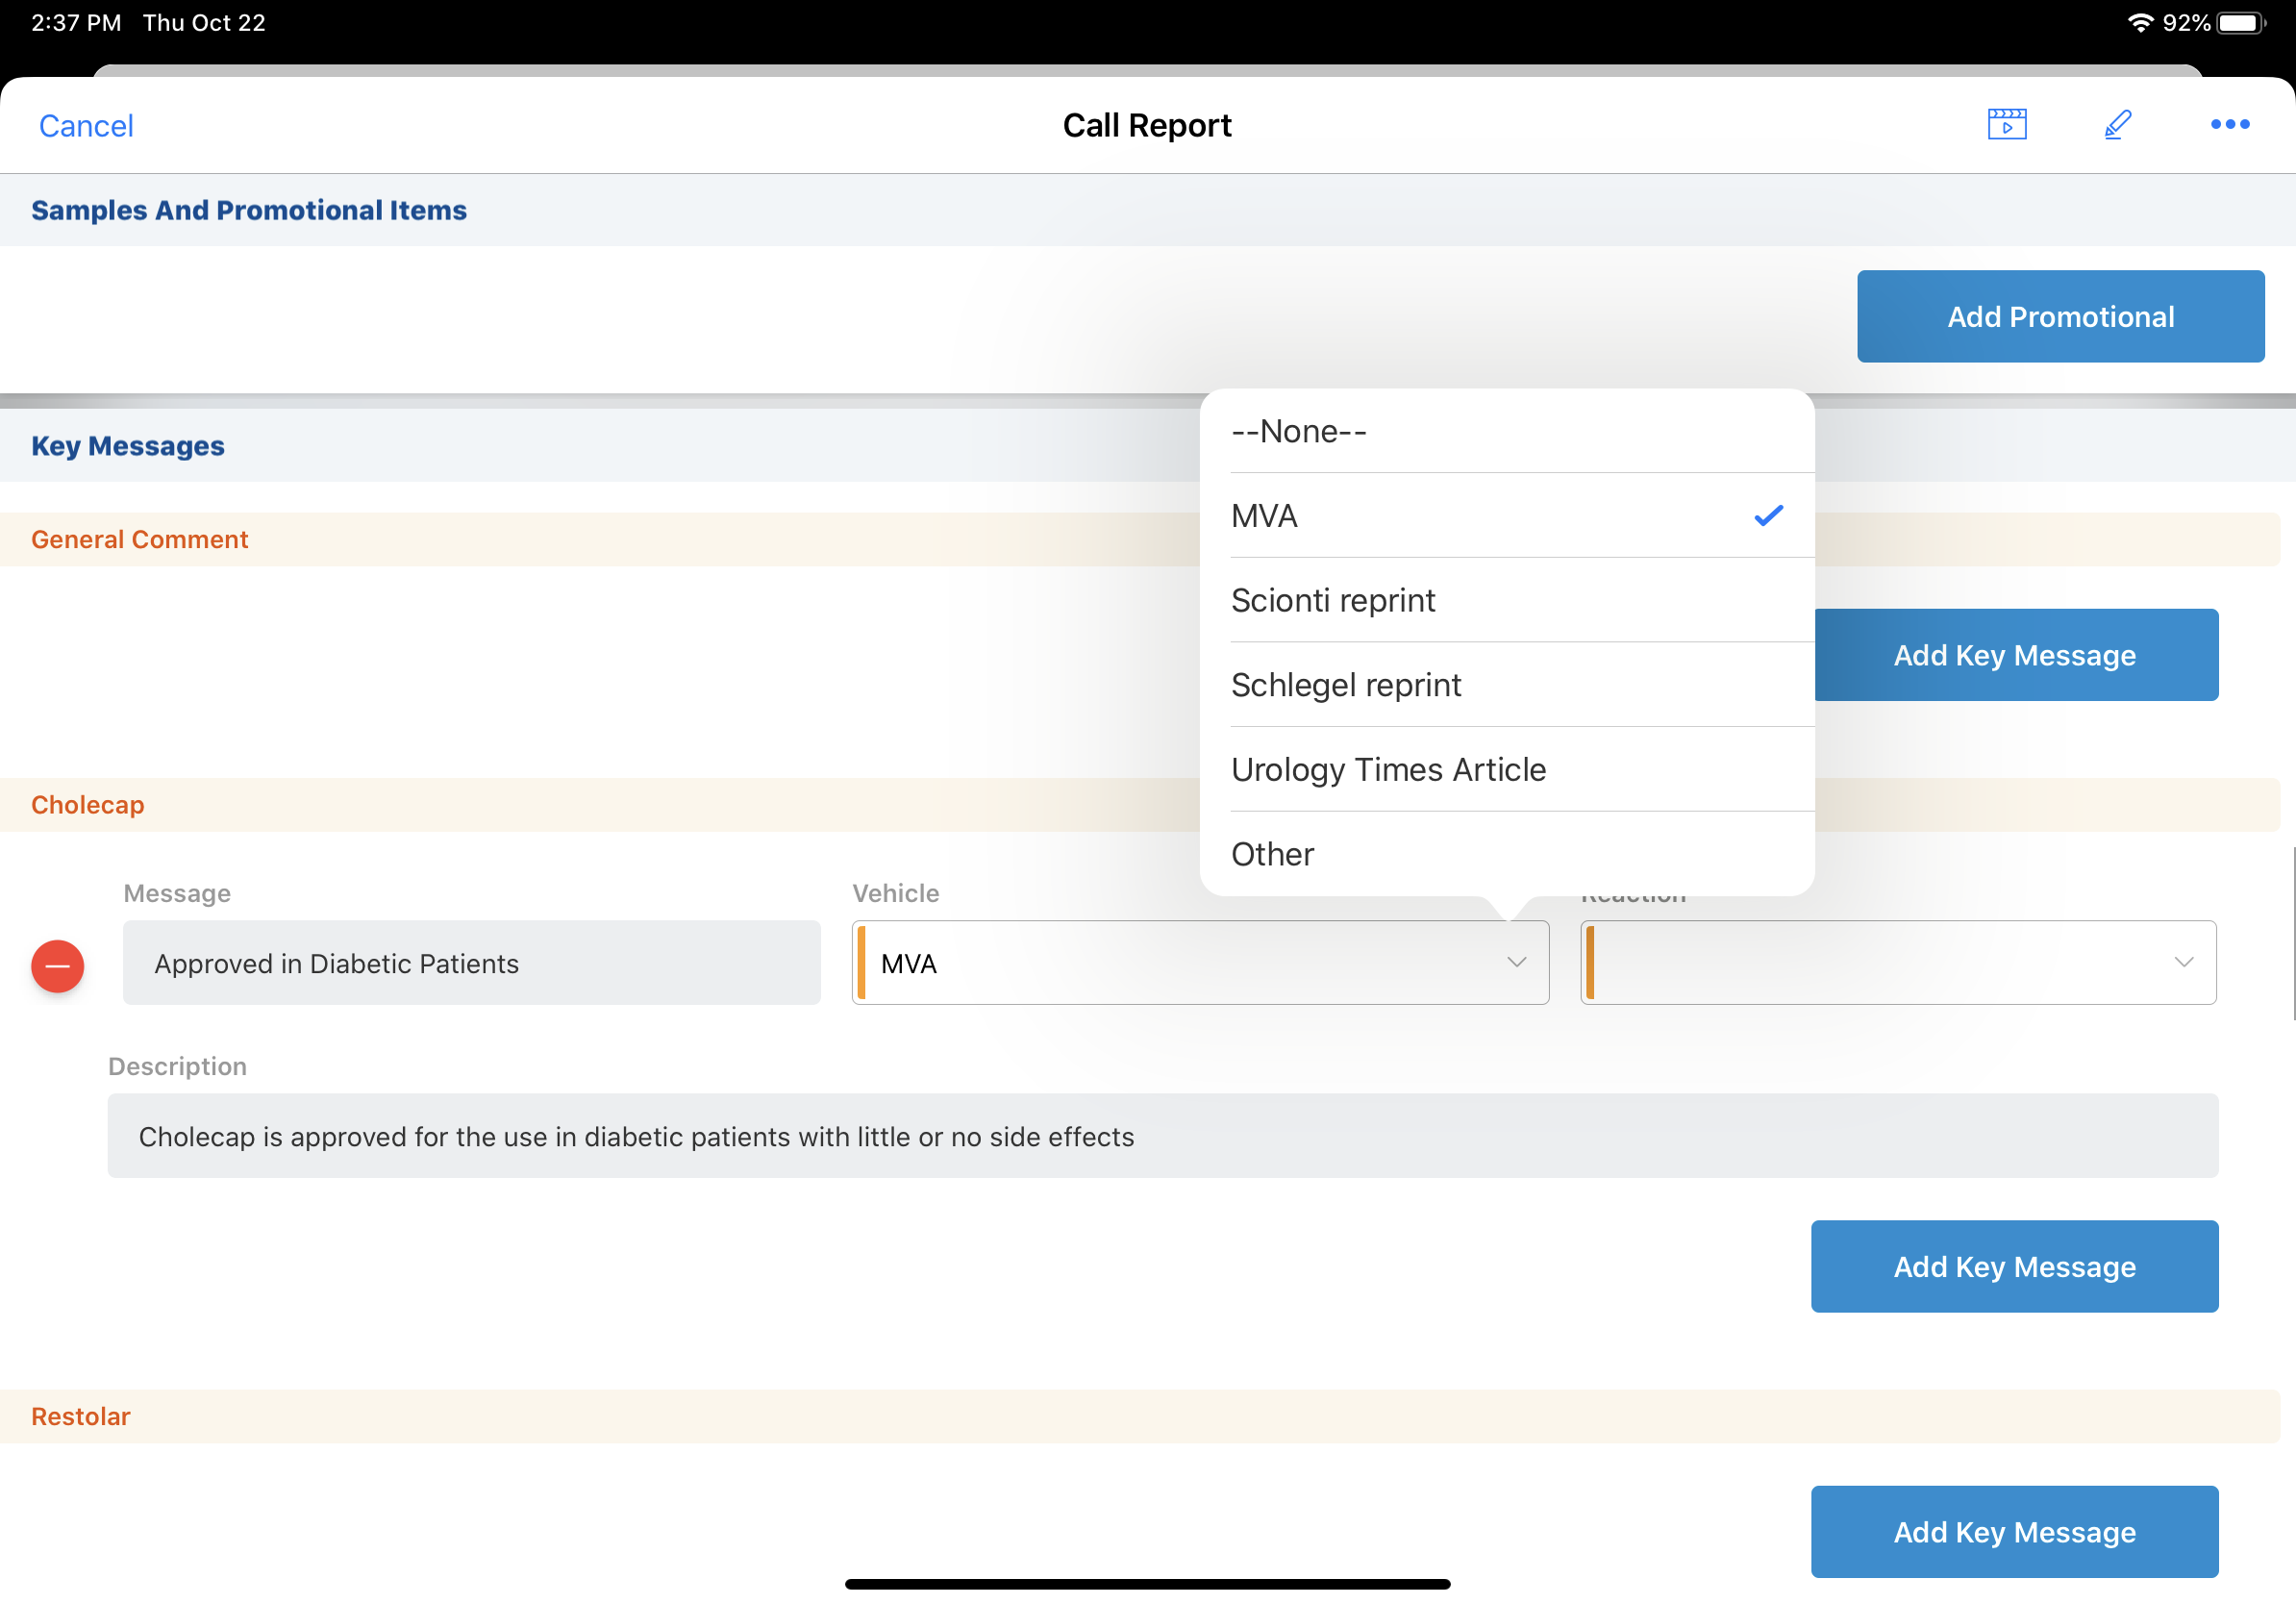
Selecting Key Message Vehicles as
Key Message vehicles enable users to capture which assets they used when delivering a Key Message, which may be used in future call planning.
Key Message vehicles are not supported on the iPhone platform.
Configuring Key Message Vehicles
To configure this feature:
-
Ensure Configuring Call Reporting is complete.
- Navigate to Admin > Users & Groups > Permission Sets.
- Select the appropriate permission set.
- Select the Objects tab.
- Grant Edit permission to the vehicle__v field on the call2_key_message__v object.
- Navigate to Admin > Configuration > Objects > call2__v > Layouts.
- Ensure the Categories section attribute is enabled for the key_messages__v section control on the appropriate call2__v layouts.
Configuring Custom Key Message Vehicles
To use custom Key Message vehicles instead of the standard Key Message vehicles, complete the following additional configuration:
- Navigate to Admin > Users & Groups > Permission Sets.
- Select the appropriate permission set.
- Select the Objects tab.
- Grant Edit permission to the custom_vehicle__v field on the call2_key_message__v object.
- Navigate to Admin > Configuration > Objects > call2__v > Layouts.
- Ensure the Categories section attribute is enabled for the key_messages__v section control on the appropriate call2__v layouts.
- Navigate to Business Admin > Objects > key_message__v.
- Populate the vehicle__v field on the key_message__v object with a comma-delimited list of custom vehicles.
If the vehicle__v field is not populated, but the Categories section attribute is enabled for the call layout, then the default list of message vehicles from the vehicle__v picklist field on the key_message__v object is used.
Using Key Message Vehicles
Select a value from the Vehicle picklist on the call report to capture which assets were used in delivering a Key Message. For example, you share a journal article that supports the Approved in Diabetic Patients Key Message during a visit with an HCP. Select the appropriate journal from the Vehicle picklist.
If custom Key Message vehicles are configured, custom vehicle options display in the Vehicle picklist instead of standard vehicle options.