Using the Service Center Inbound Tab
The Inbound tab on the Service Center console provides a centralized workspace for handling incoming emails, viewing assigned cases, and creating new cases from inbound communications. Work is organized as a two-pane layout so users can browse and take action on emails from shared inboxes, ensuring timely responses and effective case management.
Each Inbox in a Service Center Rep's queue represents one email address. Each case in the list of Case Views represents a case created from an email. This configuration allows Service Center Reps to easily manage inbound email and cases. Service Center Reps can reply to, preview, and send emails from the case console. Drafts are automatically saved and email activity is tracked. Key metrics, for example, response time, are also tracked. This integrated approach eliminates the need for external email applications and ensures all communications are recorded as part of the case history.
Who can use this feature?
- All Users - Browser
- Managing Email and Email Inboxes
- Users require a Service Center license
Configuring the Inbound Tab for
To configure this feature:
- Ensure Approved Email is configured.
- Ensure Configuring Service Center is complete.
- Navigate to Admin > Operations.
- Select Shared Inbox Availability Job.
- Select Edit.
- Ensure the Status field is set to Active.
- Select Save.
- Navigate to Admin > Users & Groups > Permission Sets.
- Select the appropriate permission set.
- Select the Objects tab.
- Grant the following permissions (or use the Service Center permission set):
Object
Object Permission
Object Types
Fields
Field Permission
application_profile__v
R
application_profile__v
All Fields
Read
case__v
CRE
All Object Types
All Fields
Read
case_conversation__v
CRE
email__v
All Fields
Read
case_queue__v
R
All Object Types
All Fields
Read
channel_assignment__v
R
All Object Types
All Fields
Read
console_application_settings_object__v
R
All Object Types
All Fields
Read
domain__v
R
All Object Types
All Fields
Read
email__v
R
All Object Types
All Fields
Read
email_address__v
R
All Object Types
All Fields
Read
email_thread__v
R
All Object Types
All Fields
Read
microsoft_authorization__v
CRED
All Object Types
All Fields
Read
received_email_v
RE
service_center__v
All Fields
Read
sent_email__v
CRE
console_application__v
All Fields
Edit
user_to_channel__v
R
All Object Types
All Fields
Read
Request Shared Mailbox Access
Before you can configure shared mailboxes in Vault, an IT admin must set up and grant access to them.
Request an IT Admin to:
- Grant MS Admin Consent to Mail.ReadWrite.Shared. This grants Service Center application permissions for shared mailboxes.
- Create a shared mailbox or convert an existing mailbox to a shared mailbox. For example, support@verteo.com or billing@verteo.com.
- Place all users who require access to the shared mailbox into a group that will share access to the mailbox. This includes Managers, SCAs, and Service Center Reps.
Configure Shared Mailboxes
Once an IT admin has set up and granted access to shared mailboxes, you can configure them in Vault.
To configure shared mailboxes:
- Navigate to Admin > Users & Groups > Groups.
- Select Create
- Enter service_center_admins__v in the Label field
- Select System Administrator from the Included Security Profiles list or add other users
- Select Save
- Navigate to Admin > Configuration > Email and Domain Configuration > Domains.
- Select Create
- Enter an name for the email domain. For example, Verteo.
- Enter the email domain. For example, verteo.com.
- Select Save
-
Navigate to Admin > Configuration > Email and Domain Configuration > Email Addresses.
- Select Create
- Add values for the following fields:
- Name - Name for the email domain. For example, Verteo.
- Domain - Select you email domain. For example, verteo.com.
- Email Username - For example, support or billing
- External Display Name - Name to display for the email address. For example, Verteo Customer Support
- Application Target - Select Service Center
- Country - Select the appropriate country
- Select Save
- Navigate to Business Admin > Objects > case_queue__v.
- Select Create
- Ensure at least one queue is configured for each email address by enter the following:
- Queue - Display name for the queue. For example, Support
- External Queue ID - Email address for the queue
- Select Save
- Navigate to Admin > Configuration > Object Lifecycles > Console Channel Lifecycle.
- Select pending_state__v in the States section.
- Select Edit in the Entry Actions section
- Select Create Entry Action
- Select Always as the Condition Type
- Select Send a notification
- Select Channel Assignment Pending as the Notification Template
- Select Service Center Admins as the Recipient
- Select Save
- Navigate to Admin > Configuration > Object Lifecycles > Console Channel Lifecycle.
- Select online_state__v in the States section.
- Select Edit in the Entry Actions section
- Select Create Entry Action
- Select Always as the Condition Type
- Select Send a notification
- Select Channel Assignment Online as the Notification Template
- Select Service Center Admins as the Recipient
- Select Save
- Navigate to Admin > Configuration > Object Lifecycles > Console Channel Lifecycle.
- Select error_state__v in the States section.
- Select Edit in the Entry Actions section
- Select Create Entry Action
- Select All conditions are met as the Condition Type
- Select the Status Message field
- Select the equals condition
- Enter err_provider__v in the text box to complete the condition
- Select Send a notification
- Select Channel Assignment Provider Error as the Notification Template
- Select Service Center Admins as the Recipient
- Select Create Entry Action
- Select All conditions are met as the Condition Type
- Select the Status Message field
- Select the equals condition
- Enter err_auth__v in the text box to complete the condition
- Select Send a notification
- Select Channel Assignment Auth Error as the Notification Template
- Select Service Center Admins as the Recipient
- Select Create Entry Action
- Select All conditions are met as the Condition Type
- Select the Status Message field
- Select the equals condition
- Enter err_platform__v in the text box to complete the condition
- Select Send a notification
- Select Channel Assignment Platform Error as the Notification Template
- Select Service Center Admins as the Recipient
- Select Save
- Navigate to Admin > Operations > Job Definitions.
- Select Shared Inbox Availability Job
- Select Active
- Navigate to CRM Setup > Outlook Integration Administration.
- Ensure the Outlook Integration User has a valid vault user name and password.
- Ensure the integration user's permission set includes the following permissions:
- Application - Access API; Access File Staging
- Objects - Received Email - for Service Center object type: Read, Create, Edit
- Navigate to Business Admin > Objects > Console Application Settings.
- Select the Default record
- Select the edit icon.
- Select Shared Inbox for Microsoft Integrations.
- Enter a value for Email Import Days (default is 3)
- Select Inbound for Console Tab Access (or set it on the record which has Console Application Profile value)
- Select Save
- Navigate to Business Admin > Objects > Channel Assignments.
- Select Create
- Select Email
- Enter a name for the channel.
- Enter the email address the IT admin created for shared mailbox access for Mailbox.
- Select Save
- Navigate to Business Admin > Objects > Channel Assignments.
- Select the appropriate channel_assignment__v record
- Select Edit
- Enter the subdomain to be used for sending emails from Service Center in the Email Subdomain field. If this field is left blank, the domain of the configured mailbox is used. For example, verteobiopharma.com from support@verteobiopharma.com.
- Select Save
The subdomain used for sending emails should align with company branding. In addition, matching the sending domain to the “From” address can improve email deliverability.
- Navigate to Business Admin > Objects > Users to Channels.
- Select Create
- Select the Channel created above
- Select the appropriate user for each Channel Assignment record to grant users access to specific inboxes, create records in the User to Channels (user_to_channel__v) object. This configuration should mirror the user and group membership of the shared inbox in Microsoft 365.
- Select Save
Managing Email and Email Inboxes as
Service Center Reps can access the Inbound tab to manage their work. When first accessing Service Center, Service Center Reps must authenticate with Microsoft to allow the integration to access shared inboxes.
Service Center integrates with Microsoft Office 365 to capture inbound emails and generate cases. Service Center does not, however, filter inbound email for spam or malware. Customers should ensure Microsoft Office 365 is configured to handle spam filtering, malware protection, and other security measures.
The Inbound tab is a pinned tab that contains a left and right pane. The left pane contains the My Cases and Inboxes sections. The right pane's content changes based on the selection in the left pane. A Refresh button in the header of the left pane reloads the entire tab and all its data.
Emails originate from Microsoft Outlook. There is one email address per inbox. Users can have multiple inboxes assigned to a queue. Inbox visibility is determined by a user’s alignment with Microsoft Groups. Only users in the groups associated with the inbox have access to the inbox. Users are prompted to log in to Microsoft Teams when they select the Service Center tab.
Managing Inboxes
Service Center Reps monitor their email inboxes for new mail. The Inboxes section in the left pane displays a list of the shared email inboxes the user is assigned to, along with a count of new emails in each. Emails are sorted by date, descending. Emails from the past 30 days display.
A case in Pending or On Hold status automatically changes to Open when a new email is received for that case.
To preview the email content, Service Center Reps select an inbox, then select an email. All users, not just the case owner, with access to a case can preview email drafts. If another user started a reply, a preview of that draft email is visible to any user who can view the case.
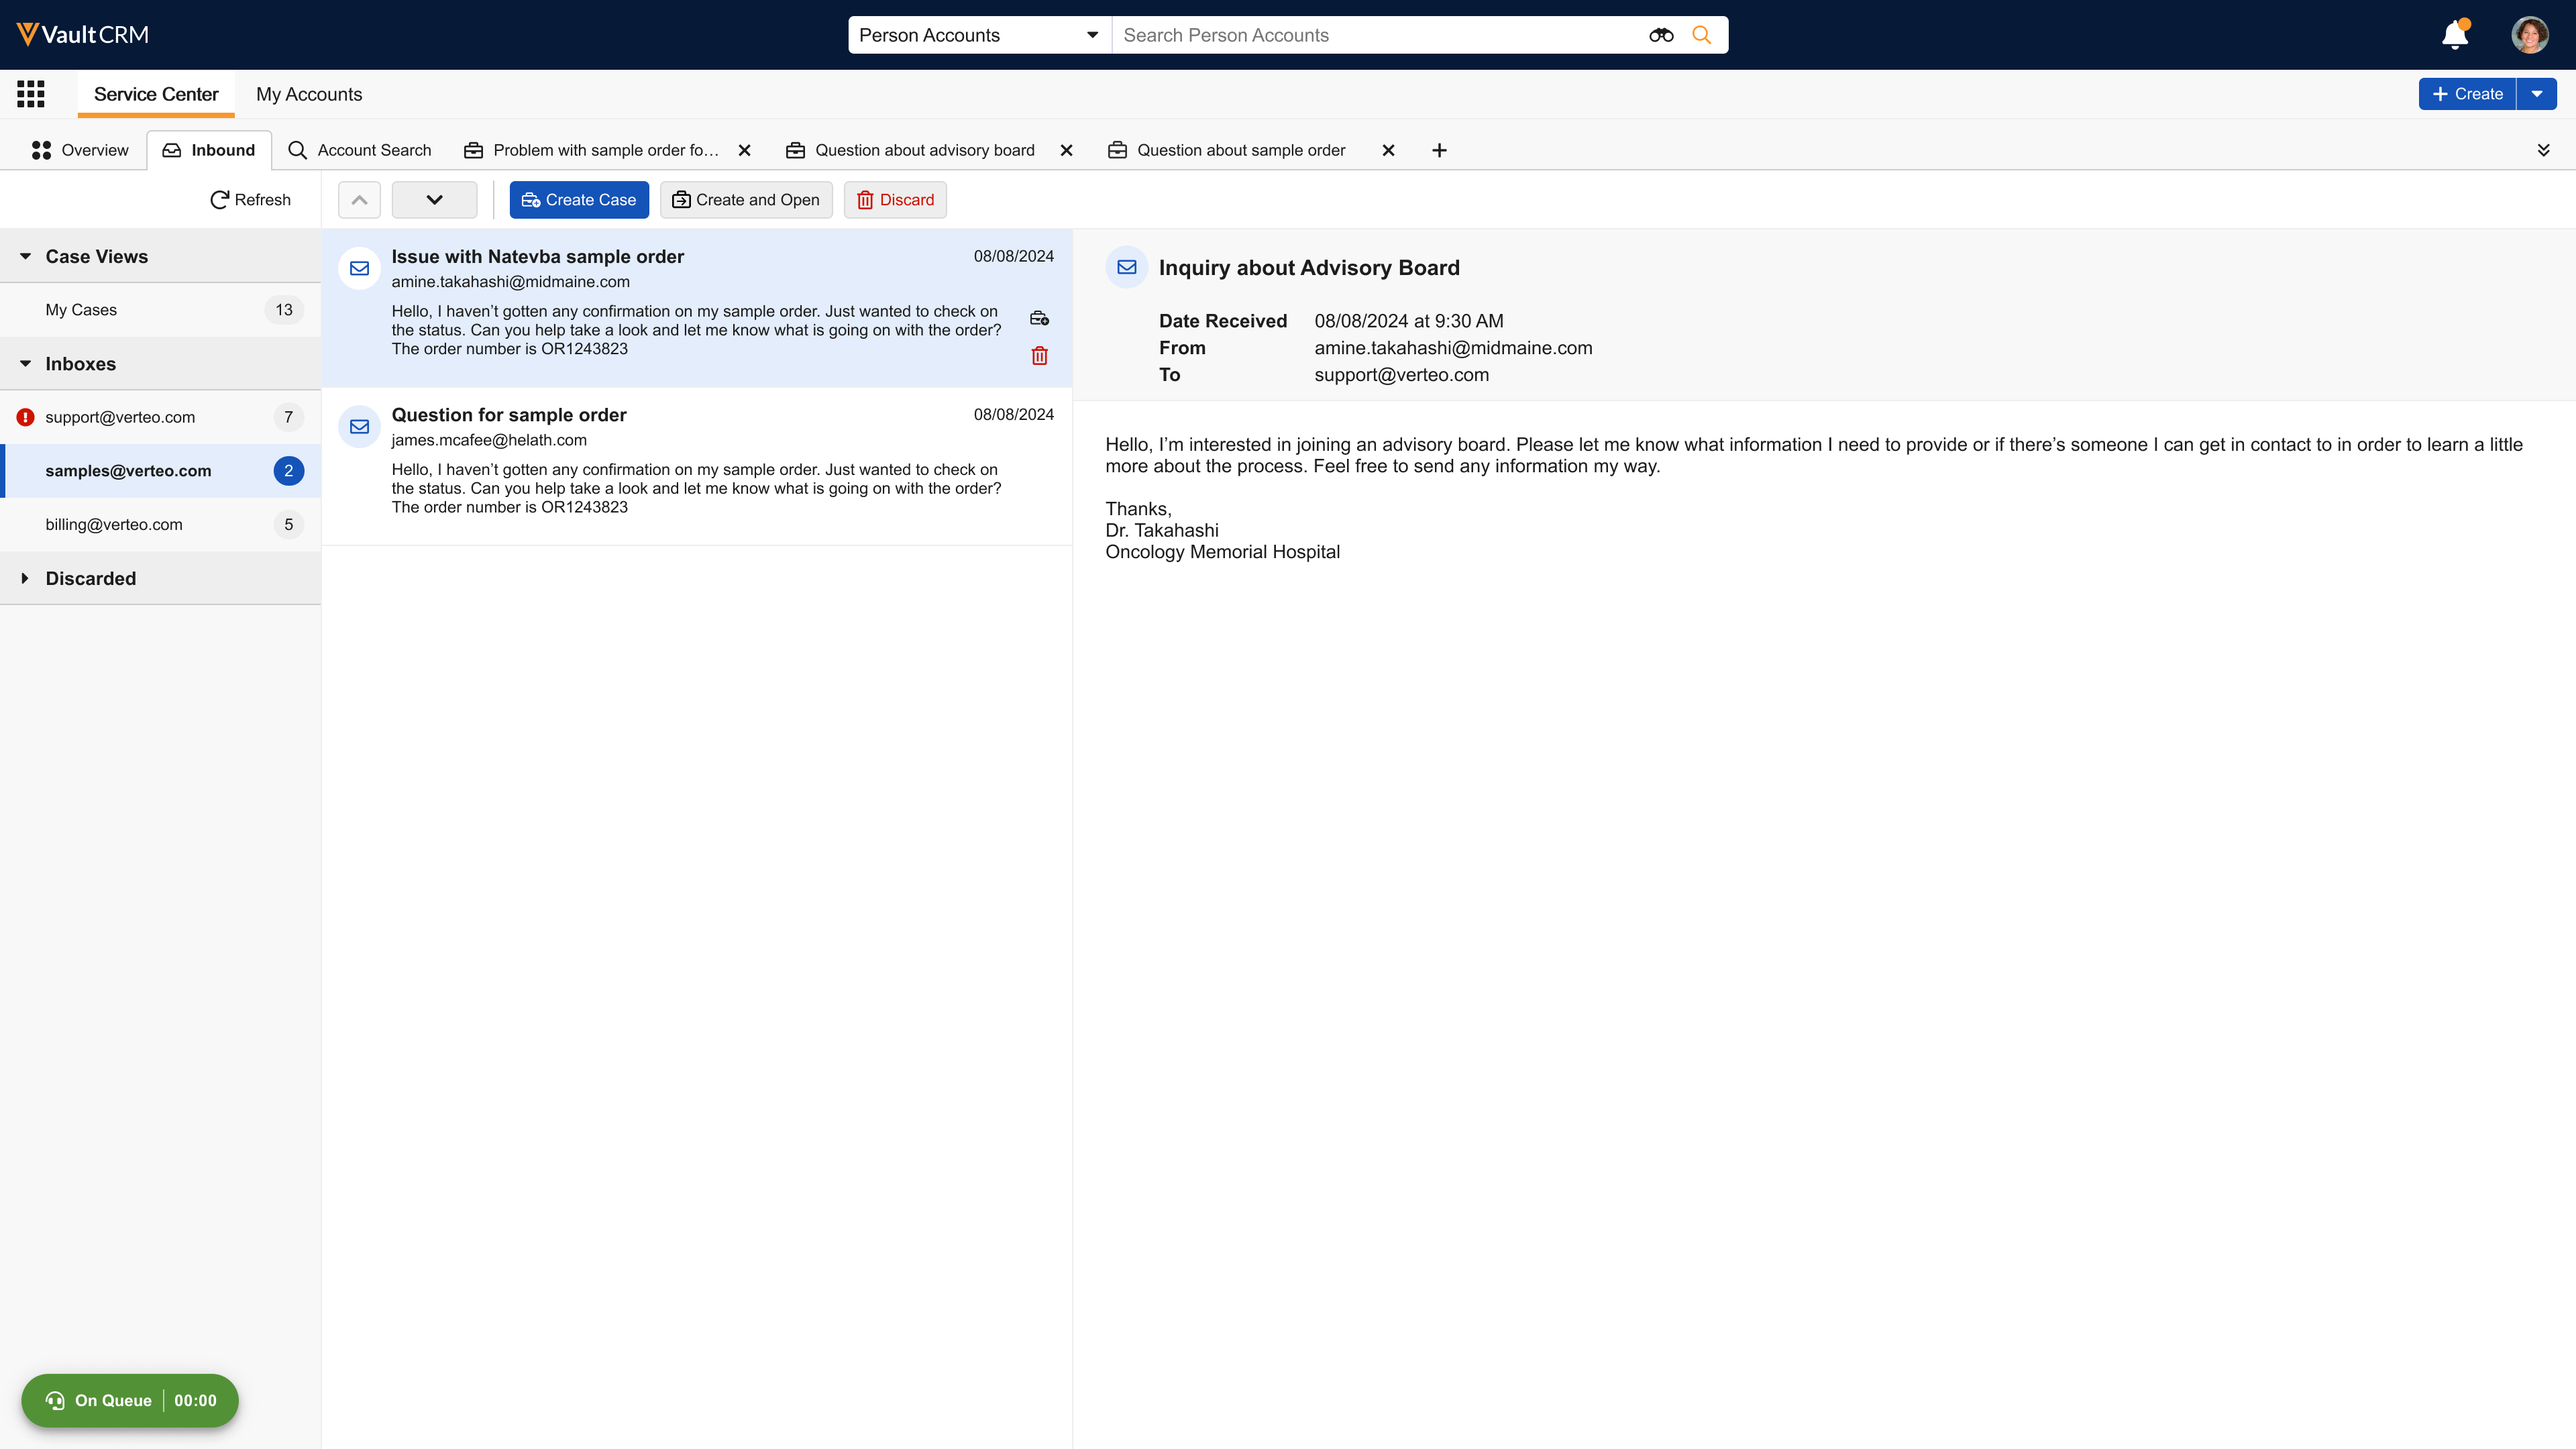
After reviewing the email content, they can select one of the following actions:
- Create Case - Creates a case but doesn’t navigate you to it. Use this option if you don’t plan on working on the case immediately.
- Create and Open - Creates a case and opens the tab
- Discard - Discard emails that do not require a case to be created
If the original sender replies to the email and copies another email address, and they reply, that reply is included in the email chain. However, Service Center Reps can only reply to the original sender, not any other email addresses.
Replying to an Email
Once a case is created from an email, the assigned case owner can reply. A case in Pending, On Hold, or Escalated status automatically changes to Open when a Service Center Rep replies to an email.
Email replies are sent to the email address of the account of record. Forwarding, courtesy copy (cc), and blind courtesy copy (bcc) are not supported.
The reply from address is auto-set to the email address of the channel assignment object (the email that it was received on). Users cannot modify or change the email address.
To reply to an email:
- Select Reply from an email thread. The action is only active if you are the case owner, an account is assigned to the case, and there is no other active draft for the thread. The email composer opens, pre-populated with a subject line and the recipient's email address.
- Compose a message in the rich text editor. The system automatically saves your draft as you type. A "Last updated" timestamp displays in the bottom right of the composer.
- Select Send. A loading indicator displays while the email is sent using Approved Email. When successful, the composer is replaced with a card displaying the sent email content and its current delivery status (for example, Delivered or Opened). A new conversation and timeline entry are created for the sent email.
The Response Time is calculated for the first reply to an inbound email, and Talk Time (the time between creating the draft and sending it) is calculated for all replies. These values are stored on the Case Conversation record for reporting.
If you navigate away from the composer, the draft is saved and remains accessible. While the composer is open, all other Reply buttons in the thread are disabled. When the email is ready, Service Center Reps can send it to the recipient.
Managing Cases Without an Assigned Account
If a case is created from an email but an account is not yet assigned, Service Center Reps must manually associate an account with the case. A case in New status without an account associated to it automatically changes to Open status when a Service Center Rep assigns it to an account.
To manually associate an account with a case:
-
Select Select Account from the Case Messaging tab.
-
Search for and select the appropriate account.
-
Select Save.
Once the account is associated, the case state automatically transitions to Open if the case owner is assigned, and the Reply action on the email becomes active.
Re-authenticating Microsoft Credentials for Shared Mailboxes
When Microsoft requires users to reauthenticate their credentials, they are notified in Vault CRM. For example, users may need to reauthenticate their credentials when Microsoft's security policies change, or when their Microsoft password or email address changes.
When users with invalid credentials and a Shared Mailbox connection navigate to Service Center, a Sign In to Microsoft pop-up displays.
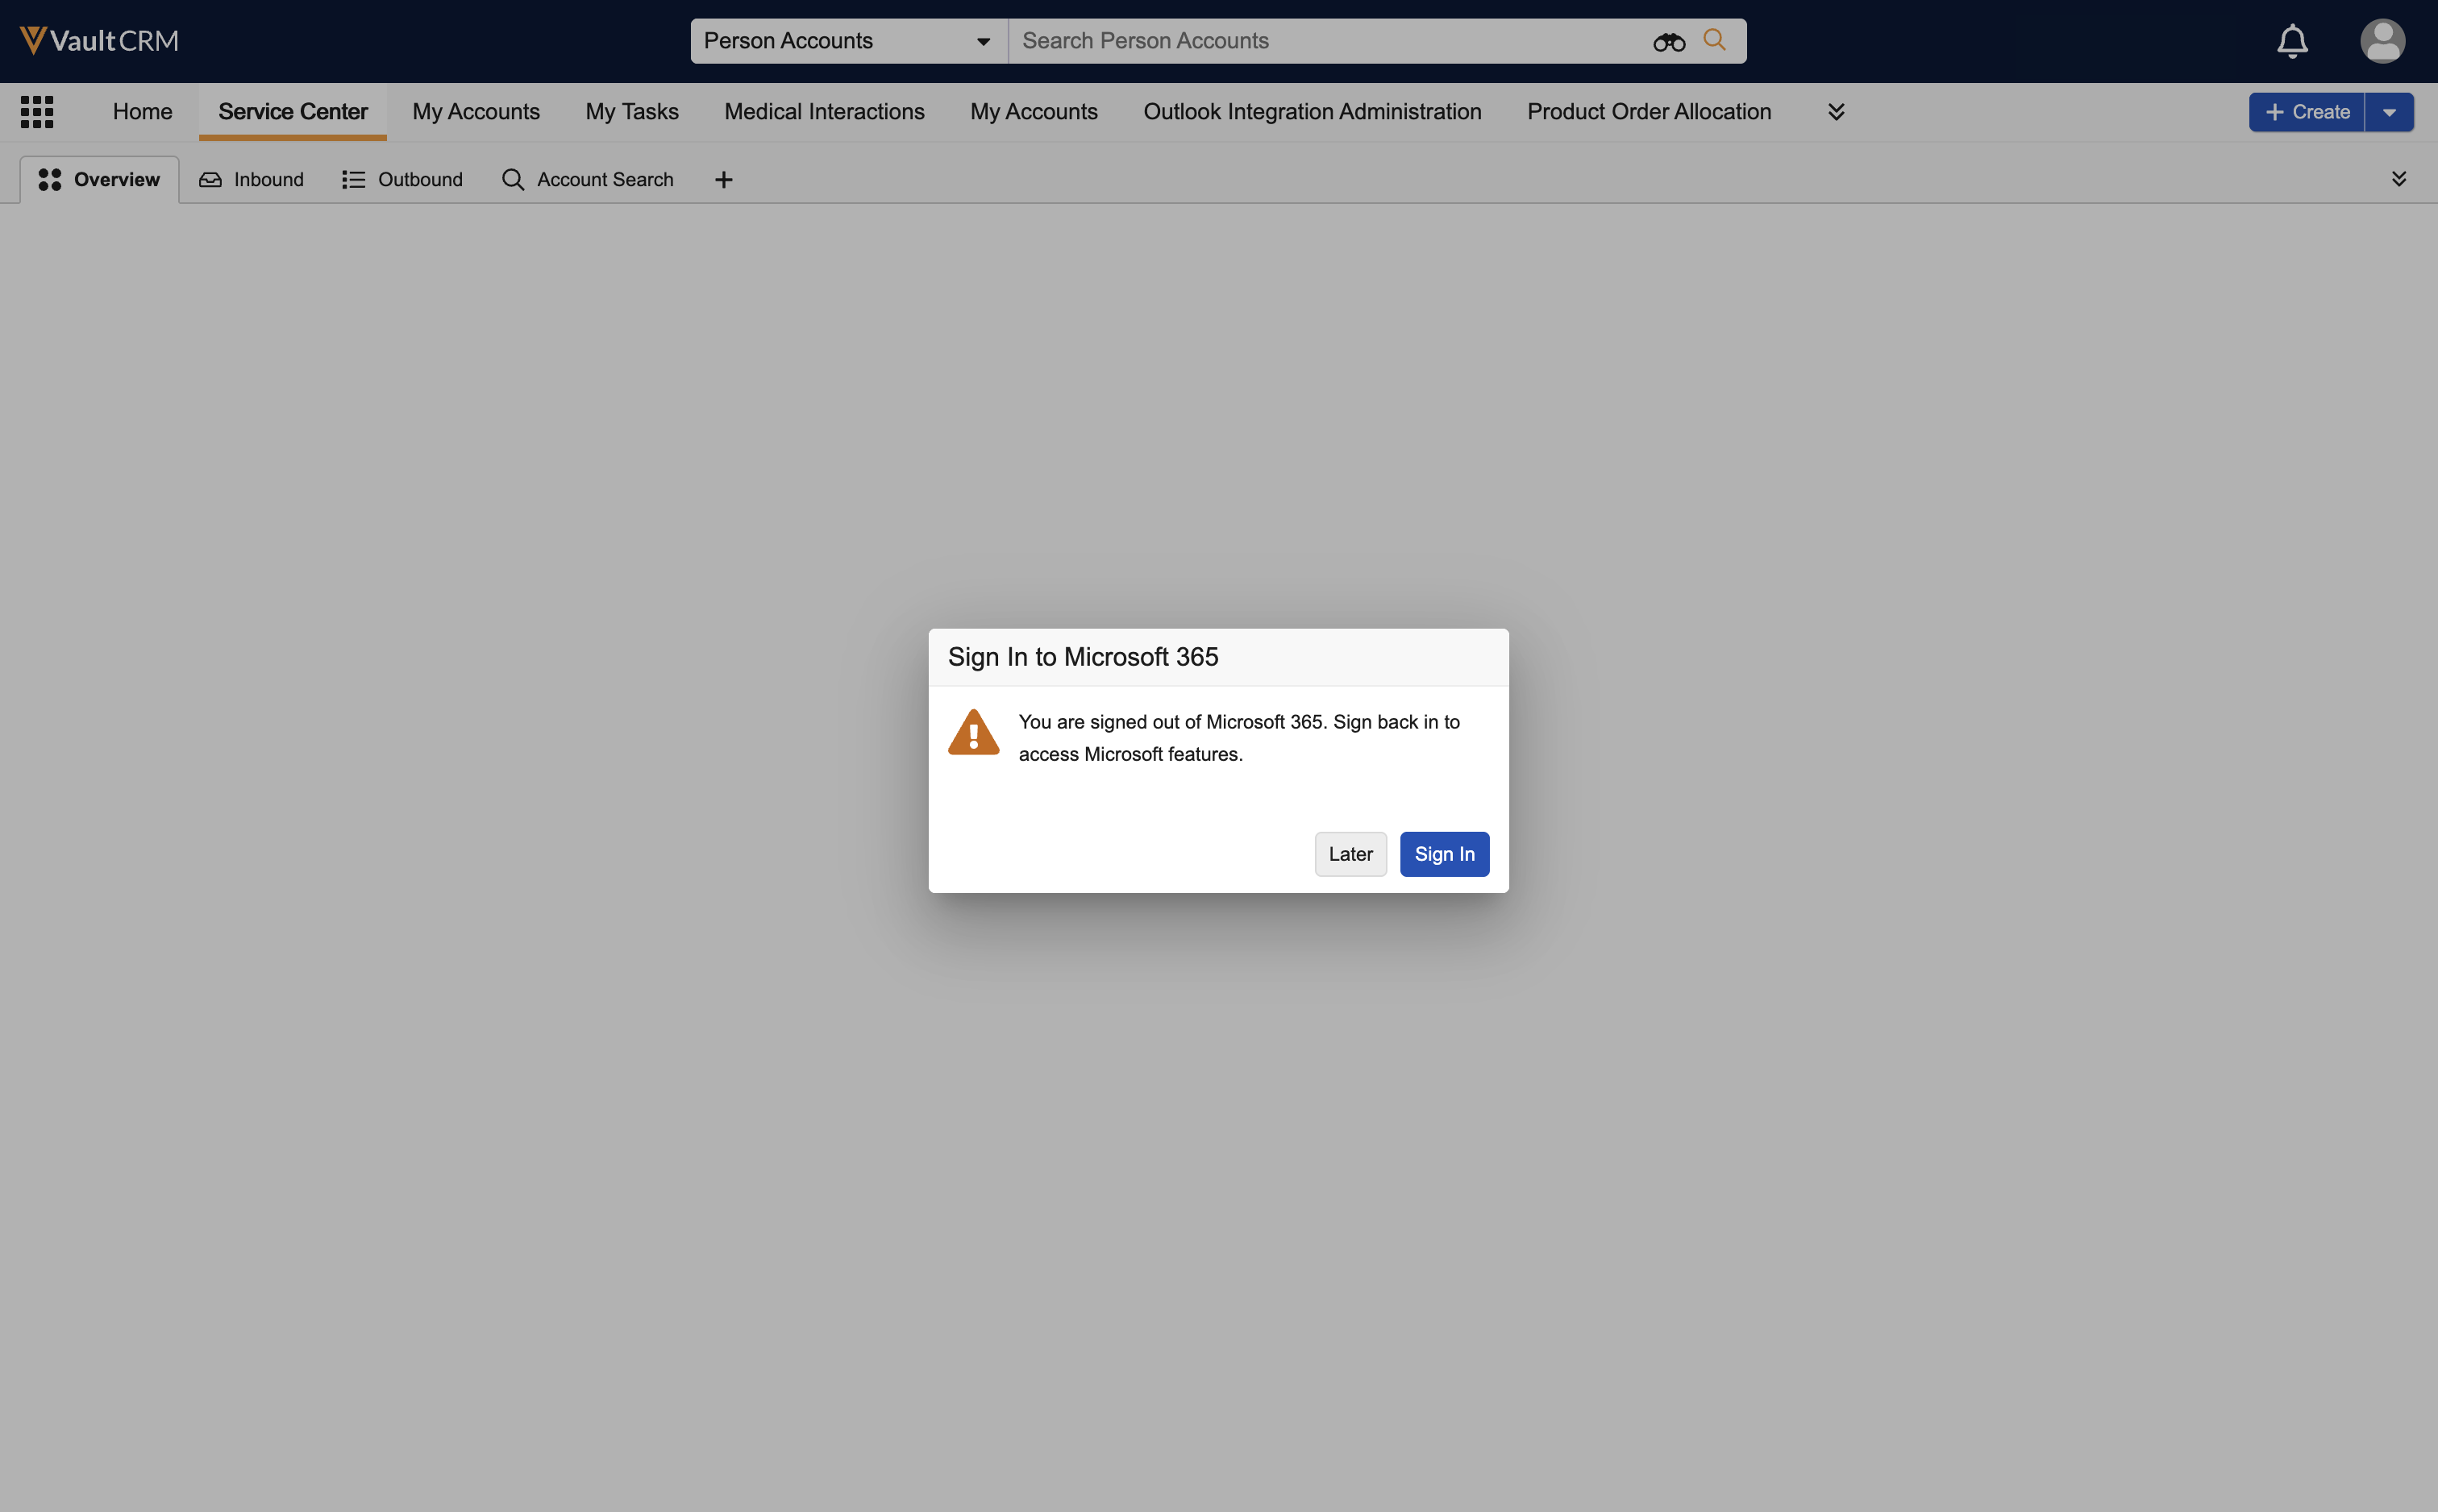
To reauthenticate, select Sign In and complete the Microsoft sign in process. After successful authentication, the user's Microsoft integrations resume. To defer the action, select Later. The pop-up closes and users can continue with Service Center tasks not related to Microsoft integrations.
If a user defers re-authentication from the main Service Center page, they are prompted again when trying to use integrated features. To access emails in the Inbound tab in Service Center, users must reauthenticate. A red banner displays on the Inbound tab, indicating the user is signed out and unable to receive new emails.
To reauthenticate:
-
Select the Sign In link within the banner.
-
Complete the Microsoft sign in process.
Reauthentication is only available for users with an active internet connection.

