Importing and Configuring Accounts in Territory Designer
Importing Accounts
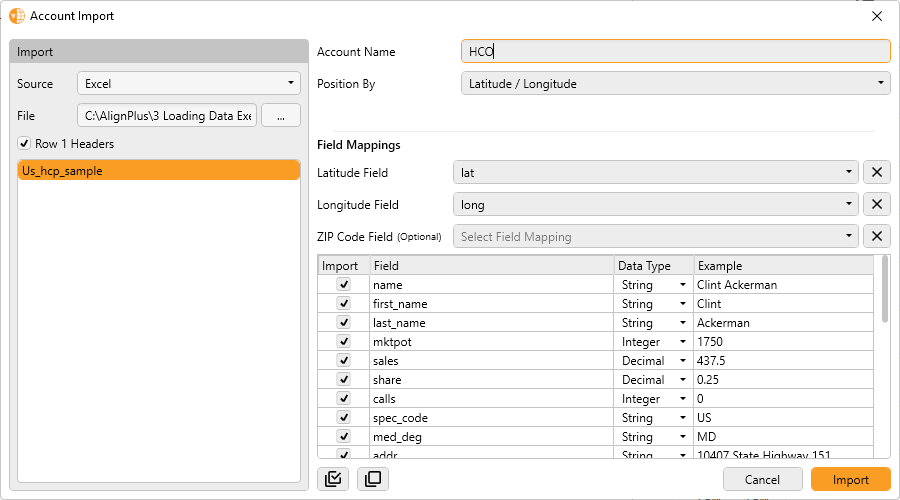
To import an account table:
-
Select Data> Import> Account Table from the main menu.
-
Select a source file type from the Source drop-down. The following values are available:
- Excel
- CSV
- Access Database
- Select ... to browse and select a file to import.
- Select the Row 1 Headers check box if the source file contains a first row of field names. This is only applicable for CSV or Excel source files.
- Select the appropriate source Excel tab name or Access database table name from the list. This is only applicable for Excel or Access Database source files.
-
Enter an Account Name used to refer to the imported accounts.
The name cannot include spaces.
-
Select a Position By method. This determines map location and summarization for the imported accounts. The following methods are available:
- ZIP Code – Requires the ZIP Code, Brick, or Postal Code field
- Latitude / Longitude – Requires the Latitude and Longitude fields
- City – Requires the City Name and State Abbreviation fields
- County – Requires either the County 5-digit FIPS or both the County Name and State Abbreviation fields
- State – Requires the State Name, State Abbreviation, or State 2-digit FIPS field
- CBSA – Requires the CBSA Code field
Using Latitude / Longitude or ZIP Code is the preferred method for best mapping accuracy and data summarization.
- Select Field Mappings.
- Select the appropriate field from the table containing the required matching fields.
- Select the check box for each additional field to import from the source.
-
Select the Data Type for each imported field. Available values are:
- String
- Integer
- Decimal
- Select Import.
After account files have been loaded, they must be configured as well as their numeric attribute data. See Configuring Accounts and Attributes from Account Files for more information.
Configuring Accounts and Attributes from Account Files
After Account files are loaded, they must be configured along with their numeric Attributes. Examples of Attributes include:
- The number of Hospital beds
- The Index used to evenly balance territories, which may comprise of several Attributes, for example:
- 50% Workload
- 30% Potential
- 20% Sales
Configuring Attributes
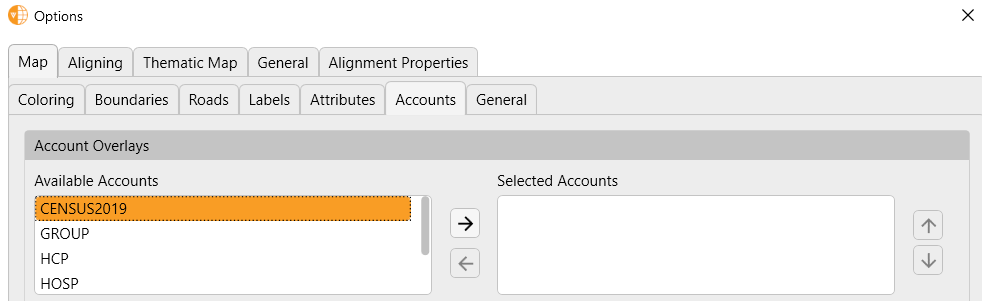
Attribute data is created from numeric Account data. Configuring Accounts enables you to see and use data by navigating to Options > Map > Accounts.
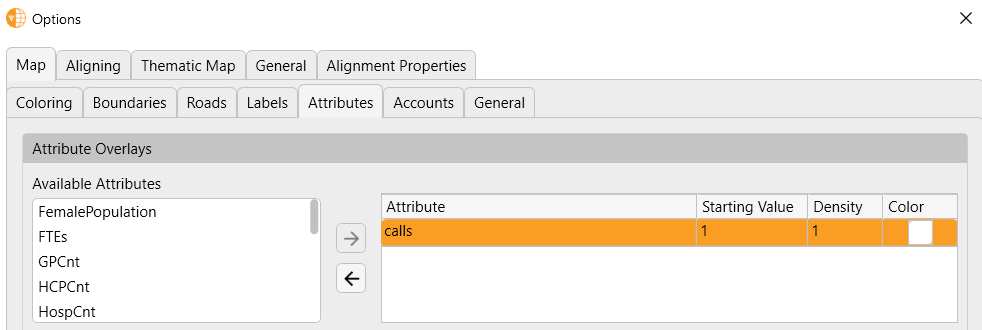
Configuring Attributes enables you to see and use data in the Options > Map > Attributes sub-tab.
Accounts and Attributes are specific to a Scenario. Users can determine, through the Configuring tool, what accounts and attributes are made available in that Scenario.
Accounts must be configured before any attributes referencing fields from the account can be configured.
The Accounts and Attributes window consists of the following sections:
- Configure Accounts
- Configure Attributes
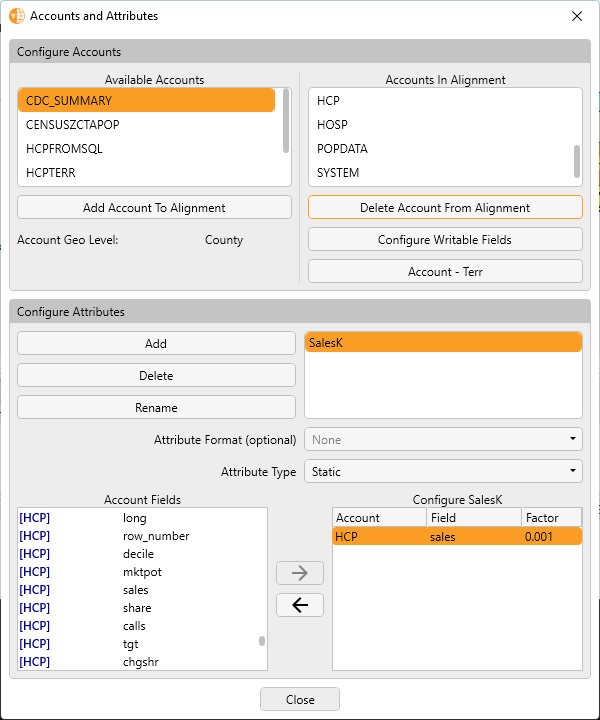
Using the Configure Accounts Section
To configure Accounts, navigate to Main Menu > Tools > Configure Accounts-Attributes.
From the Accounts and Attributes menu, users can perform a variety of Account-related actions.
Adding Accounts
To add accounts to the Alignment:
- Select an account from Available Accounts.
- Select Add Account To Alignment.
When an account is configured, its numeric fields become available as Account Fields which can then be configured as Attributes.
Removing Accounts
To remove accounts from the Alignment:
- Select an account from Accounts In Alignment.
-
Select Delete Account From Alignment.
All attributes that reference the account are also removed from the scenario.
Deleting Available Account Tables
To delete an Available Account Table from the database:
- Ensure the account is removed from all scenarios that reference it.
- Right-click an account in the Available Accounts section.
- Select Delete Account Table.
Renaming Accounts
To rename an account in the Alignment:
-
Right-click an account in one of the following sections:
- Accounts in Alignment
- Available Accounts
- Select Rename Account Table.
- Enter the new Account Name.
- Select OK.
Using the Configure Attributes Section
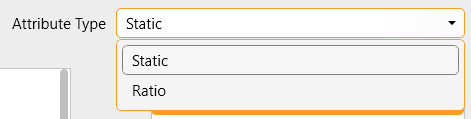
After accounts are added, create and name the attributes available for the current scenario. The following types of attributes are available:
- Static Attribute – Enables accessing original field values from your account tables
- Ratio Attribute – Enables creating a ratio of configured attributes
Creating Static Attributes
- Select Add Attribute.
- Enter an appropriate name. An attribute name must be no more than 30 characters, must be unique, and must contain only alphanumeric and underscore characters. The entered name does not need to match the associated field’s name.
- Select OK.
-
Select one or more Account Fields from the Account Fields list used to define the New Attribute.
If multiple fields are selected, the attribute will represent their sum. In the example below, the two fields are summed for Total Population.
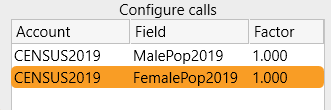
- Select the right Arrow button to add the selection to the Configuration section.
-
Enter a Factor to multiply against each field in the configuration. This step is optional and is useful to reduce large numbers, increase decimals to whole numbers, pro-rate fields to create a formula or use a pre-calculated value to normalize a performance field. For example, a pro-rated factor may be used if a particular disease affects women more than men.
- Repeat this process to create all appropriate attributes.
- Select Close when done.
Creating Ratio Attributes
- Select Add Attribute.
- Enter the new attribute name.
- Select OK.
- Select Ratio from the Attribute Type drop-down.
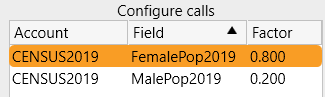
- Select previously configured attributes to be used as the numerator and denominator of the ratio in the Configure section.
- Enter a factor to multiply against each field in the ratio. This step is optional.
- Select Close.


