Importing an Alignment into Territory Designer
Importing an Alignment from Territory and ZIPTerr Tables
Data may be imported from MS Excel, CSV Text, or MS Access files.
To import an alignment from a set of files, a Territory Table must be imported first, followed by a ZIPTerr table:
-
Territory Table – Defines the territory hierarchy of the alignment. The table must include the following columns unless otherwise indicated:
- Territory ID
-
Parent territory ID – Optional, though recommended. All first level territories reference the Territory ID of the top level parent territory, while second level territories reference the Territory IDs of first level territories
The top level Parent territory does not have a Parent Territory ID.
- Territory name
Veeva recommends the inclusion of the full hierarchy of parents and children in the import table. Territory IDs that are strictly formatted with sequences of characters that define the hierarchy may be used to define structures without explicitly listing parents in the table.
For example, US101001 may define a hierarchy of US> US1> US101> US101001. See Defining the Parent Hierarchy for more information.
- ZIPTerr Table – Links each ZIP Code to its assigned territory. The table must include the following information:
- ZIP Code (postal code / brick)
-
Territory ID
All Territory ID references for ZIP assignment are normally at the bottom Territory level. Alignment options can be set to allow ZIP assignment to additional levels.
- Account Tables – Data to display on the Map and in the Alignment Worksheet. All tables other than the territory definitions import as accounts, including HCPs, Hospitals, Pharmacies, Sales by ZIP/postal/brick, Performance by ZIP/postal/brick, Demographics, Population, or other data. Account Tables must include a field or set of fields that define its geographic reference. Geographic references for Accounts may consist of the following:
- ZIP (5-digit) / postal code / brick
- Latitude and longitude – Defined as two columns
- City and state abbreviation – Defined as two columns
- County (US Only)
- County name and state abbreviation – Defined as two columns
- FIPS Code (5-digit)
- State (US Only)
- Name
- Abbreviation
- FIPS Code (2-digit)
Importing the Territory Table
To import the territory table:
- Close the existing scenario, if applicable, by selecting File > Scenario > Close.
-
Select Data > Import > Territory Table from the main menu.
-
Select a source file type from the Source drop-down. The following values are available:
- Excel
- CSV
- Access Database
- Select ... to browse and select a file to import.
- Select the Row 1 Headers check box if the source file contains a first row of field names. This is only applicable for CSV or Excel source files.
- Select the appropriate source Excel tab name or Access database table name from the list. This is only applicable for Excel or Access Database source files. A list of all fields in the table displays in the bottom right corner of the window.
-
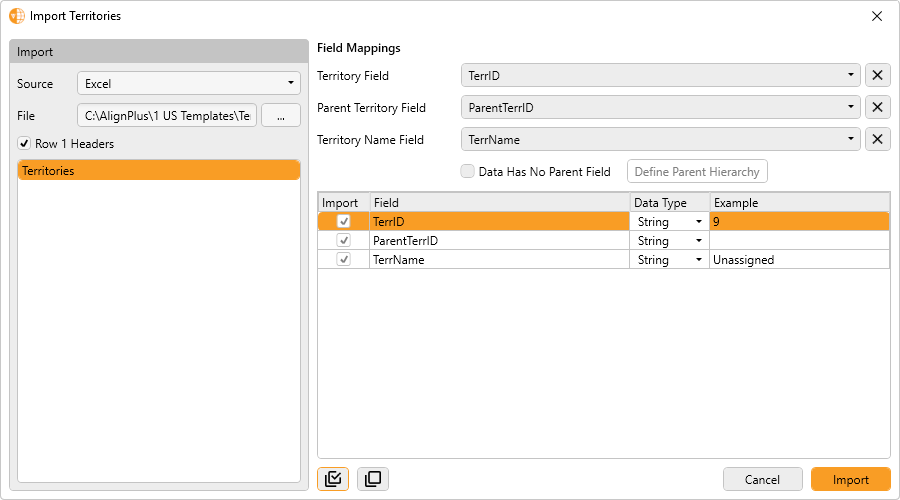
Select the appropriate field from the table for each of the field mappings:
- Territory Field (TERR_ID)
- Parent Territory Field (The Parent ID is optional if the data has no parent field and territory IDs follow a rigid structure.) See Defining the Parent Hierarchy for more information.
- Territory Name Field (TERR_NAME optional)
-
Select the Import check box for each additional field to import from the source.
The Select All (
 ) and Deselect All (
 ) buttons may be used to toggle selection of all fields other than fields that are required by the field mappings.
 -
Select the Data Type for each imported field or accept the defaults. Available types are:
- String
- Integer
- Decimal
- Select Import.
- Enter a new name for the Alignment being created.
- Select OK.
-
Select a Default Territory from one of the listed imported territories.
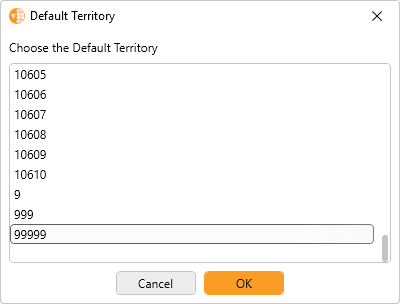
The Default Territory is typically the white space or Unassigned Territory. If none of the imported territories are intended to be the default territory, select one to use temporarily. A new one can be set up at a later time.
- Select OK.
Defining the Parent Hierarchy
If a Territory Table does not contain parent territories and parent IDs, but territory IDs are formatted with sequences of characters that define the hierarchy with a rigid structure, then the territory IDs can be used to define structures.
For example, 101001 may define a Region>District>Territory hierarchy of 1> 101> 10101.
To define the parent hierarchy during import using territory IDs that conform to a rigid structure:
- Select the Data Has No Parent Field check box.
- Select Define Parent Hierarchy.
- Select Add Level to add additional levels in the hierarchy as required.
-
Edit the Name of each level.

- Select a character length for each of the level IDs as a portion of the whole ID. Each subsequent parent level is a larger subset of the territory ID.
- Select OK after all levels have been configured.
- Select Import to proceed with import of the Territory table using the defined parent structure.
Importing the ZIP Code/Territory (ZIP Terr) Table
After a Territory hierarchy is created, the next step is to import the ZIP Terr Table.
This table relates ZIP Codes to territory IDs.
-
Select Data> Import> ZIP/Terr Table from the main menu.
-
Select a source file type from the Source drop-down. The following values are available:
- Excel
- CSV
- Access Database
- Select to ... browse and select a file to import.
- Select the Row 1 Headers check box if the source file contains a first row of field names. This is only applicable for CSV or Excel source files.
- Select the appropriate source Excel tab name or Access database table name from the list. This is only applicable for Excel or Access Database source files.
-
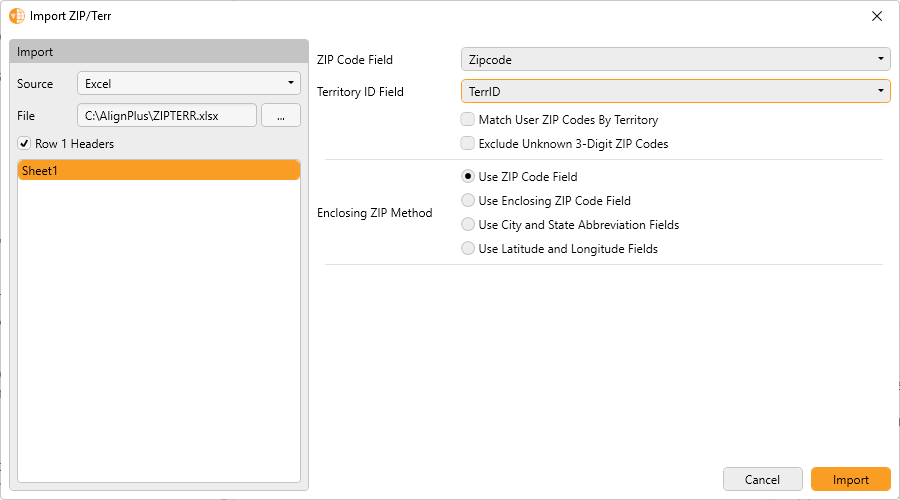
Select the appropriate field from the table for each of the field mappings:
- ZIP Code Field
- Territory ID Field (TERR_ID)
- Select the Match User ZIP Codes By Territory check box to use the Territory ID of the user’s ZIP Code to limit the selection of an enclosing ZIP Code to match one within the same territory. This step is optional.
- Select the Exclude Unknown 3-digit ZIP Codes check box to ignore User ZIP Codes that have no match on the first 3 digits. This step is optional.
-
Select the appropriate Enclosing ZIP Method for determining enclosing ZIP Codes. This defines the method used to link custom User ZIP Code points to existing ZIP Code shapes. The available methods are:
- Use ZIP Code Field – User ZIP Code points are created within the shape ZIP Codes that are numerically closest to the user ZIP Code and match on the first 3 digits. This is the default method.
- Use Enclosing ZIP Field – If an Enclosing ZIP field is provided, User ZIP Code points are created within the Enclosing ZIP Code shape.
- Use City/State Field – If City and State abbreviation fields are provided, User ZIP Code points are created within the shape ZIP Codes that are numerically closest to the user ZIP Code and match the City and State abbreviation field values.
- Use Latitude and Longitude Fields – If Latitude and Longitude fields are provided, User ZIP Codes are created within the shape ZIP Codes that enclose the coordinates of the provided Latitude and Longitude.
- Select Import.

