Agentic Sign-In Sheet for Events
Agentic Sign-In Sheet uses AI to transform photographs of paper event sign-in sheets into confirmed attendance records and new walk-in attendee records in Vault CRM. The Sign-In Sheet Agent evaluates uploaded images against an event's registered attendees, speakers, and team members, and extracts handwritten walk-in entries, staging every proposed change for review before any record is created or updated.
By eliminating manual transcription and row-by-row reconciliation of paper sign-in sheets, Agentic Sign-In Sheet empowers event organizers to complete post-event sign-in processing in minutes instead of hours, while reducing the chance of data entry errors that create compliance exposure.
Who can use this feature?
- End Users — Browser, iPad
- Supported Sign-In Sheets
- Uploading Sign-In Sheets
- Reviewing the Extracted Results
- Reviewing the Registered Roster
- Reviewing Walk-Ins
- Saving Sign-In Results
- Users require Vault AI and Events Management licenses
Configuring Agentic Sign-In Sheet for Events for
 End Users
To configure this feature, ensure Configuring Agentic Sign-In Sheet is complete.
Supported Sign-In Sheets
End Users
Agentic Sign-In Sheet supports paper sign-in sheets generated from a Print Template configured on the event. The agent uses Print Templates to interpret the printed sheet, whether it carries pre-printed attendee, speaker, and team member names, blank rows for handwritten entries, or a mix of both.
Sign-in sheet values are interpreted in the language of the Print Template associated with the event. Ensure the Print Template language matches the language likely to be used for sign-in sheet entries.
Sign-in sheets that are not generated from a configured Print Template, including venue-provided forms, third-party templates, and sheets handwritten on blank paper, are not supported.
For more on Print Templates and column requirements, see Print Template Requirements.
Uploading Sign-In Sheets as
End Users
Users begin the sign-in process by photographing the event's physical sign-in sheet and submitting the images for processing.
To capture and submit sign-in sheet images for processing:
-
Select Process Sign-In Sheet from the All Actions menu on the appropriate event.
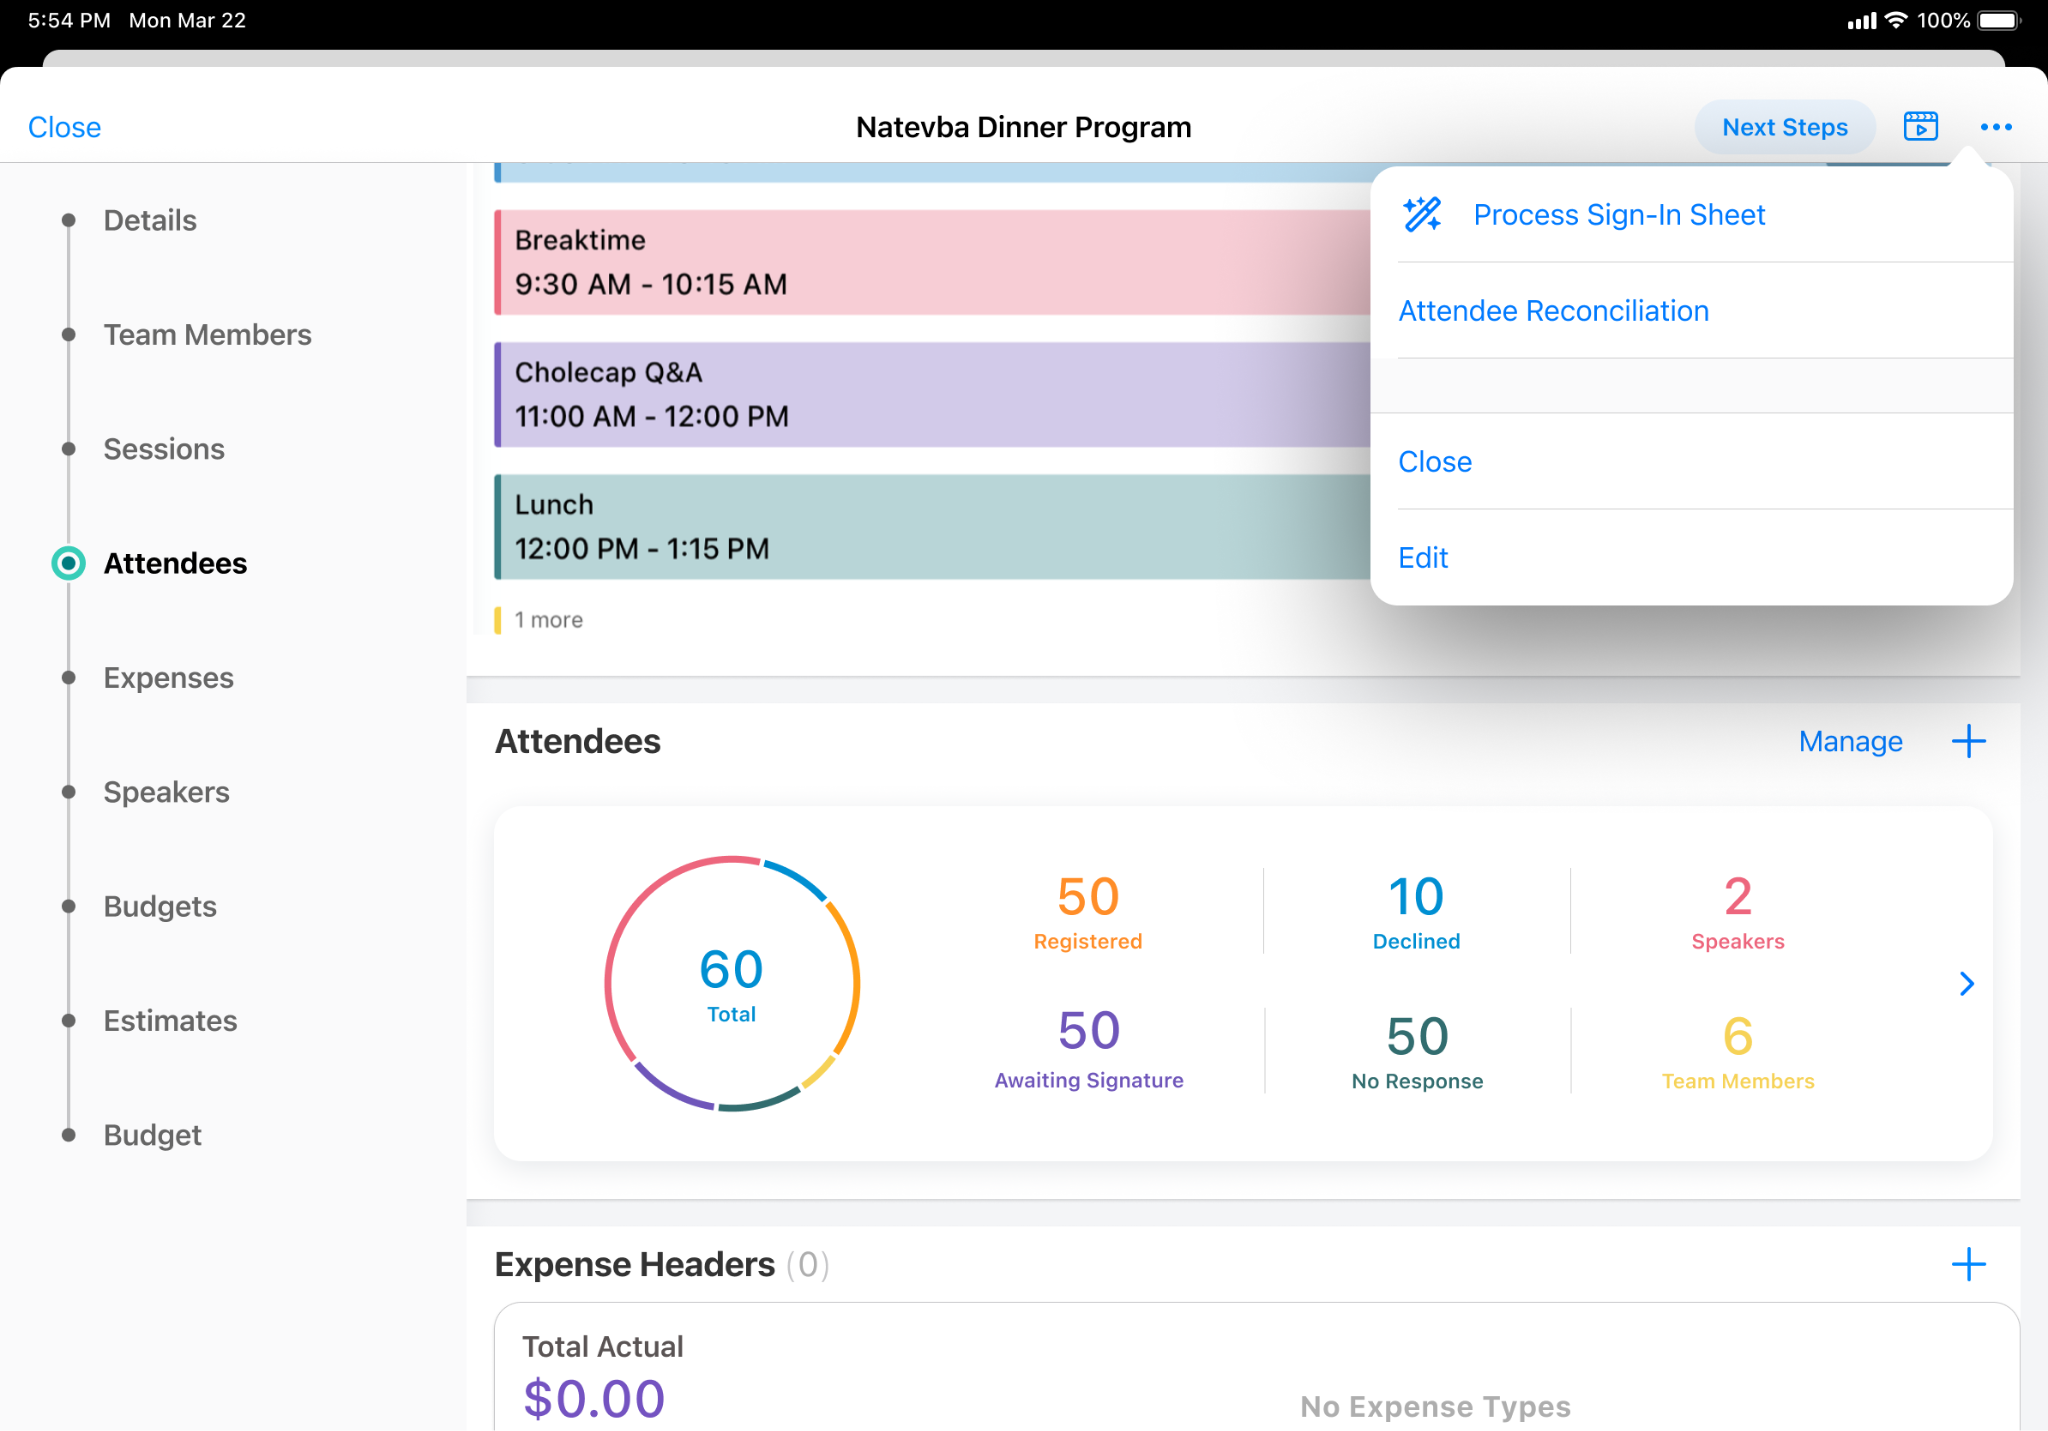
There must be at least one eligible sign-in sheet for the event's Print Template. For more information, see Print Template Requirements in Configuring Agentic Sign-In Sheet.
-
Capture or select a photo for each page of the sign-in sheet:
- iPad: Select Take New Photo to capture a page with the camera, or select Add from Device Library to choose an existing photo.
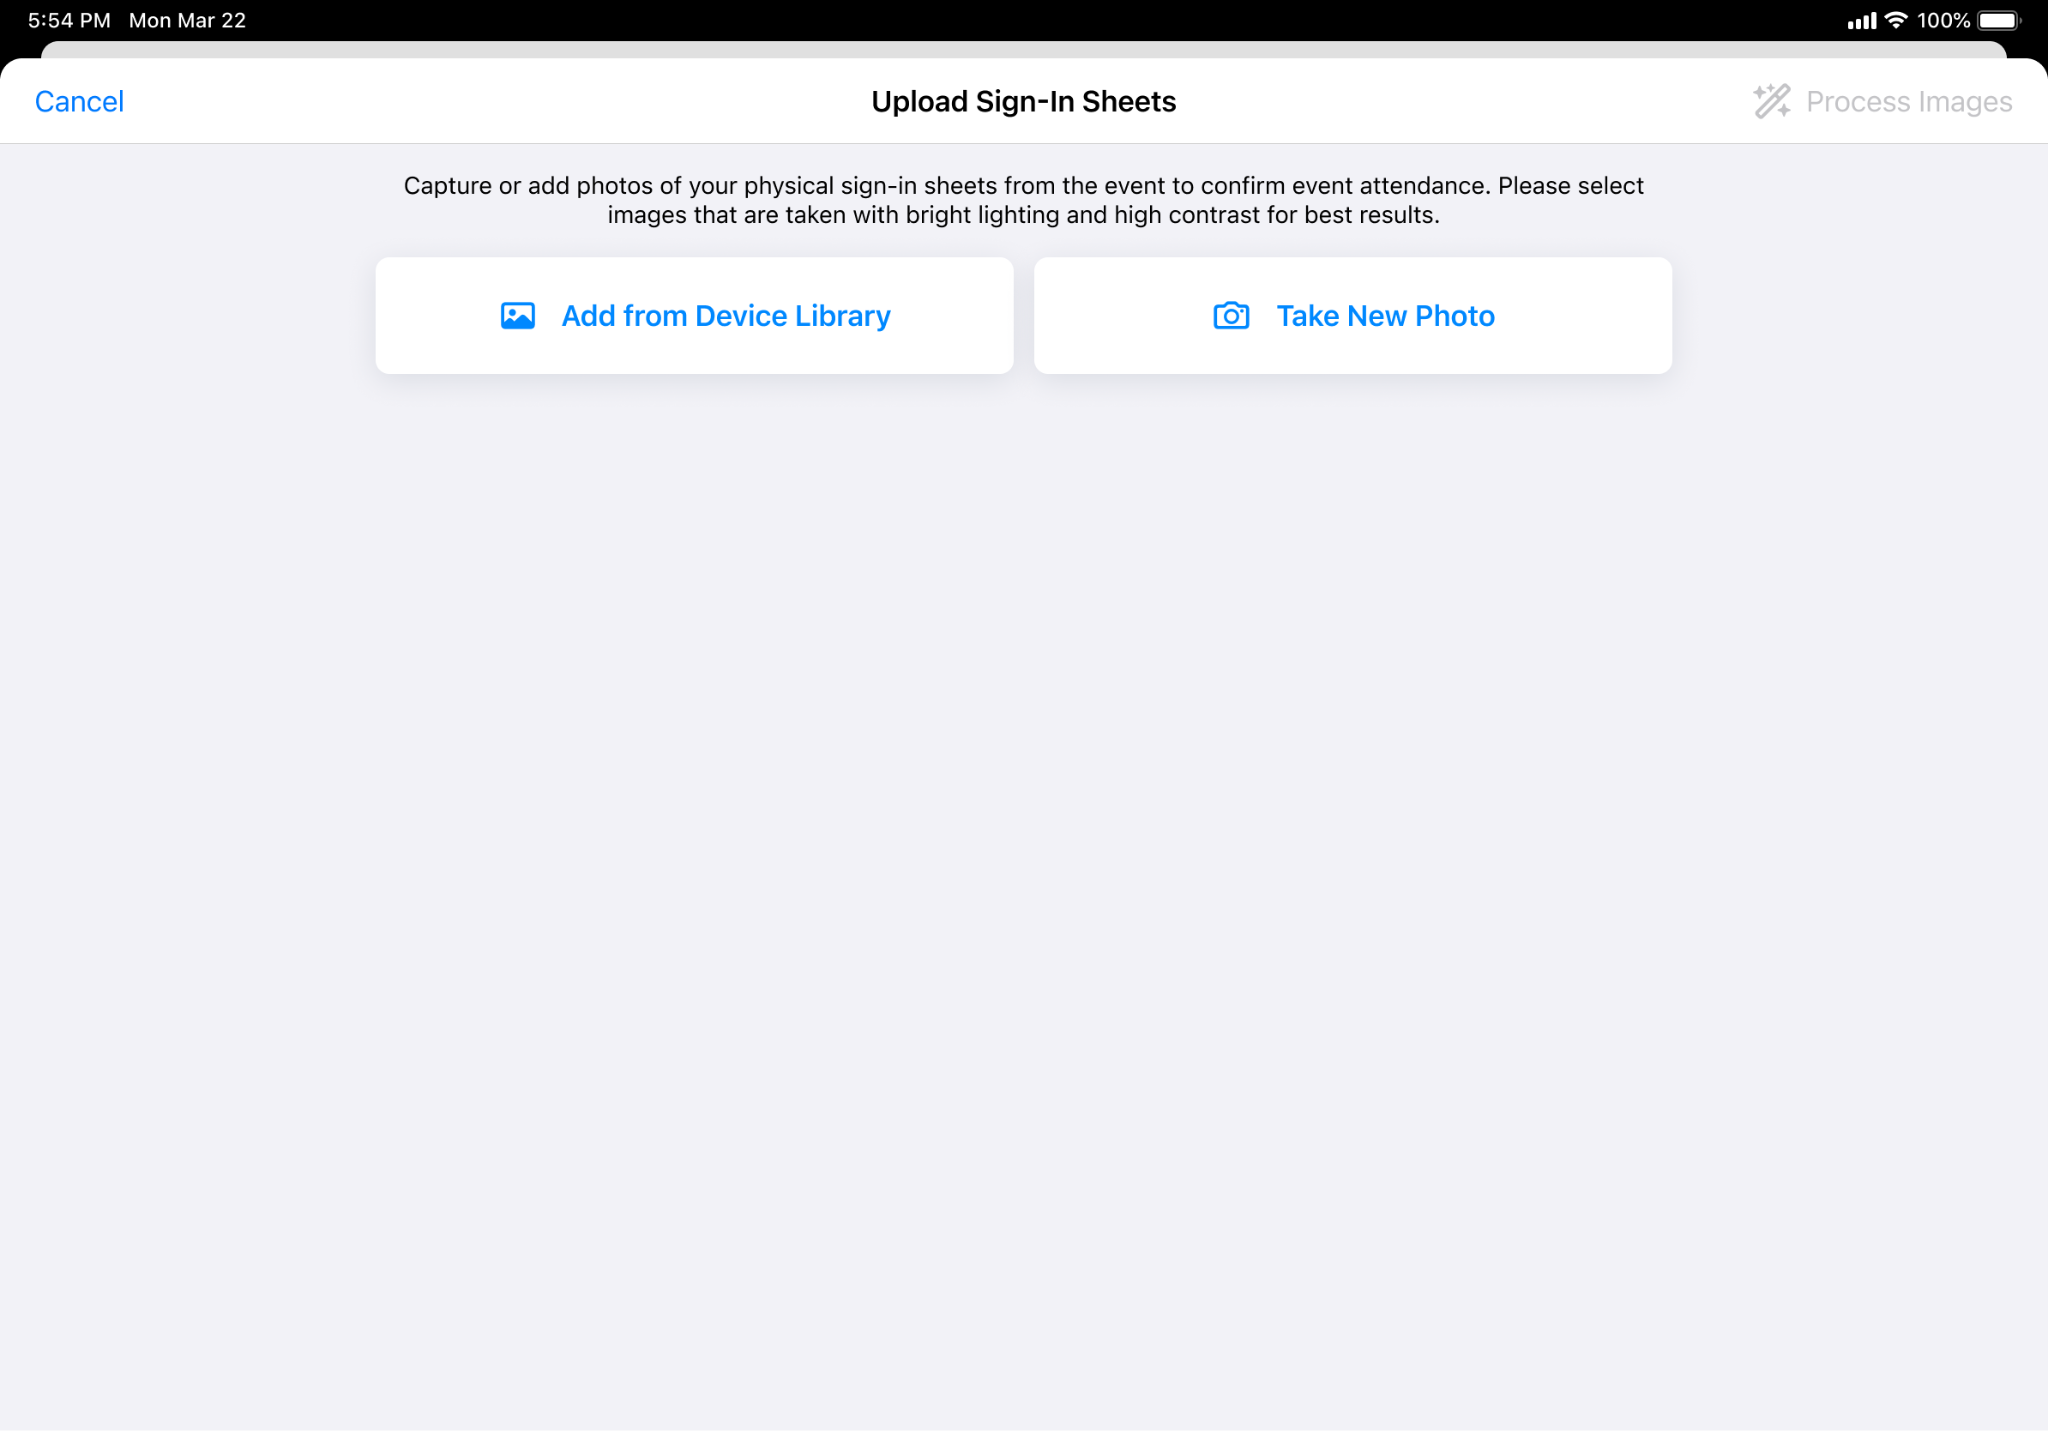
Camera capture straightens and crops each page automatically and supports capturing multiple pages in a single session. - Browser: Drag image files into the upload area, or select Browse Files to choose files from the device.
Users can add up to 10 photos at a time. iPad accepts JPEG, PNG, and HEIC files; Browser accepts JPEG and PNG files only.
- iPad: Select Take New Photo to capture a page with the camera, or select Add from Device Library to choose an existing photo.
-
Confirm that each photo is accepted before continuing. Replace any photo that is rejected, for example because it does not use a valid Print Template or duplicates a photo already added.
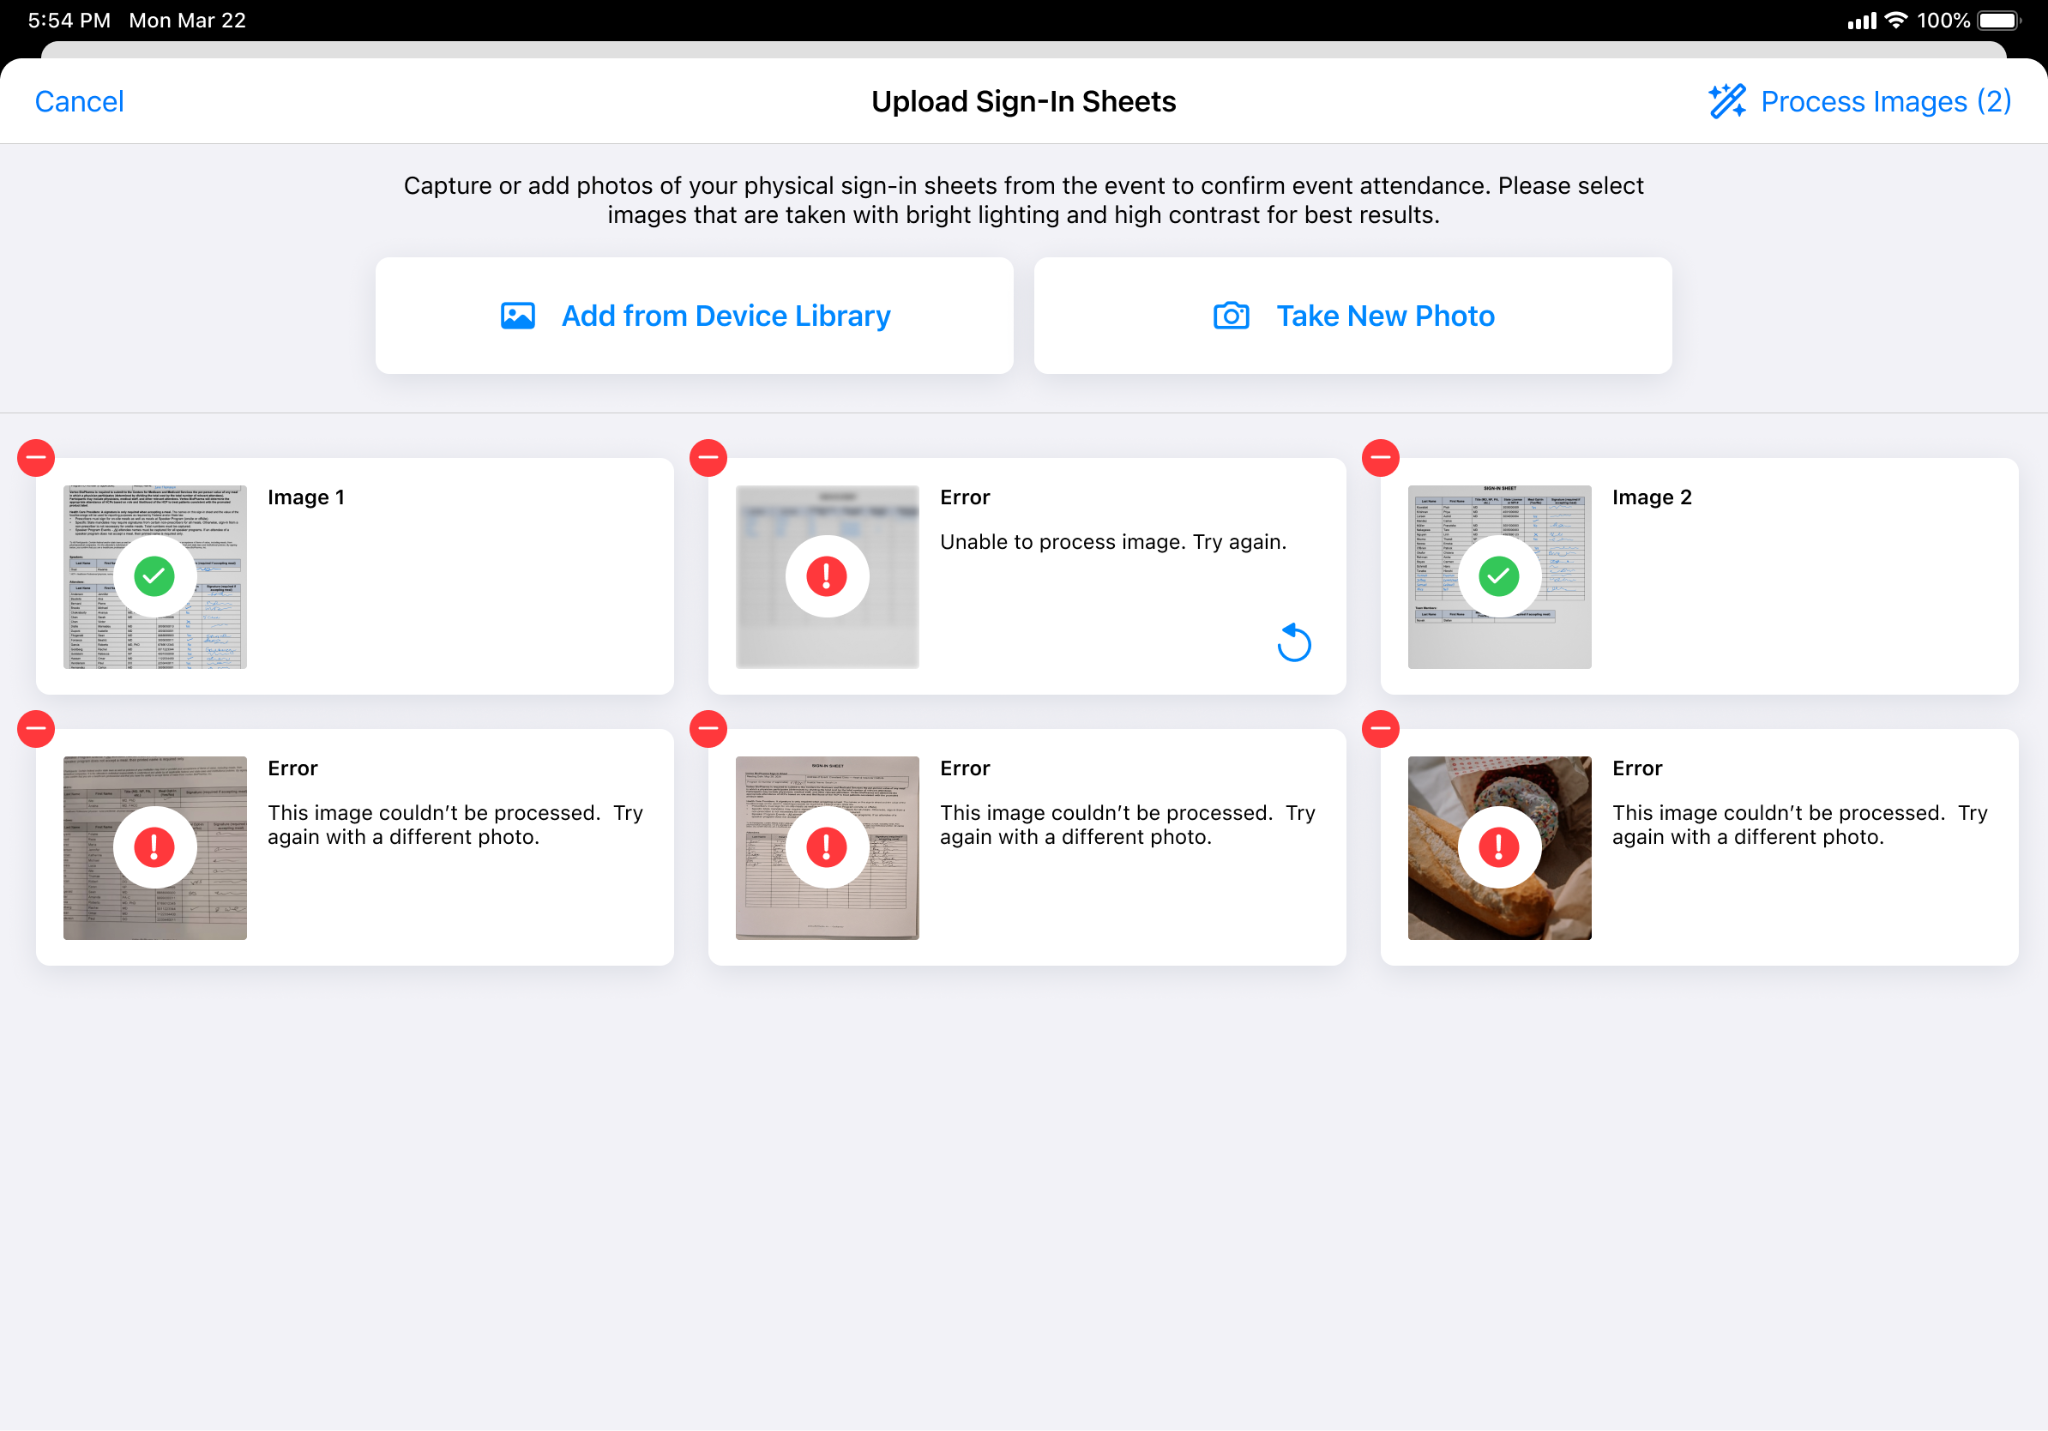
- Select Process Images after confirming the appropriate photos are accepted.
Rejected Images
Users receive an Image Rejected error in the following circumstances:
- The photographed sign-in sheet does not use a valid Print Template
- The image file type is unsupported
- The image has the same file name, type, and size as an image already uploaded for the event
- The image is dim or blurry
If an image is rejected, retake it with even lighting and the sheet lying flat, then attempt to add it again.
Images of event sign-in sheet cover pages are accepted based on whether the page format resembles a cover page, not on whether it belongs to this event's sign-in sheet. A cover page from a different event can be accepted and shown in the image review panel. It is recommended that users review uploaded images and remove any images not applicable to the event before selecting Process Images.
Reviewing the Extracted Results as
End Users
After users submit photos, the agent matches signed names against the event's roster and reads each walk-in entry. This extraction typically completes in under two minutes.
When extraction completes, the agent's results open directly into a review, consisting of a Registered Roster tab and a Walk-Ins tab, alongside the submitted photos.
The Walk-Ins tab does not display when walk-ins are not configured for the event, or when attendee reconciliation is already complete for the event.
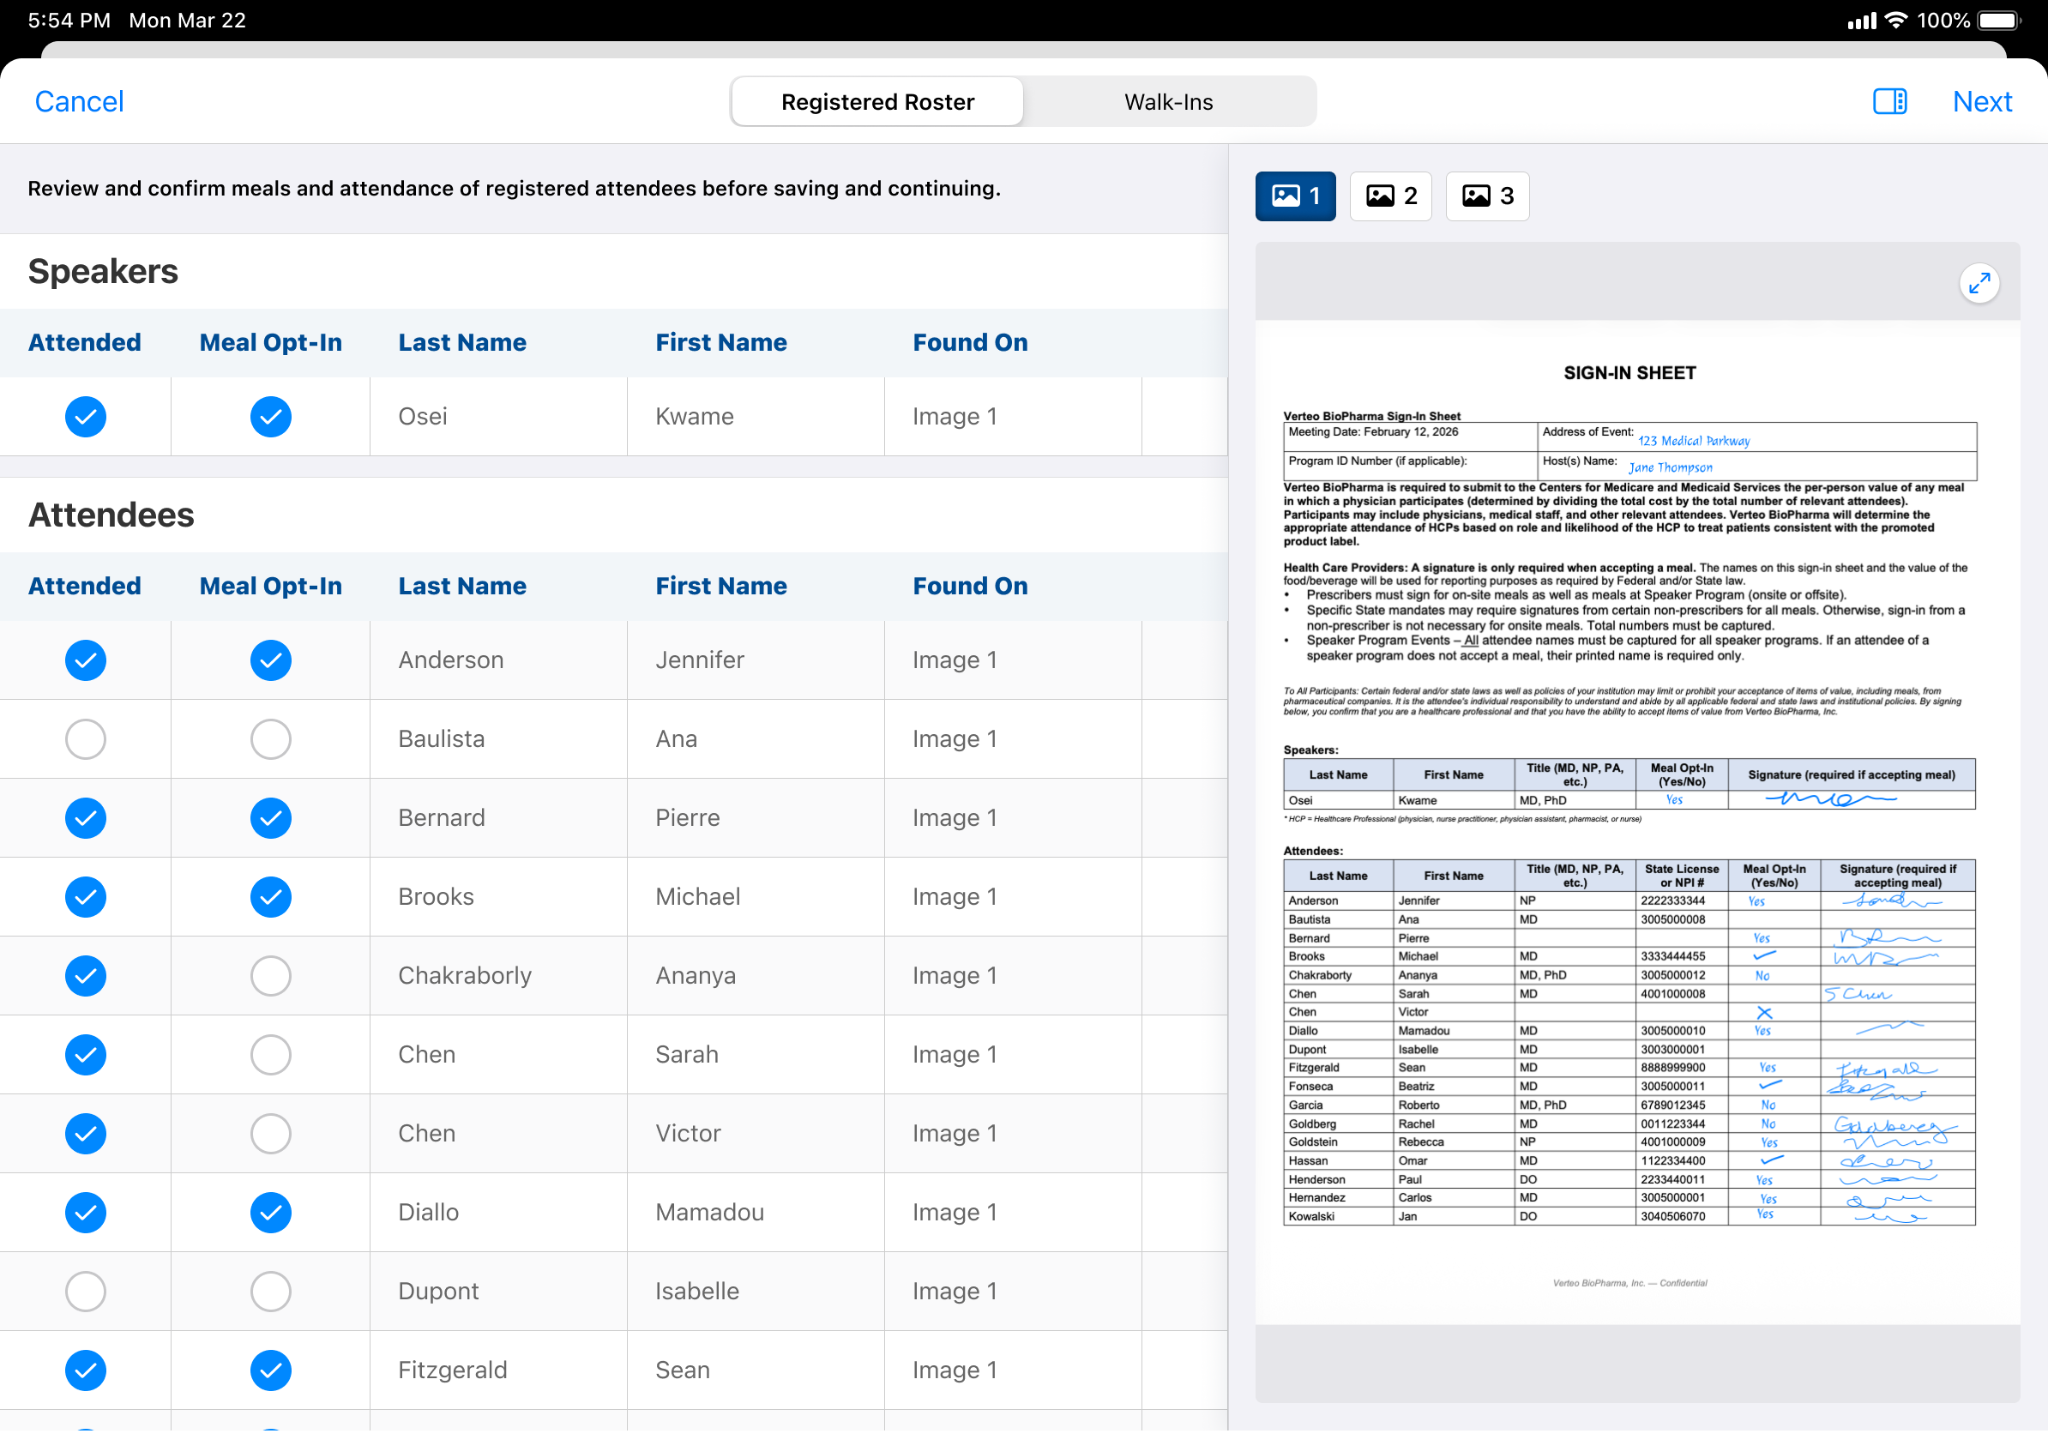
Select any row in either tab to display the photo it was extracted from, and confirm its accuracy against the source image before proceeding.
The following records are excluded from the roster and are never displayed, for this review and for extraction matching:
- Any attendee, speaker, or team member with Status set to Inactive
- Any team member with Team Member Type set to Group. A group team member represents a public group or queue rather than a person, carries its name in the Group Name field, and has no first or last name.
- Any attendee whose account is a business account
Reviewing the Registered Roster as
End Users
After the agent returns its results, review the Registered Roster first to confirm which Speakers, Attendees, and Team Members attended the event. Every person on the event's roster is listed for review, regardless of whether the agent detected them on the sign-in sheet or whether they were entered via another method.
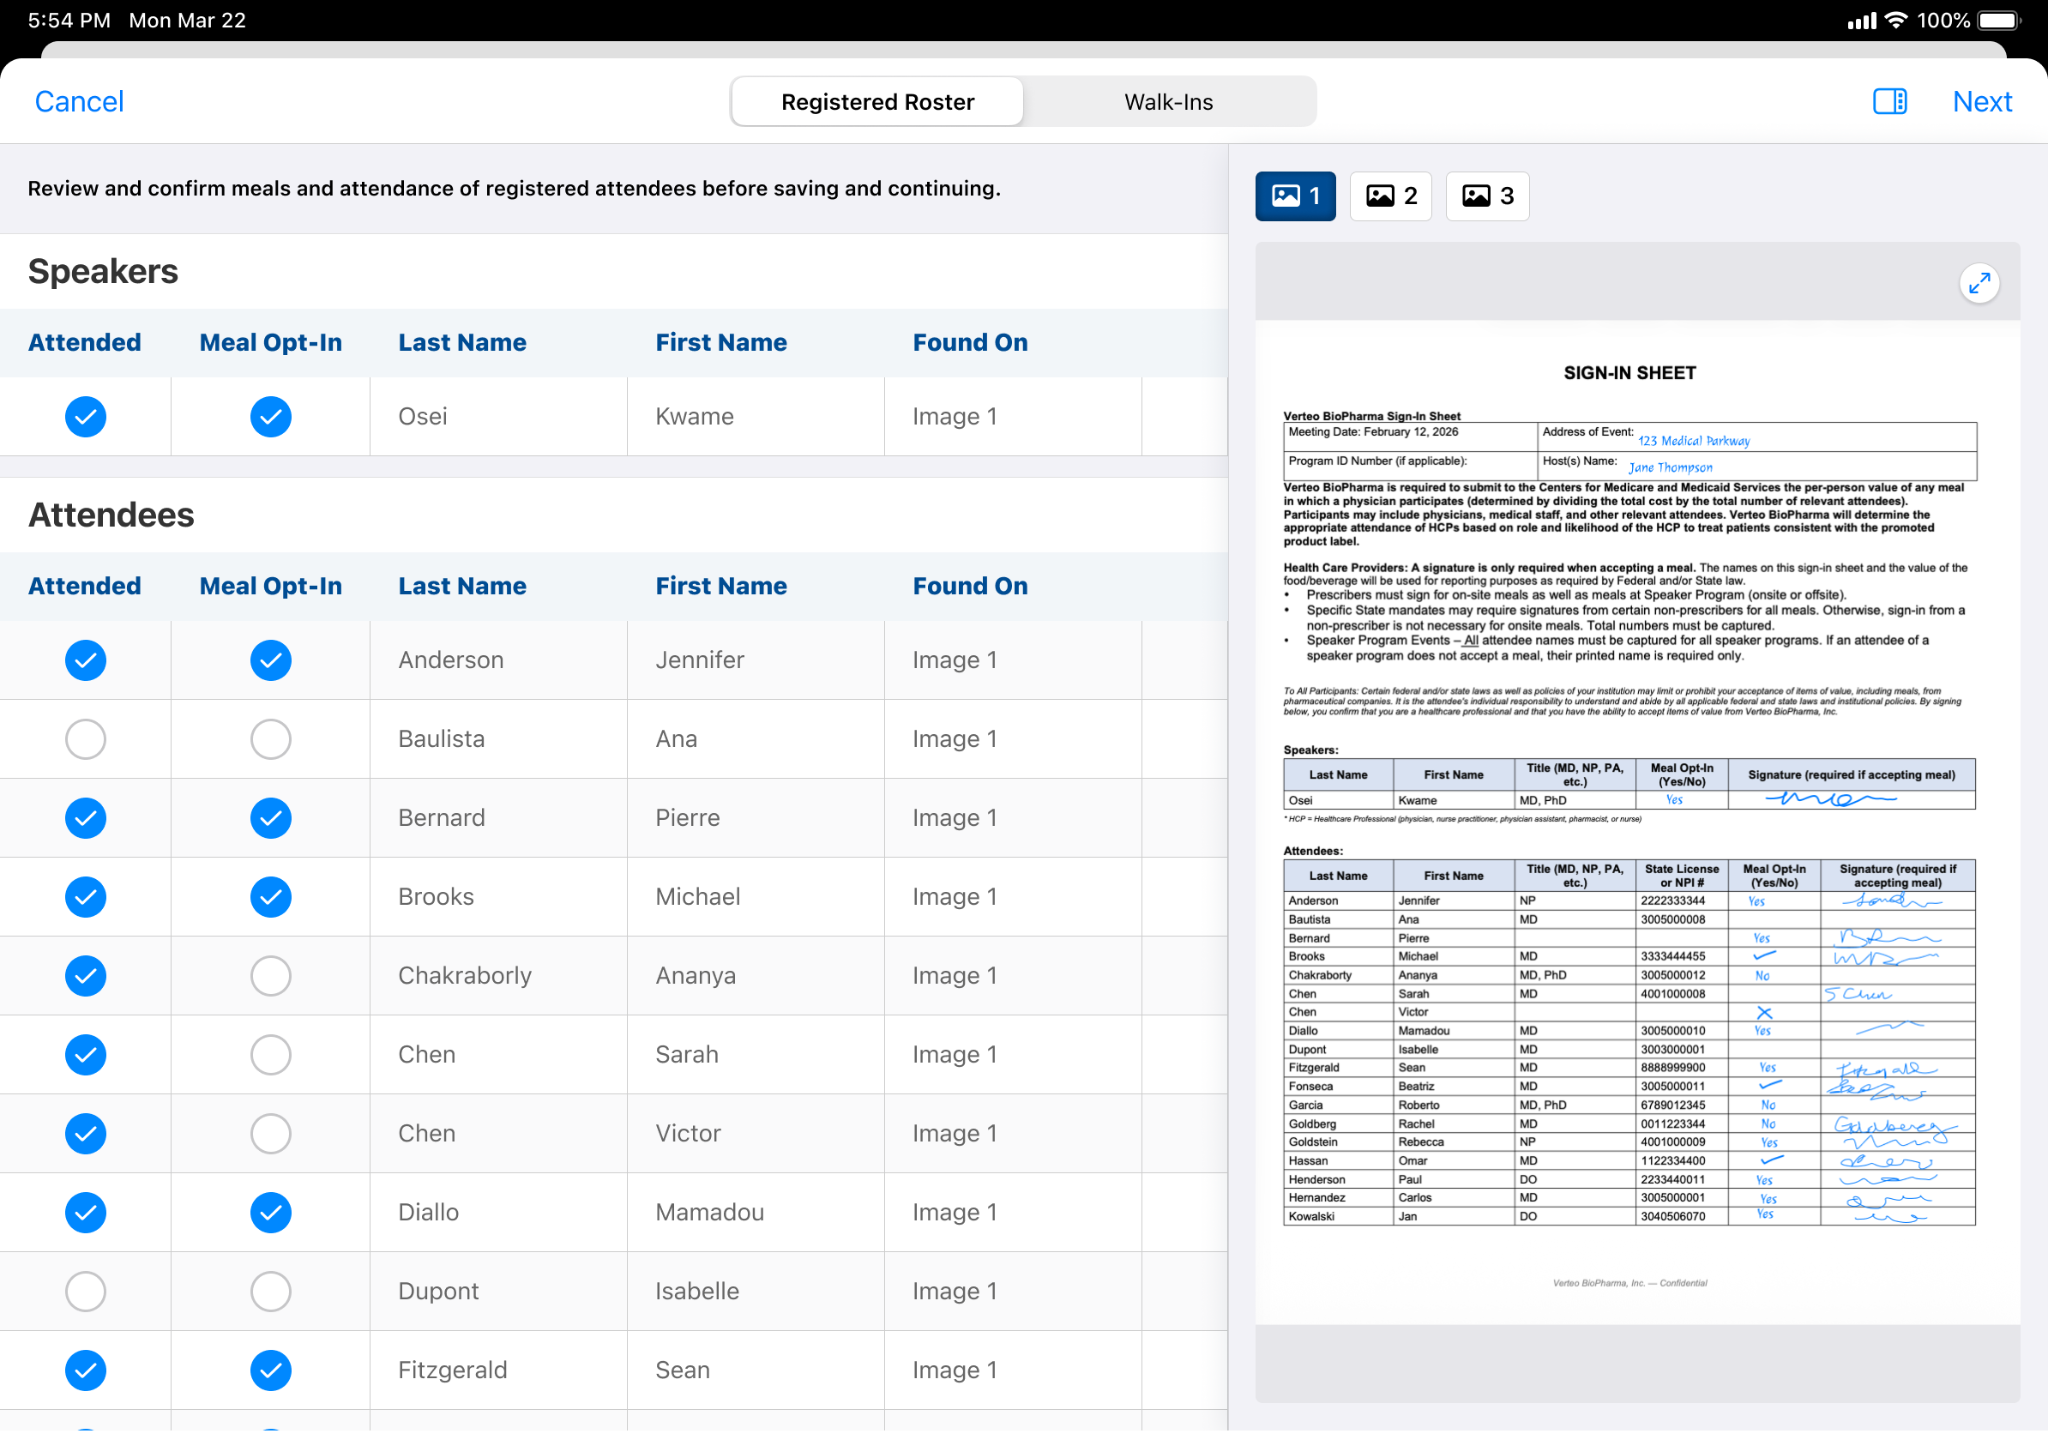
Confirming Attendance and Meal Opt-In
To confirm attendance:
- Review each row marked Attended. Confirm that the agent correctly identified the person as signed in.
- Mark Attended for any additional row where the agent did not detect a signature or mark. Leave a row unmarked to indicate a no-show.
- Mark or clear Meal Opt-In for each row as needed. Marking Meal Opt-In for a row also marks Attended for that row. Clearing Attended for a row also clears Meal Opt-In for that row.
If a mark looks misread, check the photo for a mark that sits on the boundary between two rows, or a column format the configured Print Template does not support. A mark counts only for the row whose cell it occupies; a mark straddling two rows is attributed to the row it mostly occupies and is not counted twice.
Only rows marked Attended are updated when the review is saved; rows left unmarked are not changed.
Reviewing Walk-Ins as
End Users
After confirming the Registered Roster, review the Walk-Ins tab, if applicable, to finalize any unregistered attendees the agent identified on the sign-in sheet. Customized Scoring and Matching When Reconciling Walk-in Attendees and Displaying Walk-in Fields by Attendee Type are respected, if enabled.
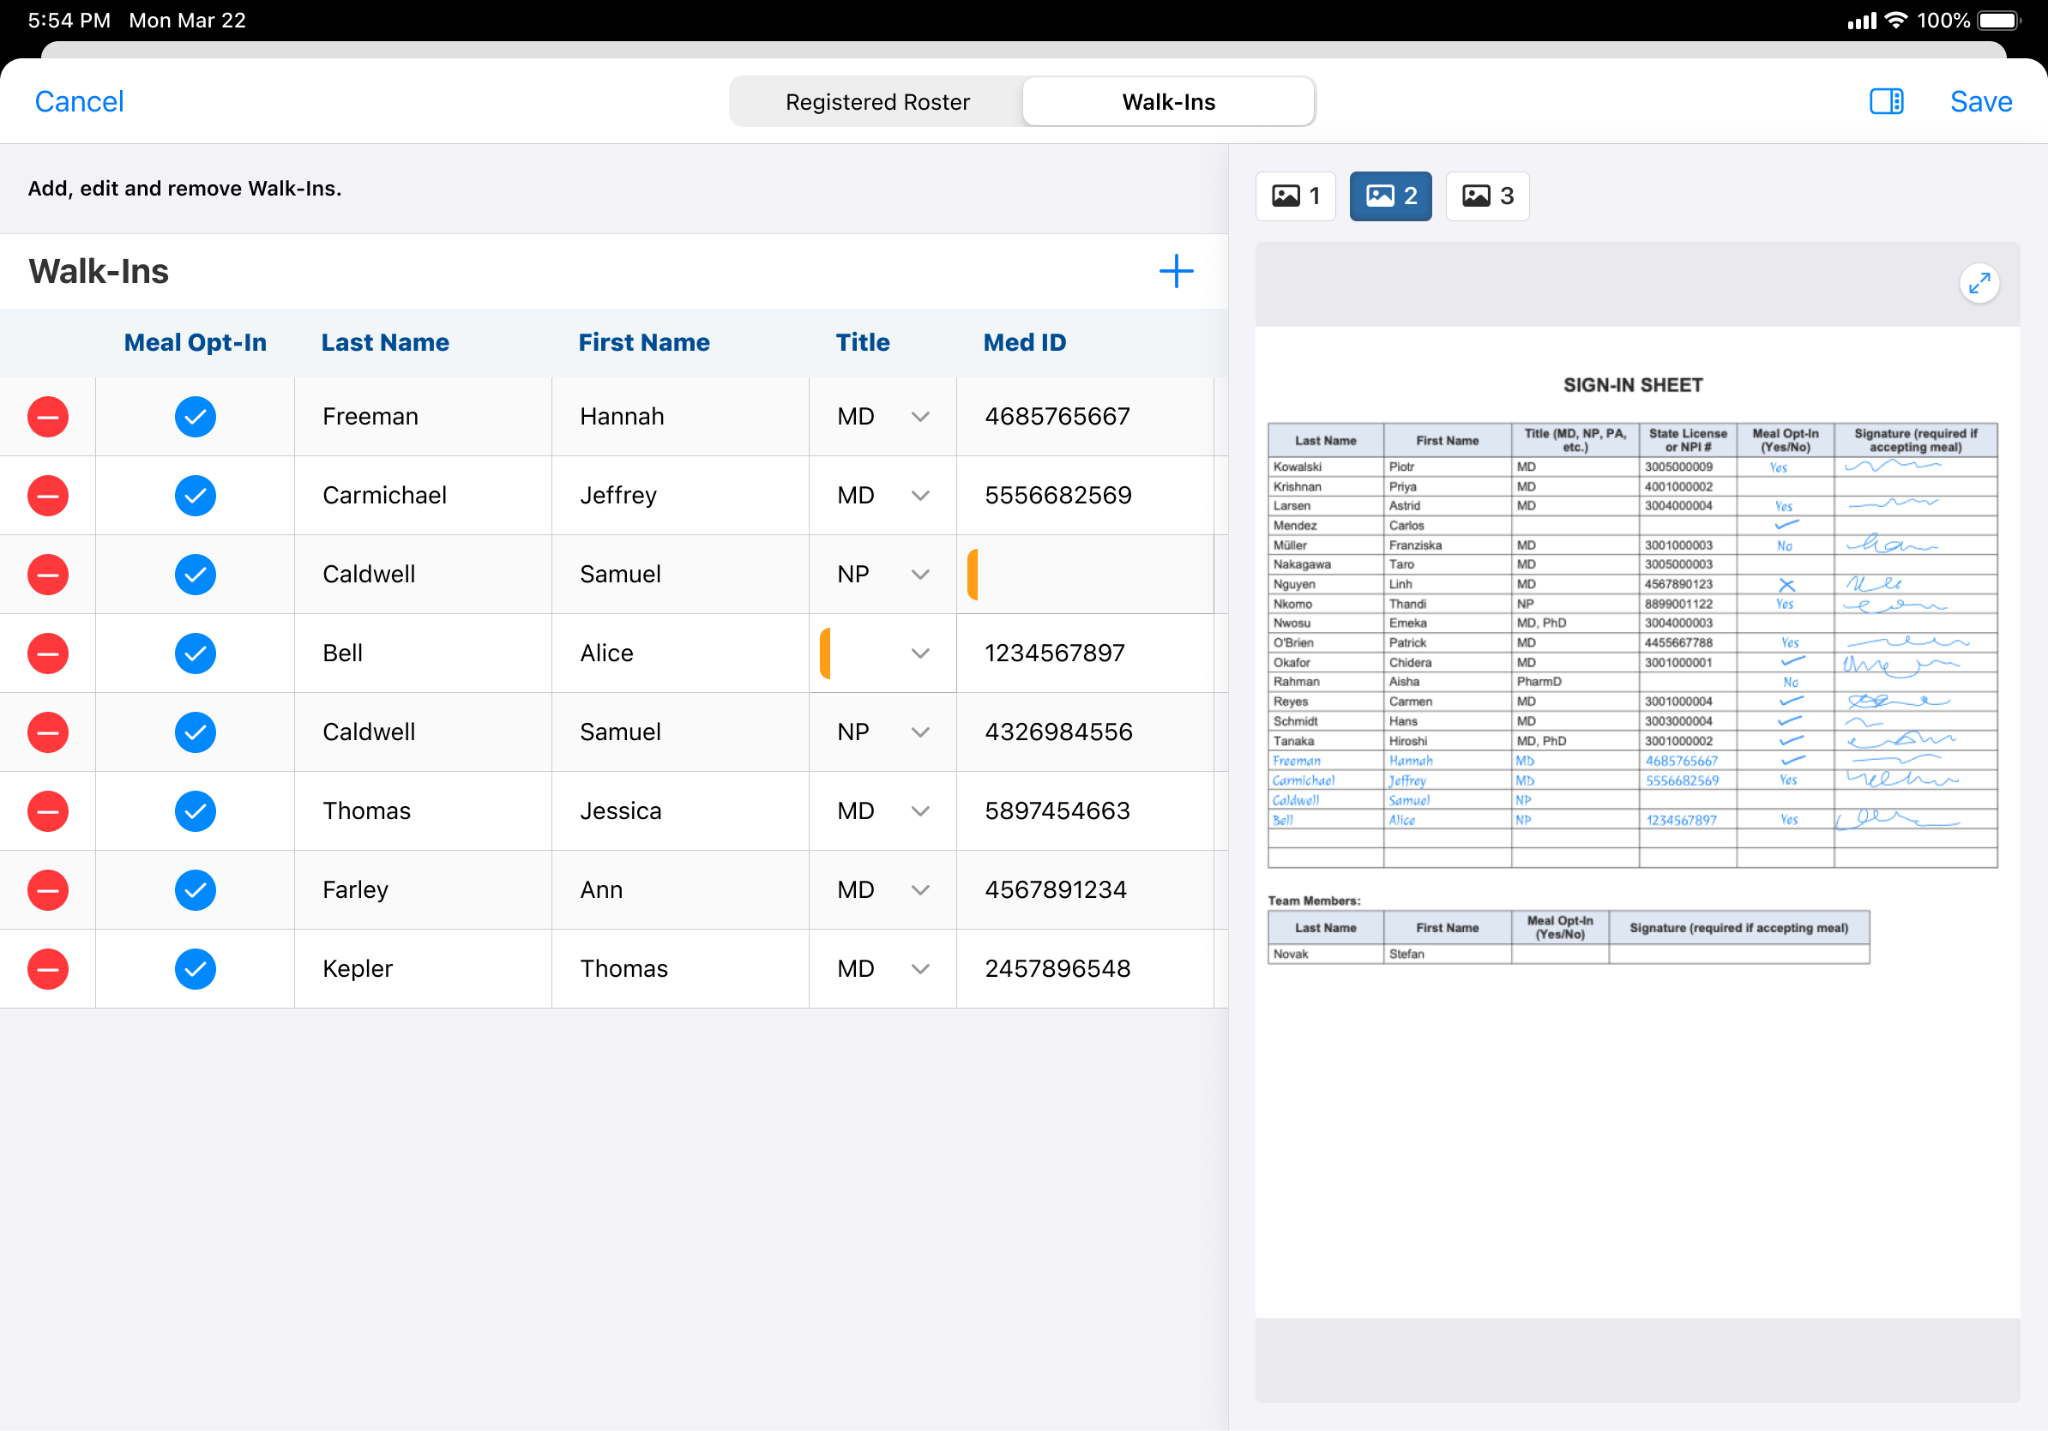
Each walk-in row is pre-populated with the values the agent extracted, including name, meal opt-in, and any other fields configured for the event. Required fields are indicated in the table. Complete any field the agent did not populate before saving.
Text values truncate in the cell when you leave it. Yes/No fields display as a picklist with translated Yes and No options. Picklists show active values by their translated label, and an optional picklist includes --None--, which clears the field.
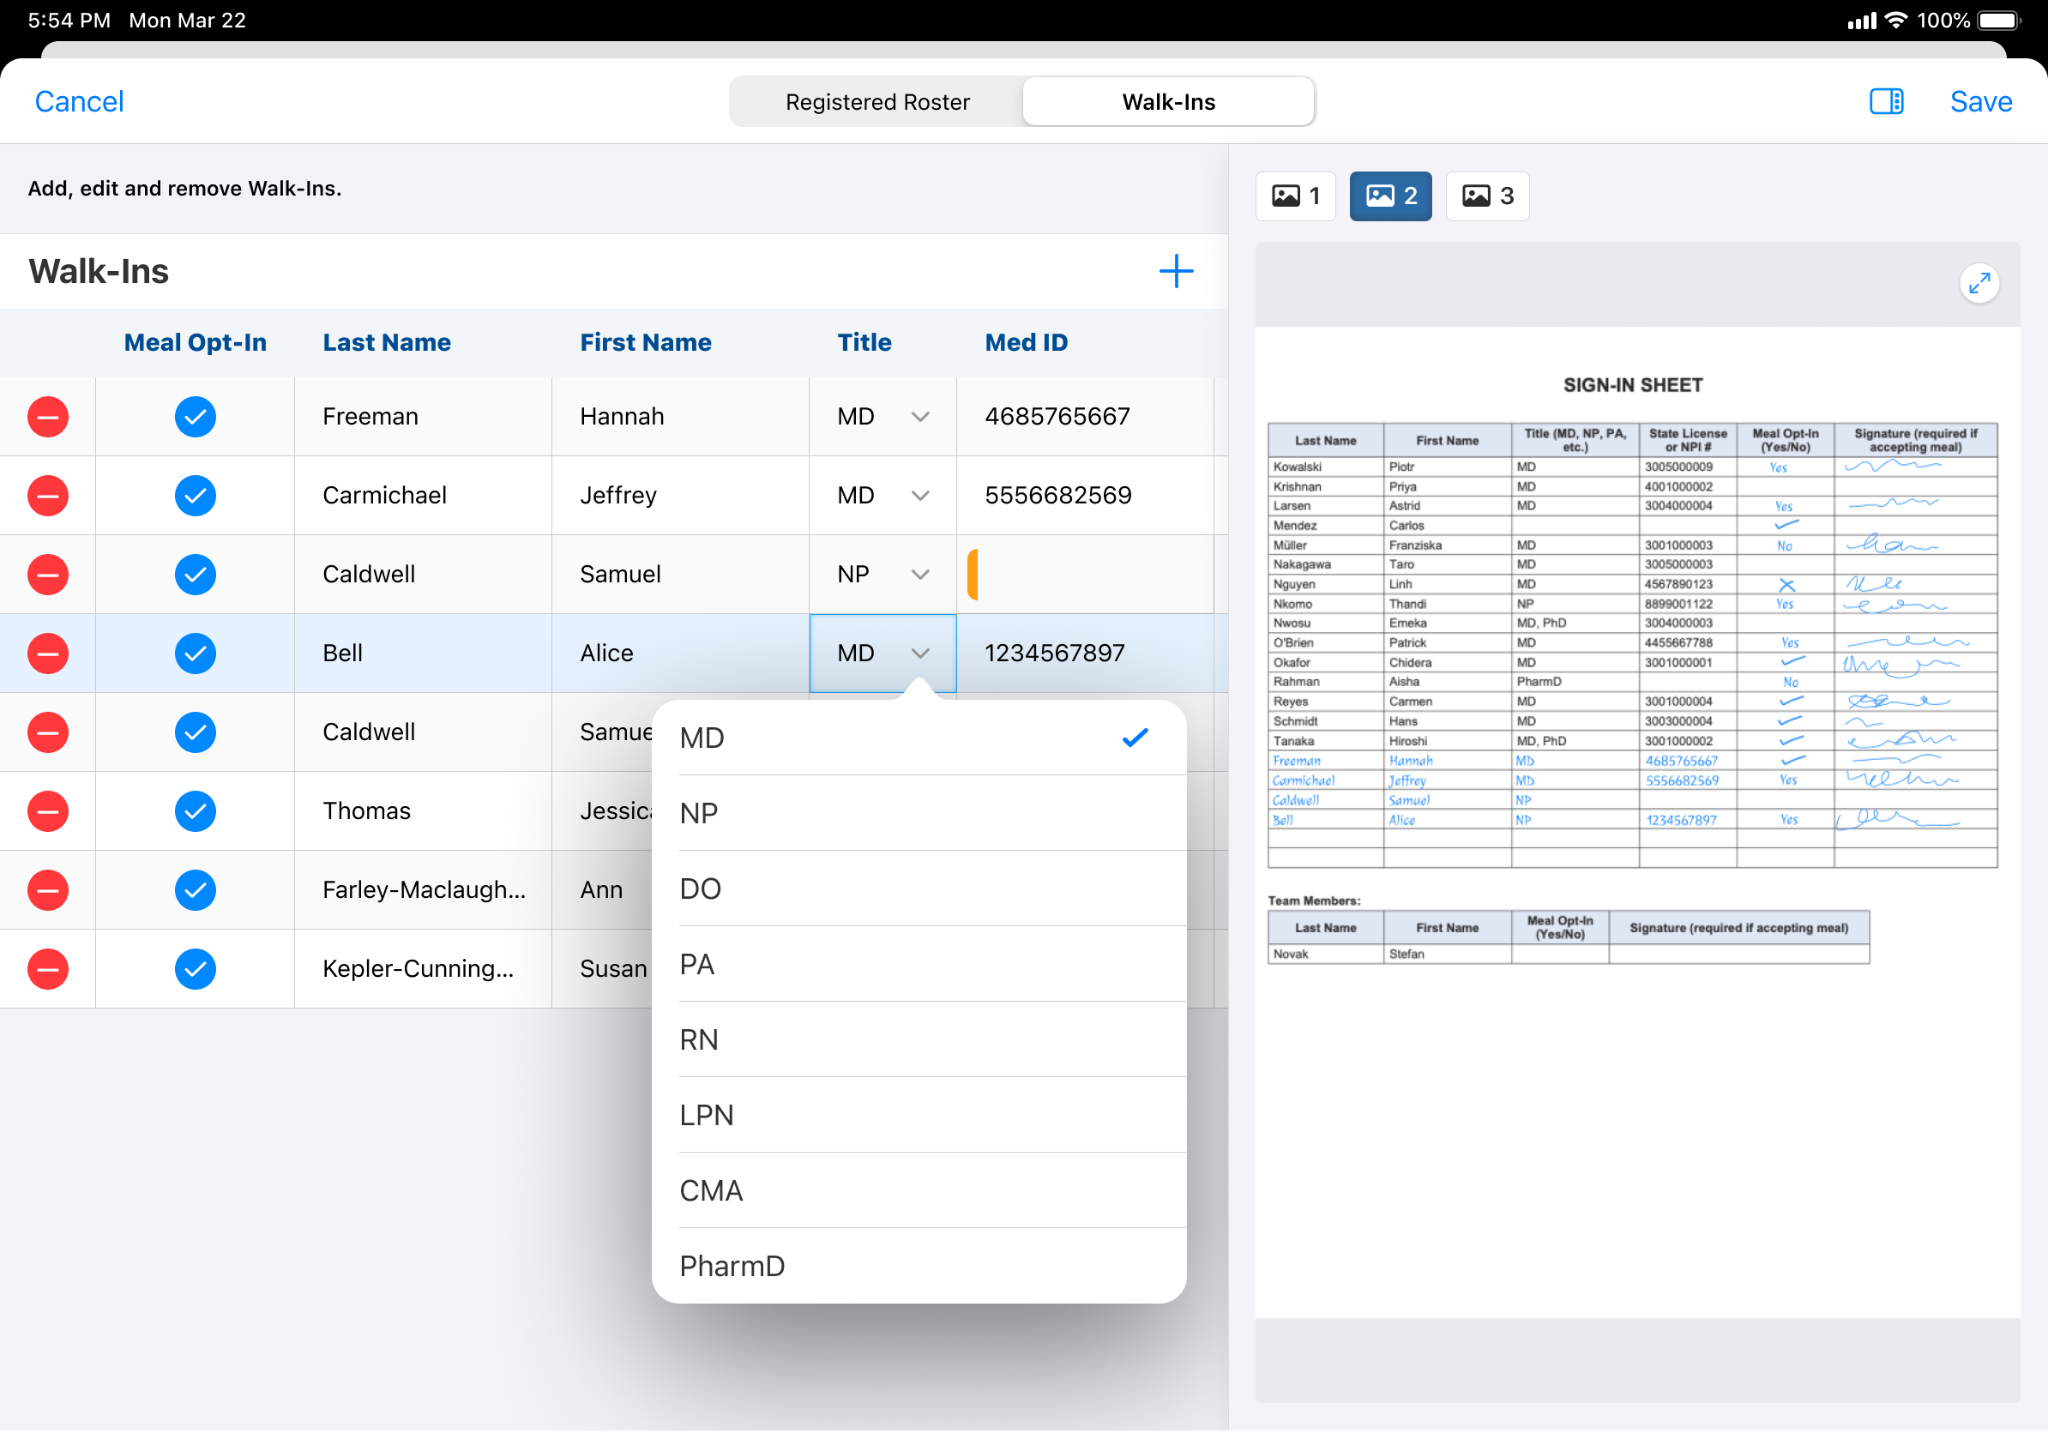
Adding a Walk-In
To add a walk-in that the agent did not detect:
- Select the + icon or Add Walk-In.
- Enter the walk-in's details, beginning with Last Name.
Walk-ins are created when you select Save, after reviewing both the Registered Roster and Walk-In tabs. See Saving Sign-In Results as below.
Removing a Walk-In
Remove any walk-ins that should not have a record created. To remove a walk-in row so that no record is created for it, for example a duplicate entry or a misread name:
- Select the remove control on the row.
- Select Remove to confirm.
A removed row is not created as a record when the review is saved.
Saving Sign-In Results as
End Users
After reviewing the captured information, save the sign-in results to update event attendance in Vault CRM.
To save sign-in results:
-
Resolve any row flagged with an error. Select the error icon to view the missing or invalid value that requires correction.
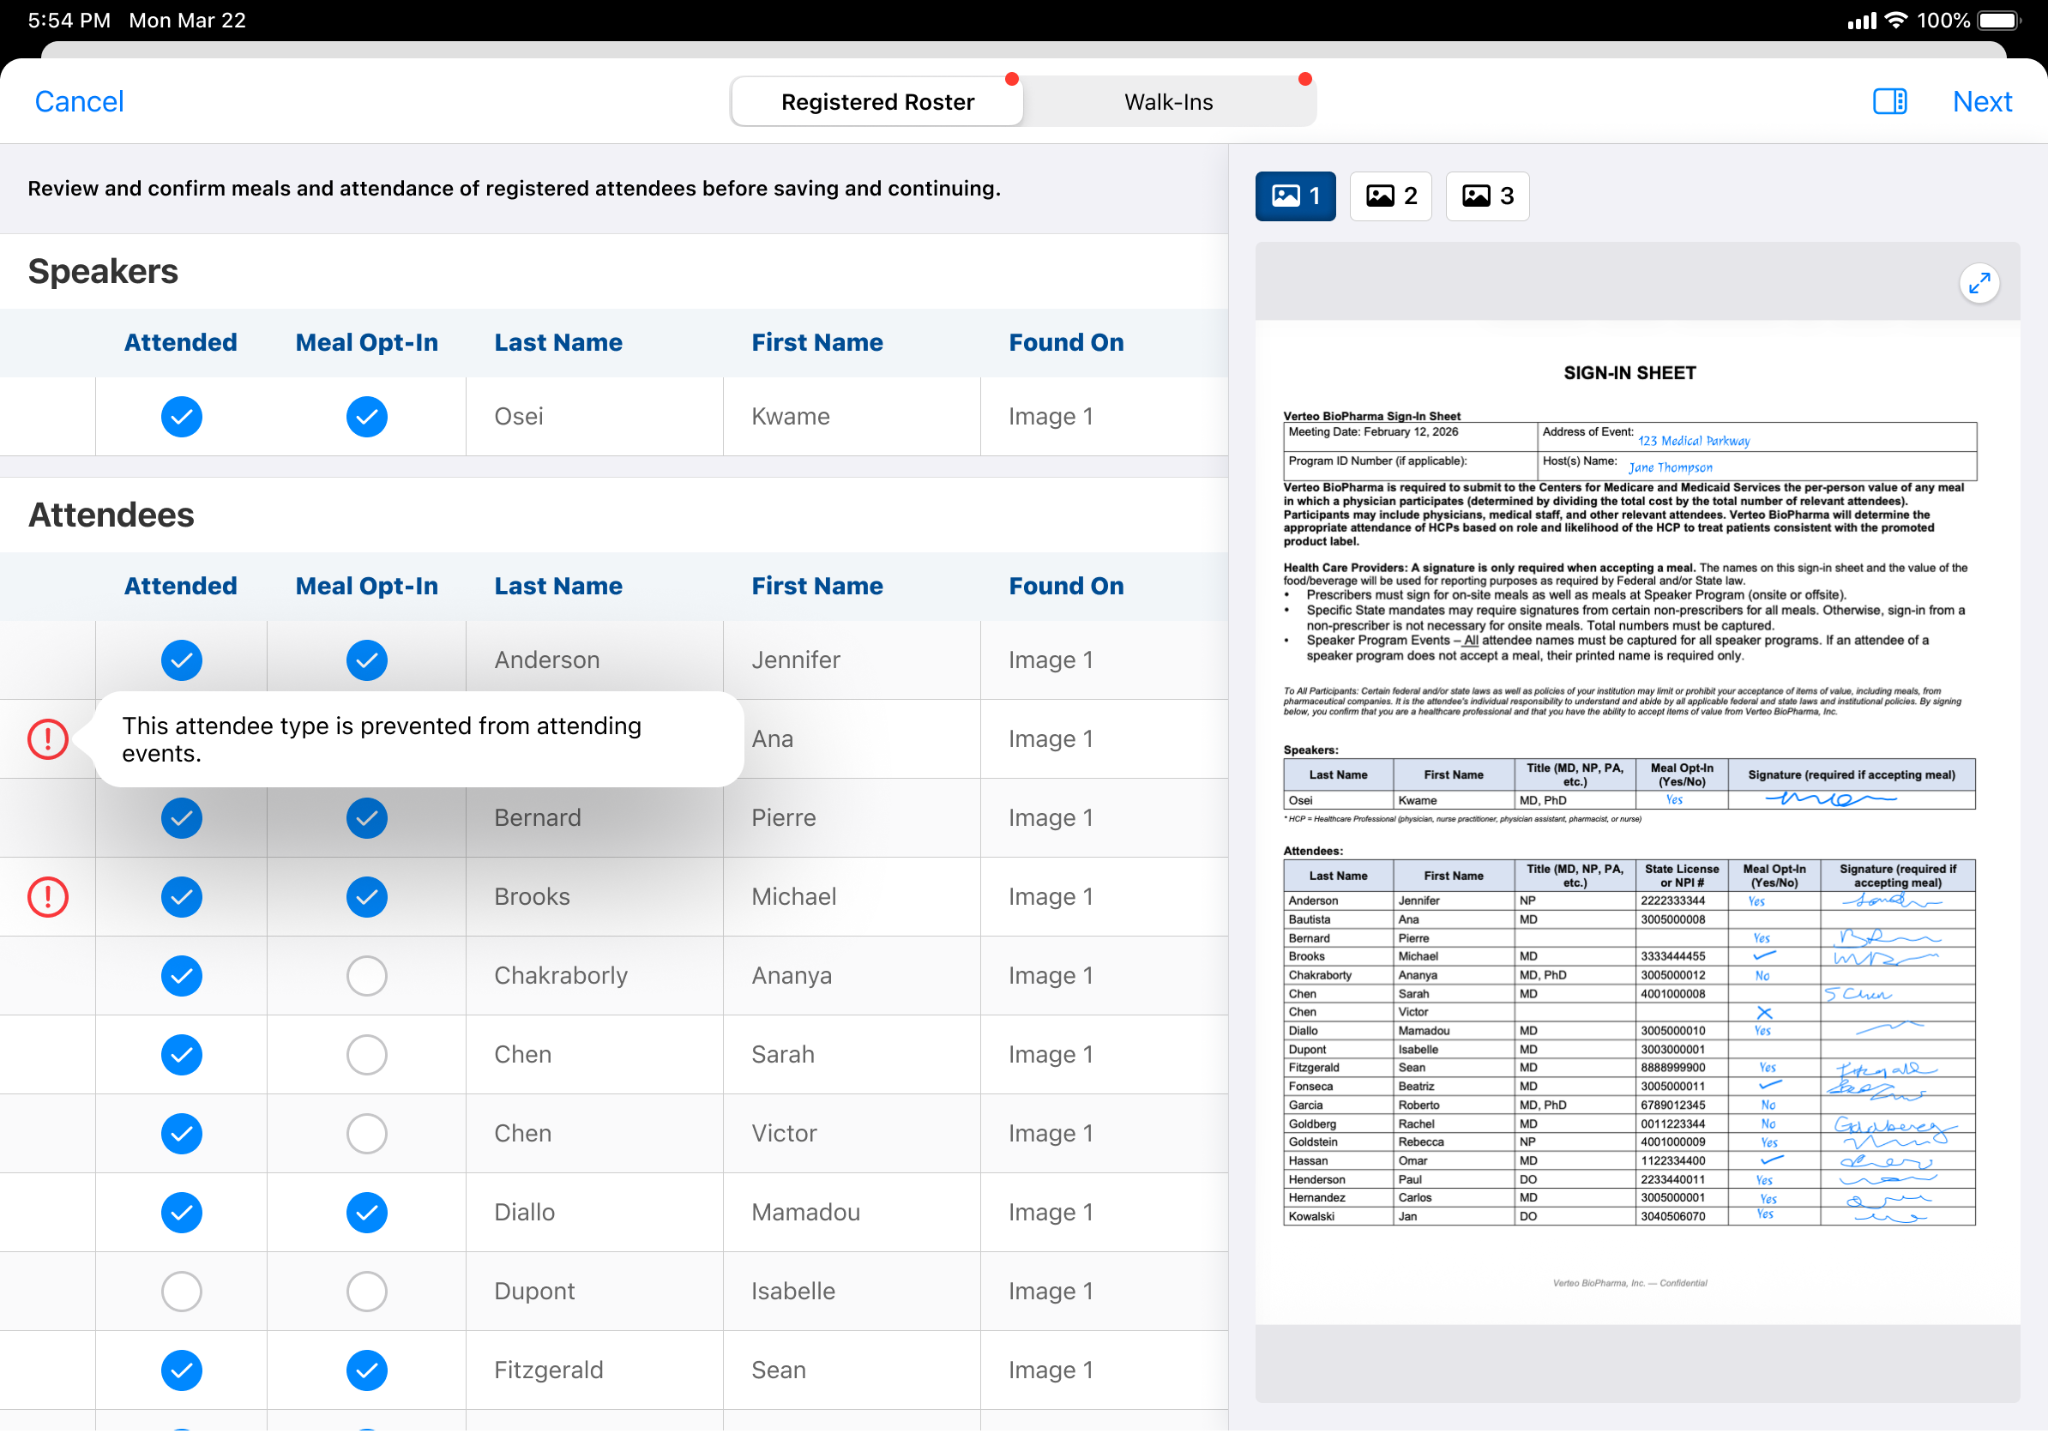
- Select Save.
If any record still contains an error, Vault CRM lists the affected records and their errors, grouped by Registered Roster and Walk-Ins.
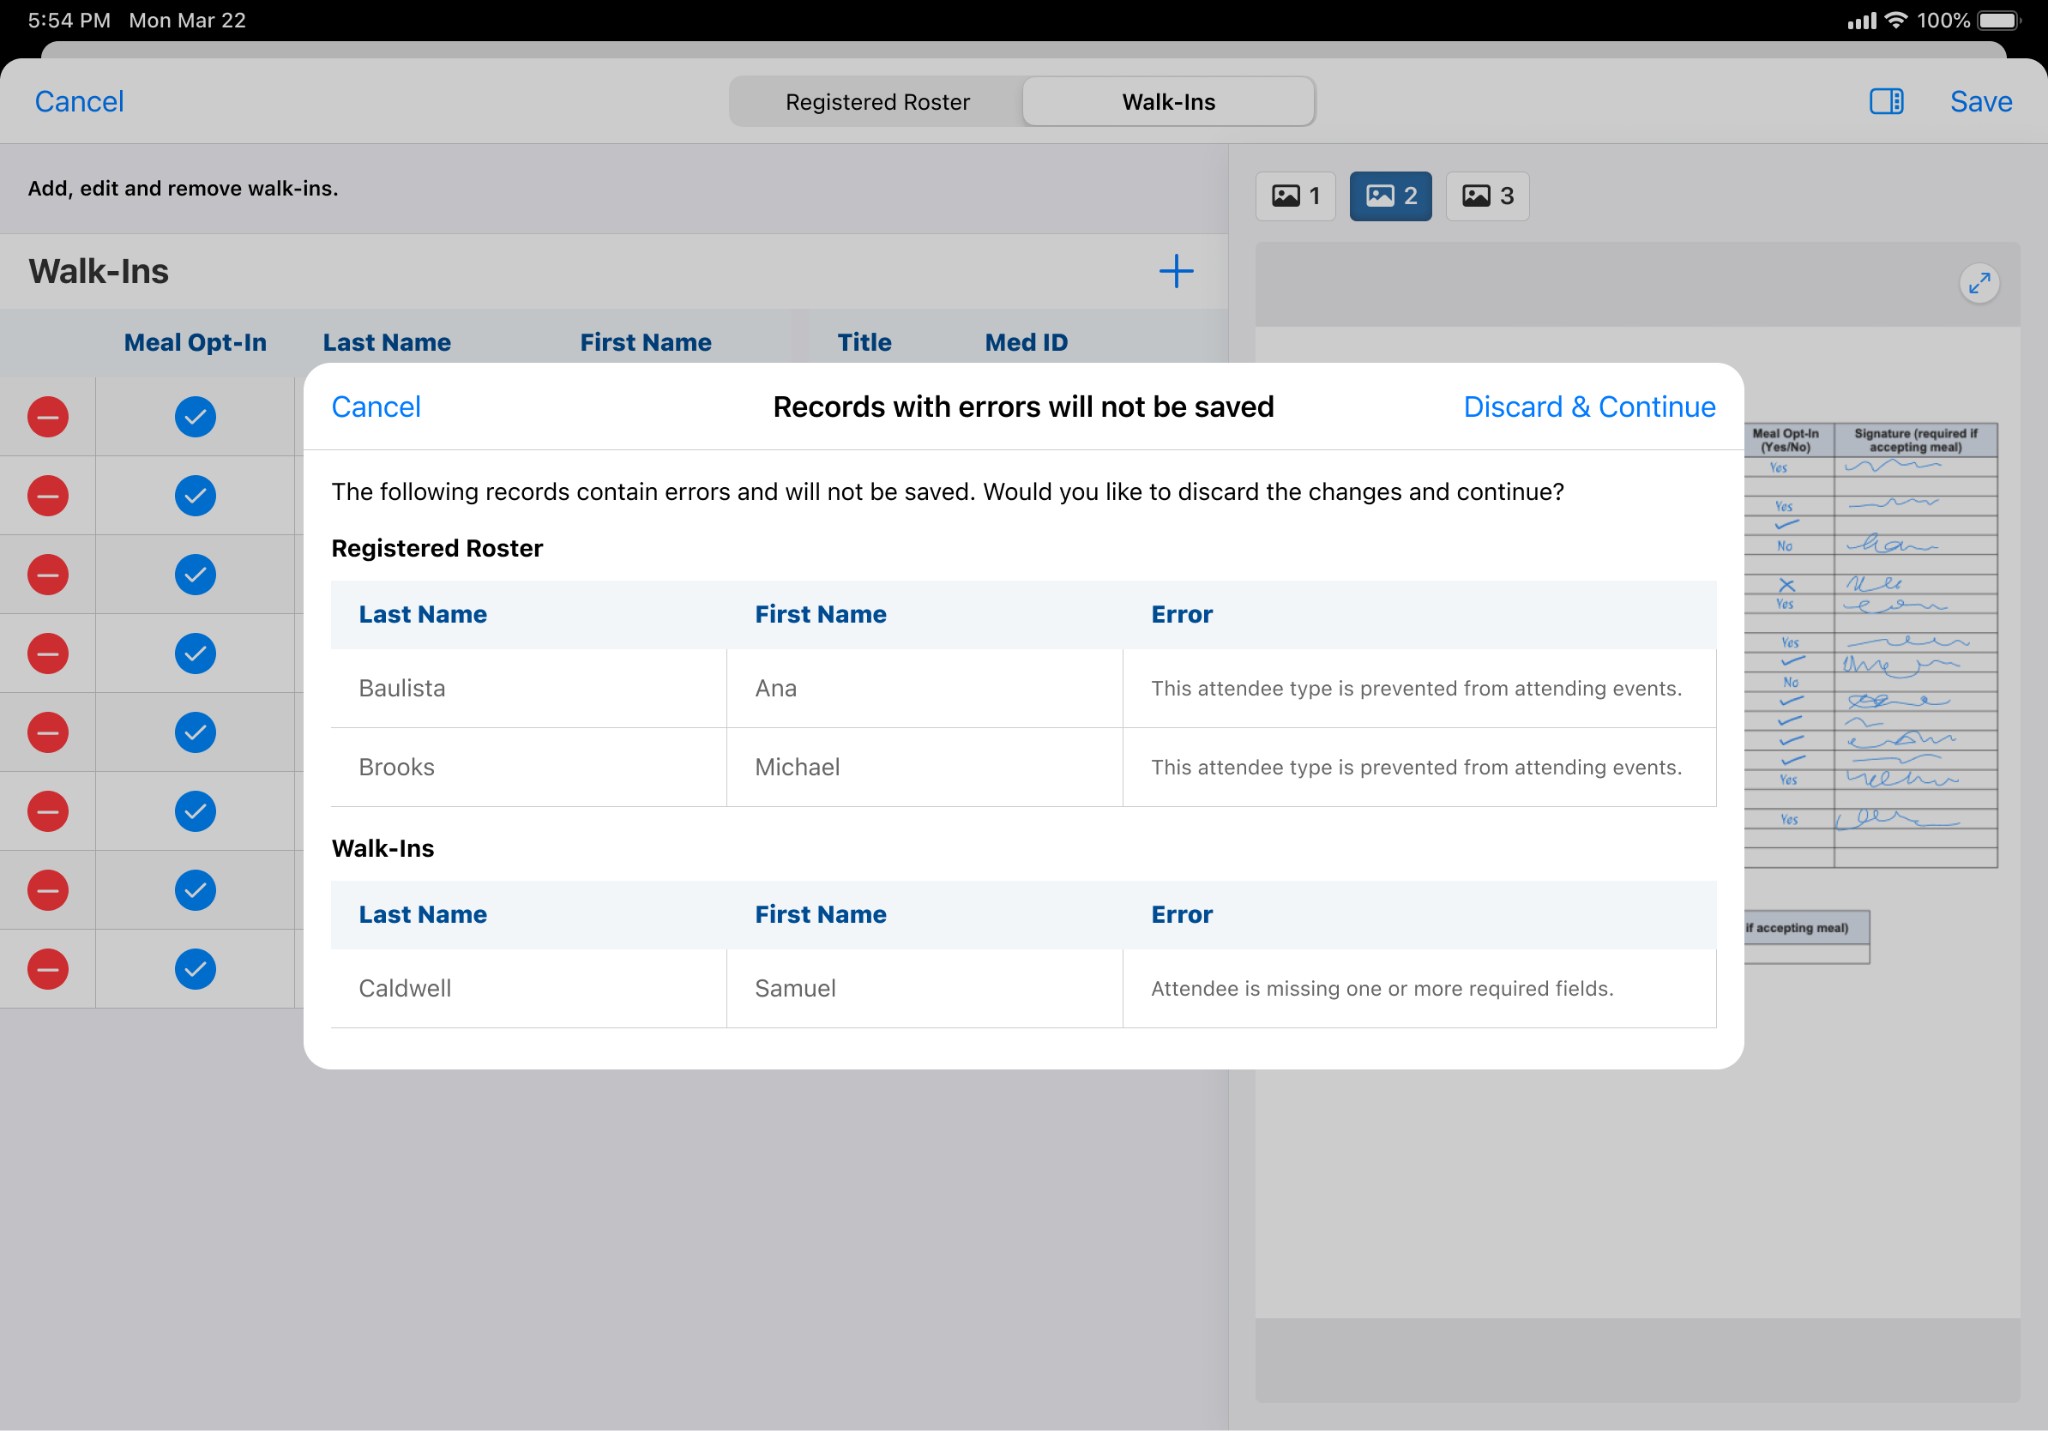
Select Discard & Continue to save every record without errors and discard the records with errors, or select Cancel to return to the review and correct the errors.
When the save completes, Vault CRM updates every confirmed speaker, attendee, or team member from the Registered Roster and creates an em_attendee__v record for every remaining Walk-Ins row, capturing the information from the sign-in sheet.
Each saved record is written with the following values:
|
Attendee Type |
Object |
Field |
Value |
|---|---|---|---|
|
Attendee |
em_attendee__v |
em_attendee_status__v |
signed__v |
|
Speaker |
em_event_speaker__v |
em_event_speaker_status__v |
signed__v |
|
Team Member |
em_event_team_member__v |
em_event_team_member_status__v |
signed__v |
|
All |
|
meal_opt_in__v |
The Meal Opt-In column value |
|
All |
|
ai_source__v |
sign_in_sheet_agent__v |
For audit purposes, every record the agent creates or updates is stamped with the sign_in_sheet_agent__v value in the ai_source__v field.